School Agile Classrooms | HyFlex Breakout Guide
Overview
This guide is designed to help you walk through the logistics of hosting a HyFlex meeting with breakout groups in the School Agile Classrooms via Zoom.
Need Help?
If you need immediate assistance, please call EdIT at: 919-966-6220
If you’re interested in a training or consultation, please submit a help request via: SOE EdIT Services
Main Zoom Meeting
The first step in conducting HyFlex breakout discussions in the Agile Classrooms is to host a Zoom meeting. You will use this main Zoom meeting you can conduct the full-room portions of your meeting.
Showing Zoom on screen
To show Zoom on screen:
1. Push the “System Power” button:

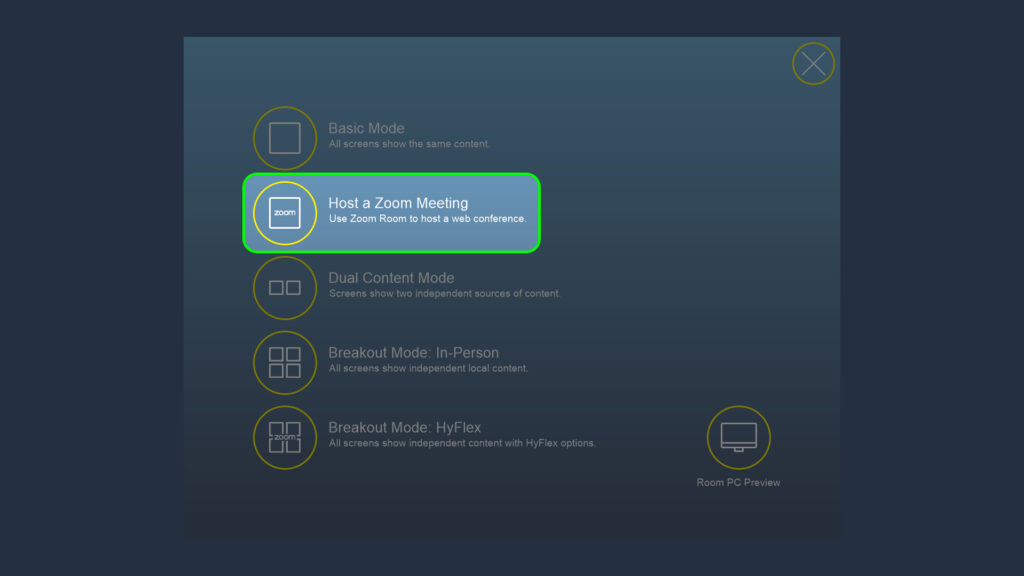
2. Select “Host a Zoom Meeting” from the menu:
Starting or joining a Zoom meeting
Once you have Zoom displayed on screen, you join and manage your Zoom meetings via the Zoom iPad stored on top of the credenza:
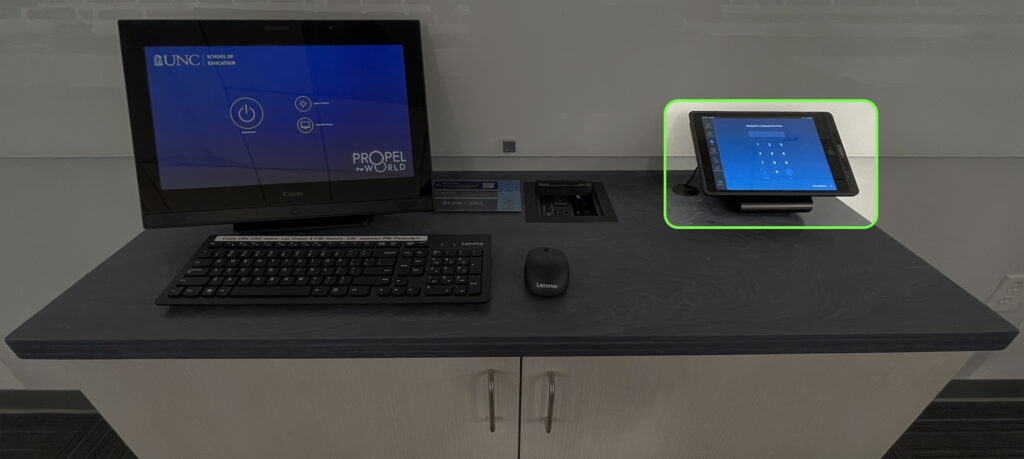
Please return the iPad to the charging dock when you are finished with the room.
From the iPad, you will join your meeting via the meeting ID:
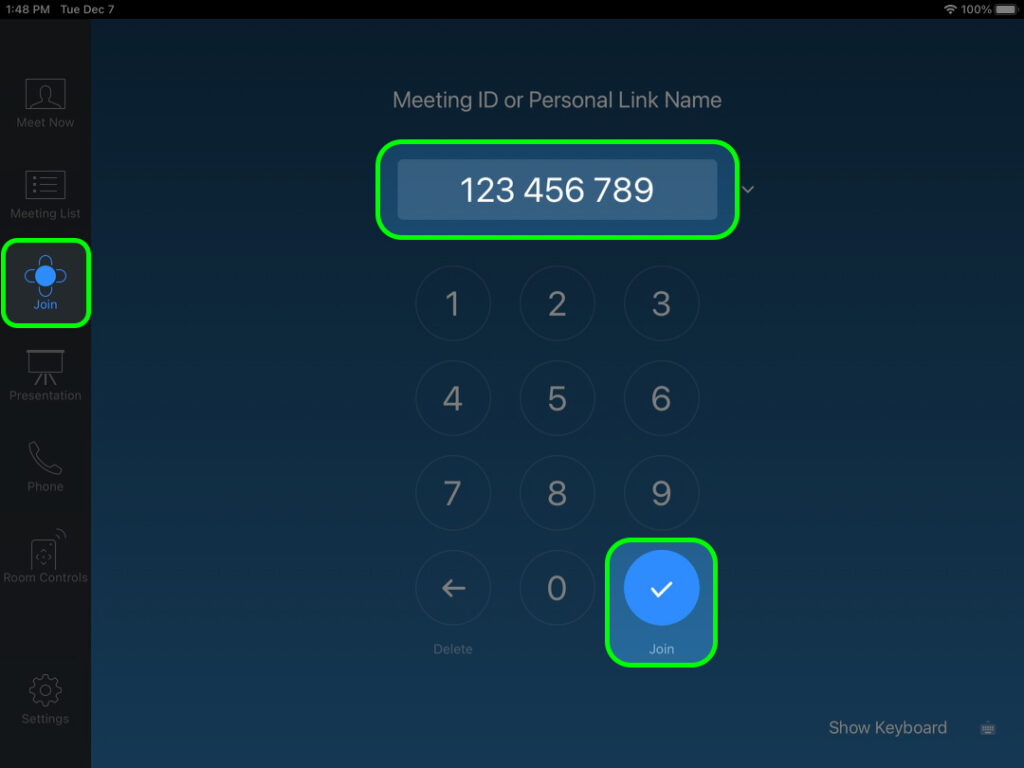
- Select “Join” from the options on the left
- Type the “Meeting ID” of your meeting via the number pad
- Click “Join” at the bottom right
If you would like to invite the Agile Classrooms to your Zoom meeting so they show up in the meeting list, please see the Host a Zoom Meeting section of the School Agile Classrooms | Comprehensive Guide.
Conducting a Zoom meeting
Once you have started/joined a meeting, the Zoom iPad enables you to control the meeting:
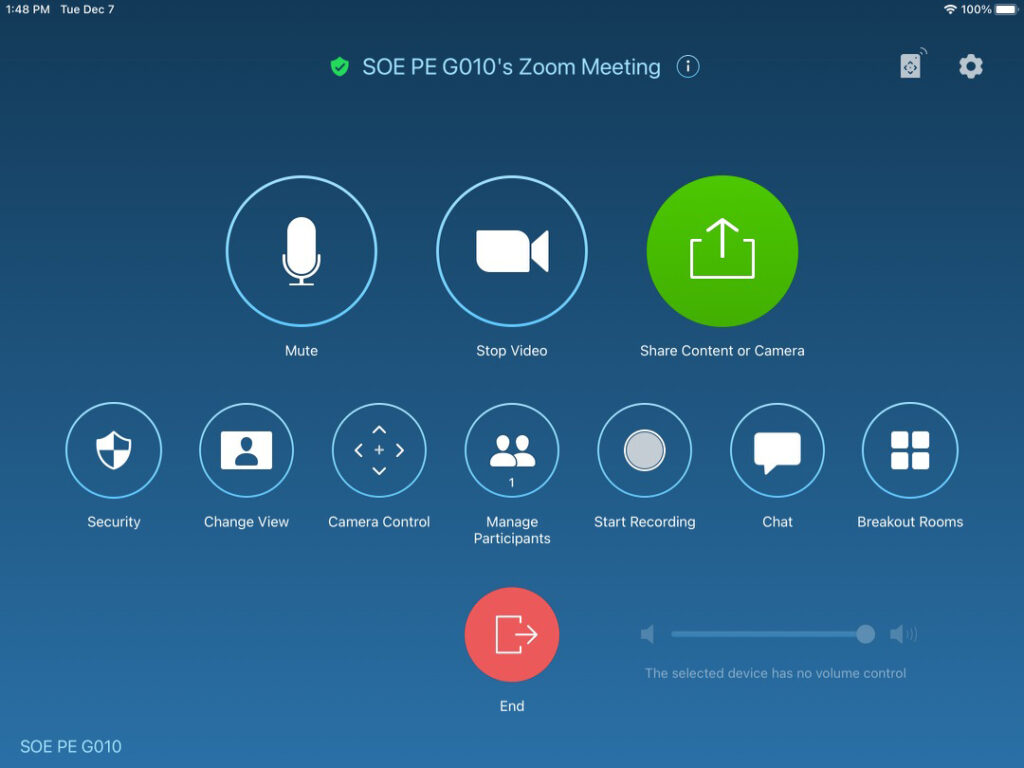
- Mute Microphone: Enables you to toggle the microphone mute on/off.
- Stop/Share Video: Enables you to toggle the camera sharing on/off.
- Share Content or Camera: See Zoom: Sharing Content or Camera with a Zoom Room Meeting
- Change View: Enables you to switch between various views of the meeting participant webcams.
- Camera Control: Due to the way the cameras interact with the AV system, camera control via this button is not available. Please see the “Camera Control” section below.
- Chat: Allows you to view and contribute to the meeting chat.
- Host Controls: The following controls are only enabled if the Zoom Room is set as the host.
- Manage Participants: Allows you to invite/remove participants, and manage participant audio and video.
- Record: Enables you to start/stop Zoom cloud recording
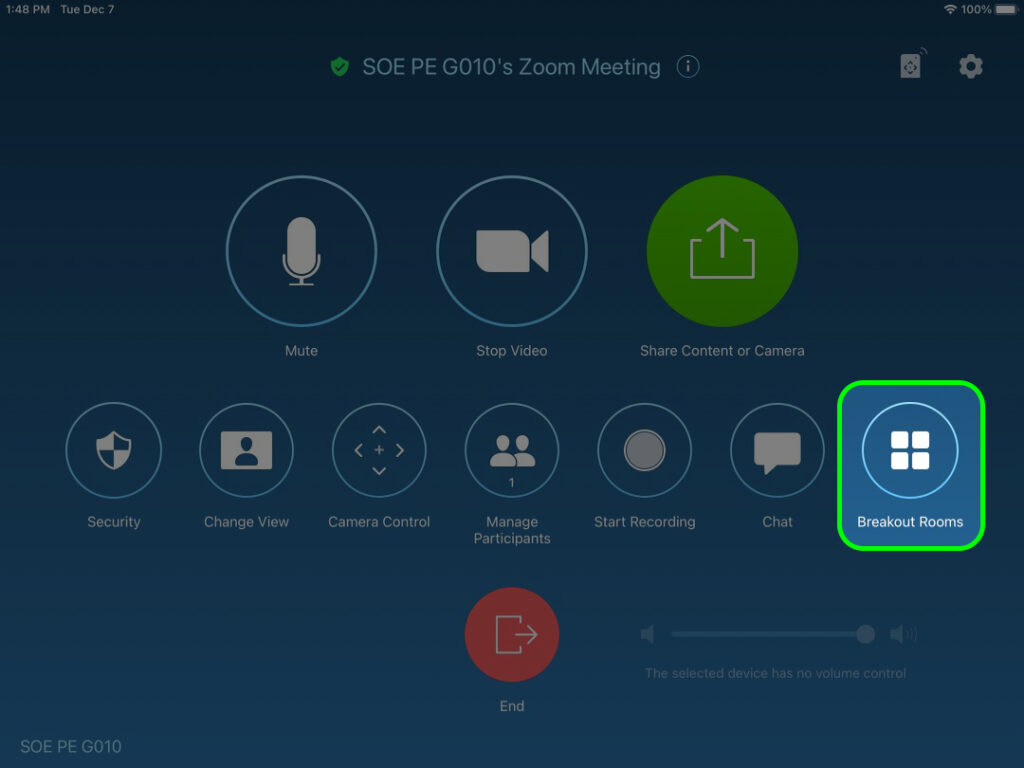
- Breakout Rooms: Enables you to open Breakout Rooms. This is covered in more detail below.
Camera Control via the AV Touch Panel
Due to the way the cameras interact with the AV system, camera control via the “Camera Control” button from the main Zoom control screen is not available. The most user friendly way for controlling the cameras is via the the AV touch panel.
1. Open the Camera Routing & Control menu by pushing the button at the bottom of the Basic or Dual Content screens:

2. Select the camera you would like to use and adjust the view via the controls on the right. Also included is a preview of the selected camera:
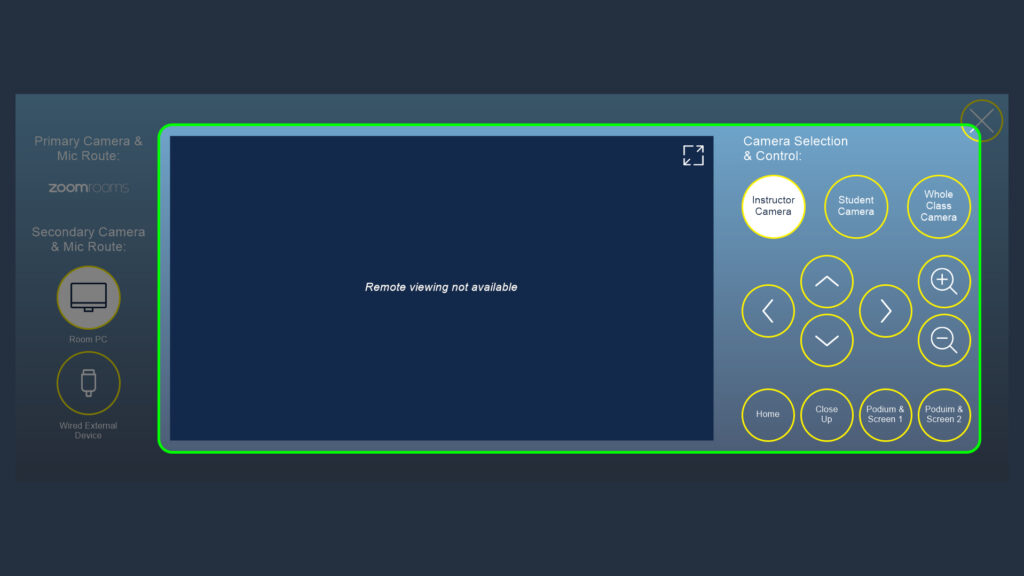
- Cameras:
- Instructor Camera: Controllable camera mounted at the back of the room facing the front.
- Student Camera: Controllable camera mounted at the front of the room facing the back.
- Whole Class Camera: Static wide angle camera mounted at the front of the room facing the back.
- Directional Arrows: Moves the selected controllable camera up/down/left/right.
- Magnifying Glasses: Zooms the selected controllable camera in/out.
- Preset Buttons: Recalls helpful presets for the selected controllable camera.
Camera Control via the Zoom iPad
Due to the way the cameras interact with the AV system, camera control via the “Camera Control” button from the main Zoom control screen is not available. The most user-friendly way to control the camera is via the AV system, which is covered above.
Camera control is also available via the Zoom iPad via the “Room Controls” button, which appears at the top right when a meeting is in progress:
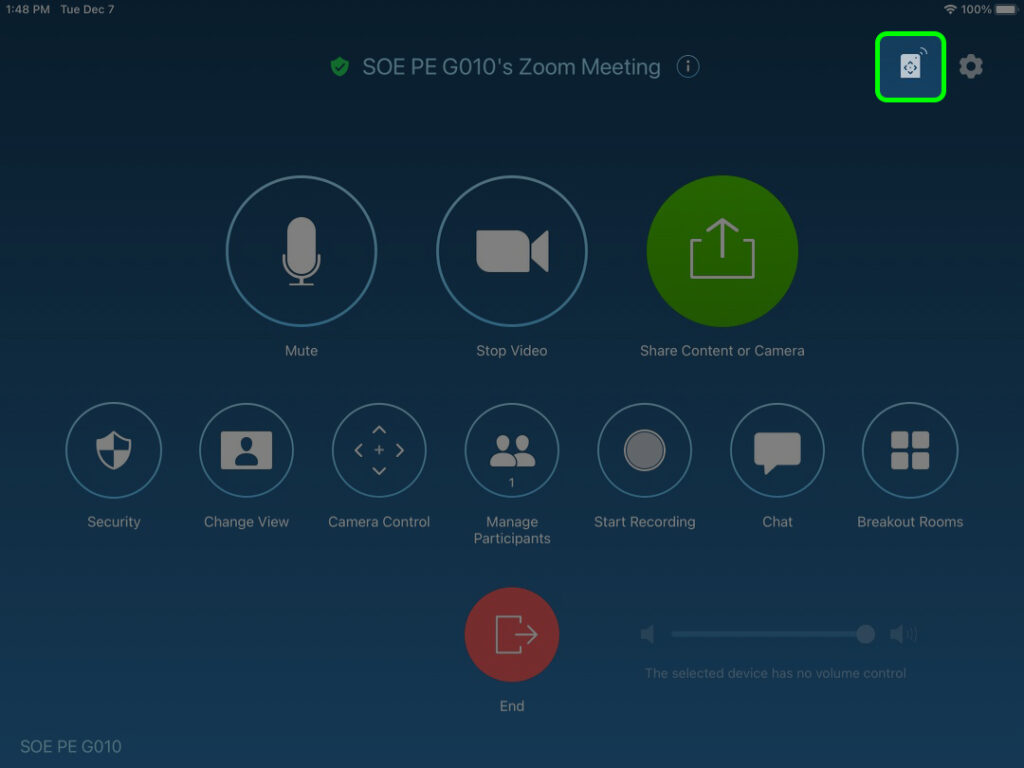
This will bring up the Room Controls menu, and “Camera Control” is the first section:
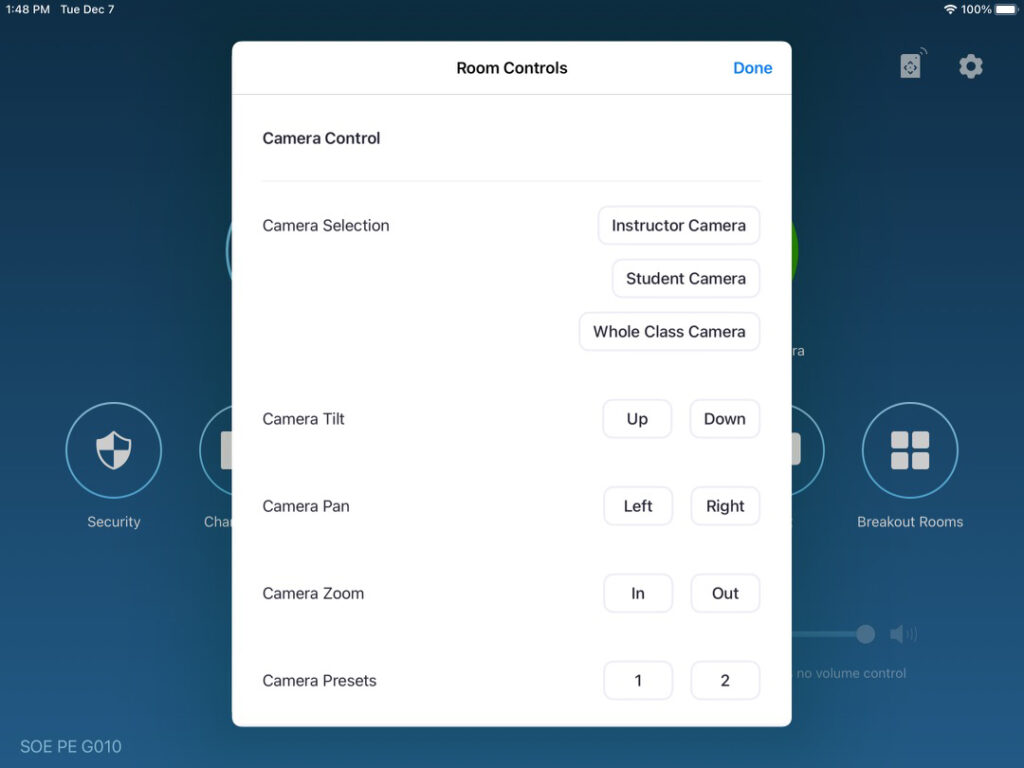
- Instructor Camera: Controllable camera mounted at the back of the room facing the front.
- Student Camera: Controllable camera mounted at the front of the room facing the back.
- Whole Class Camera: Static wide angle camera mounted at the front of the room facing the back.
- Camera Tilt: Tilts the selected controllable camera up/down
- Camera Pan: Pans the selected controllable camera right/left
- Camera Zoom: Zooms the selected controllable camera in/out
- Camera Presets: Recalls helpful presets for the selected controllable camera
Starting Breakout Groups
Once you are ready to conduct breakout discussions, three of the eight screens in the School Agile Classrooms are capable of facilitating HyFlex breakout groups. You may have as many additional in-room only breakout groups as you’d like (the other screens can show in-room content), but screens 2, 4, & 7 are the screens you will leverage for HyFlex breakout discussions.
Step 1: Add Screens 4 & 7 to the Meeting
The main Zoom Room will be leveraged for the breakout group at Screen 2, so the first step is adding the Zoom Rooms at Screens 4 & 7 to the meeting. This can be done via invitation or meeting ID:
Add Screens via Invitation
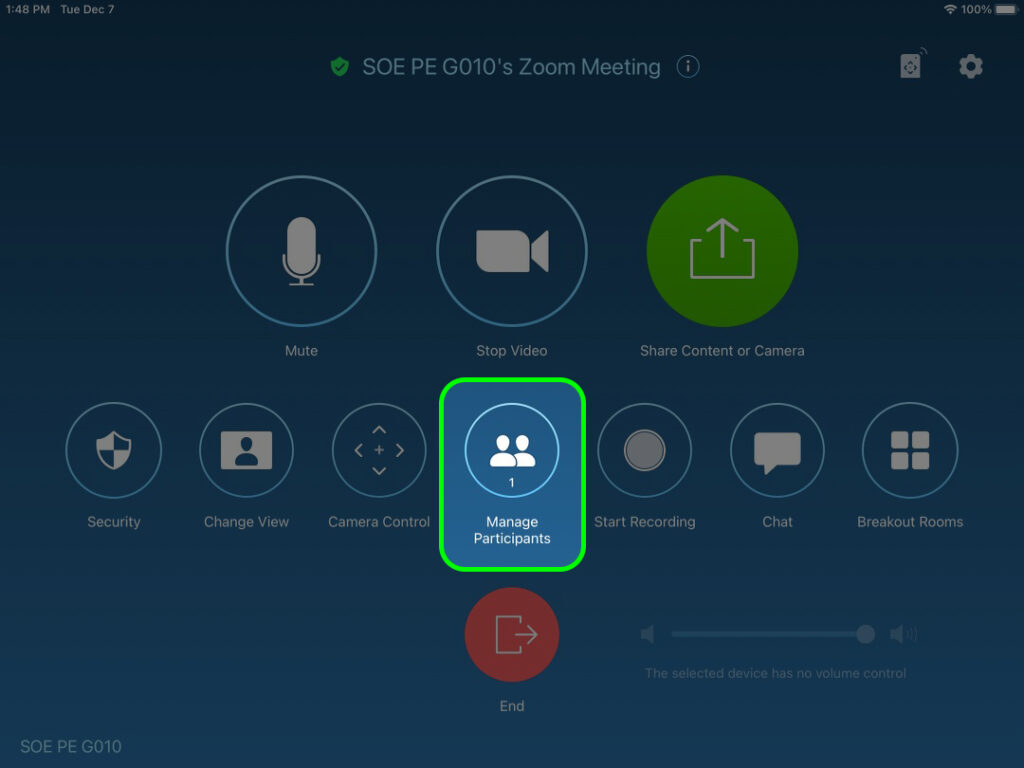
1. Push “Manage Participants” in the meeting controls on the main Zoom iPad:
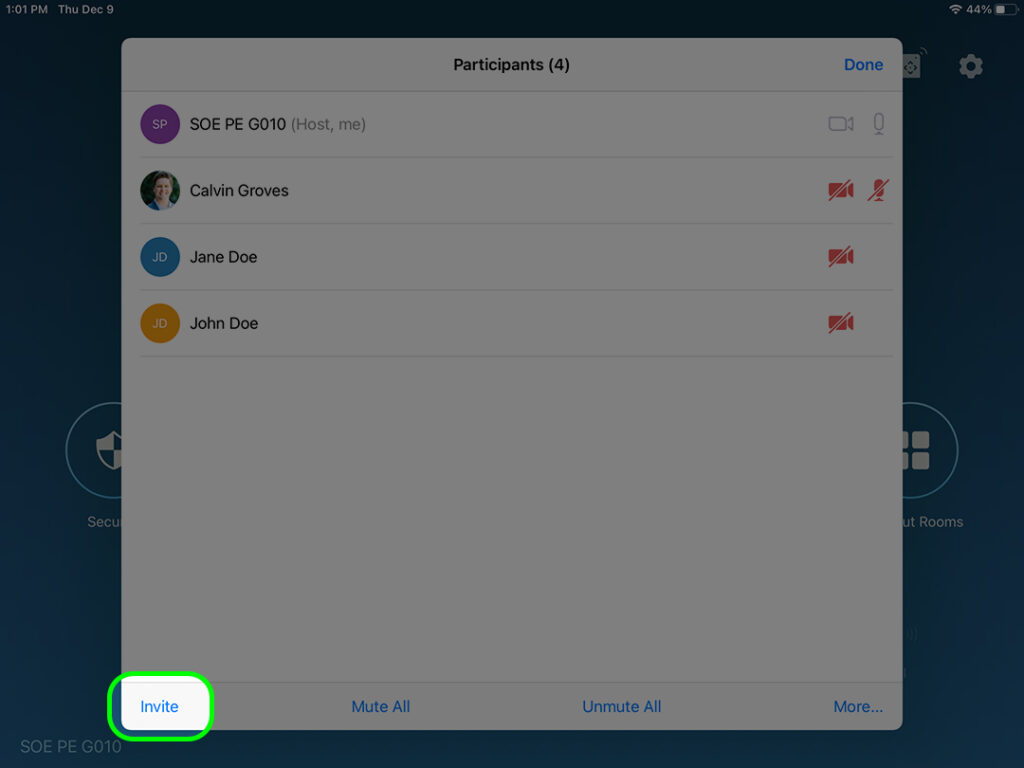
2. Push “Invite” in the participant list:
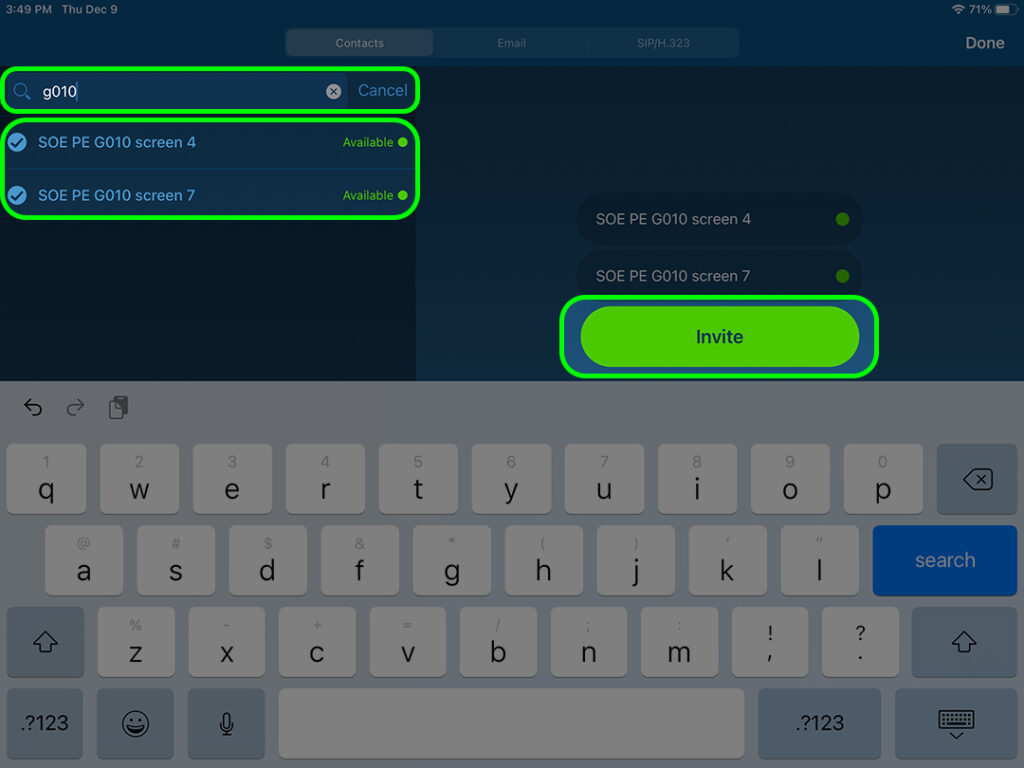
3. Search the room number of the Agile Classroom you are in via the search bar, select both breakout screens, and push the “Invite” button:
4. From each breakout screen Zoom iPad, accept the invitation:
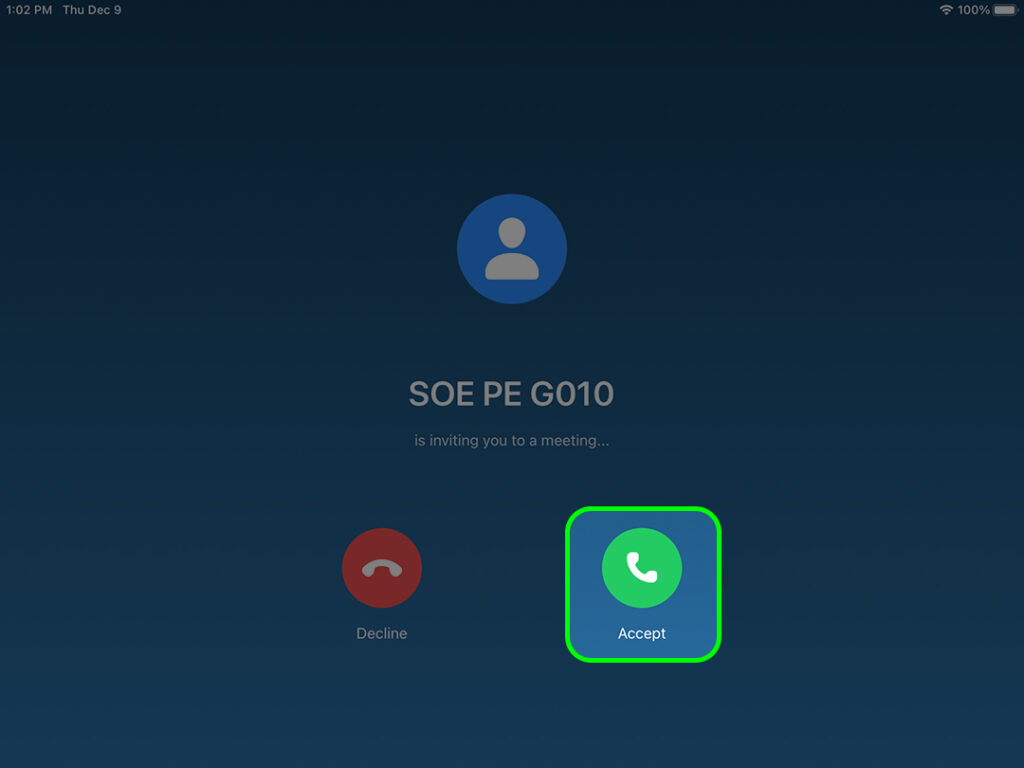
Depending on your meeting settings, you may then be prompted to admit the rooms to your meeting.
Add Screens via Meeting ID
This method requires someone to use the iPads mounted at screens 4 & 7 to join the meeting:
[add image once permanent iPads installed]
For each breakout screen iPad, the instructions are the same as starting/joining a meeting from the main Zoom iPad:

- Select “Join” from the options on the left
- Type the “Meeting ID” of your meeting via the number pad
- Click “Join” at the bottom right
Depending on your meeting settings, you may then be prompted to admit the rooms to your meeting.
Step 2: Open Zoom Breakout Rooms
Once all of the Zoom Rooms have joined the meeting, you can open the breakout rooms in Zoom:
Opening the Zoom Breakout Rooms
Create the Breakout Rooms
1. Push “Breakout Rooms” from the main Zoom iPad:
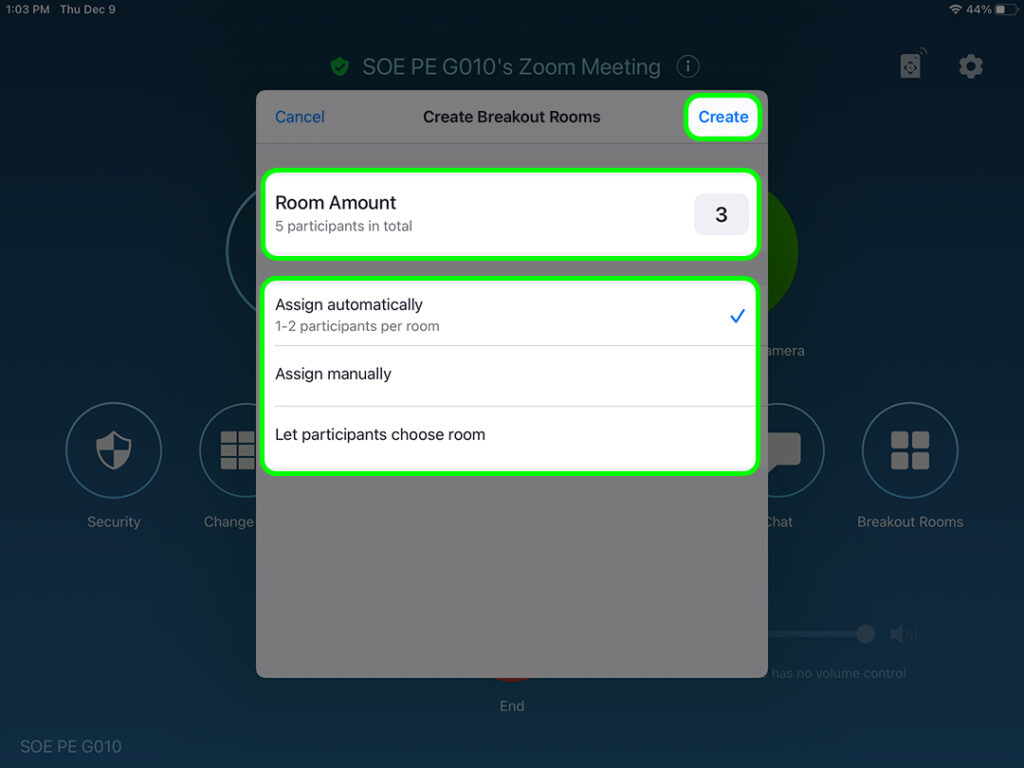
2. Change the “Room Amount” to 3, choose your room assignment method, and push the “Create” button:
Ensure the Zoom Rooms are in Different Breakout Rooms
If you used “Assign automatically” when creating your breakout rooms you’ll need to ensure each Zoom Room is in a different breakout room and/or move participants around.
1. Push the name of the Zoom Room or participant, and select which breakout room they should move to:
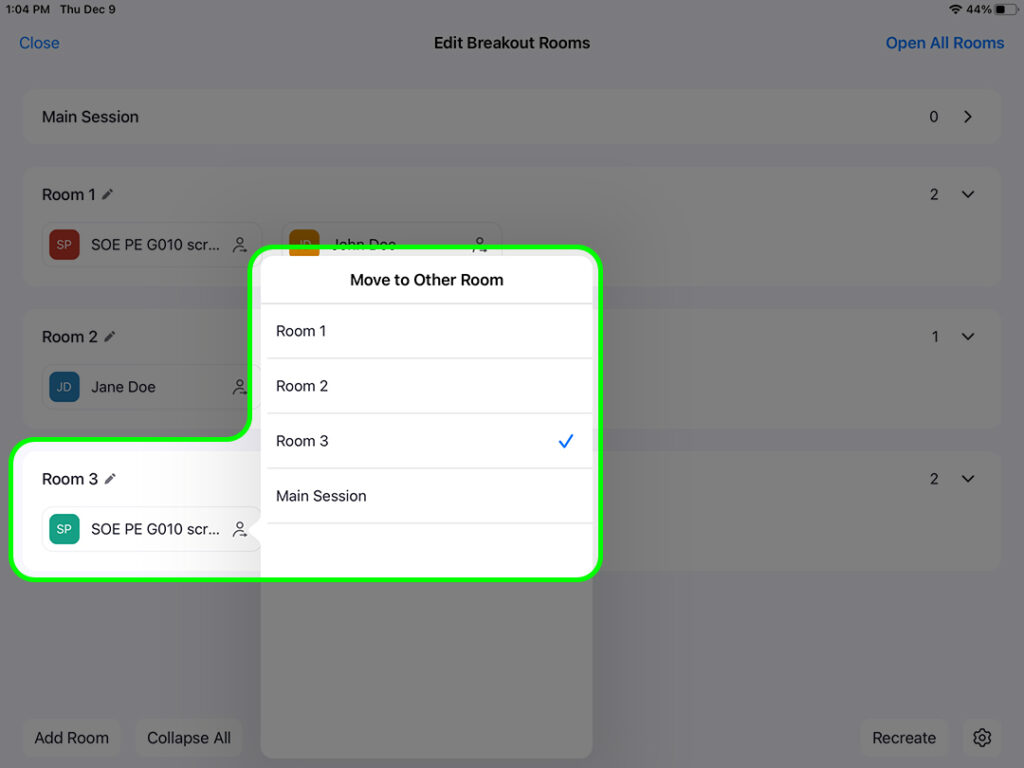
2. Repeat as necessary.
Open the Breakout Rooms
1. Push “Open All Rooms” at the top right:
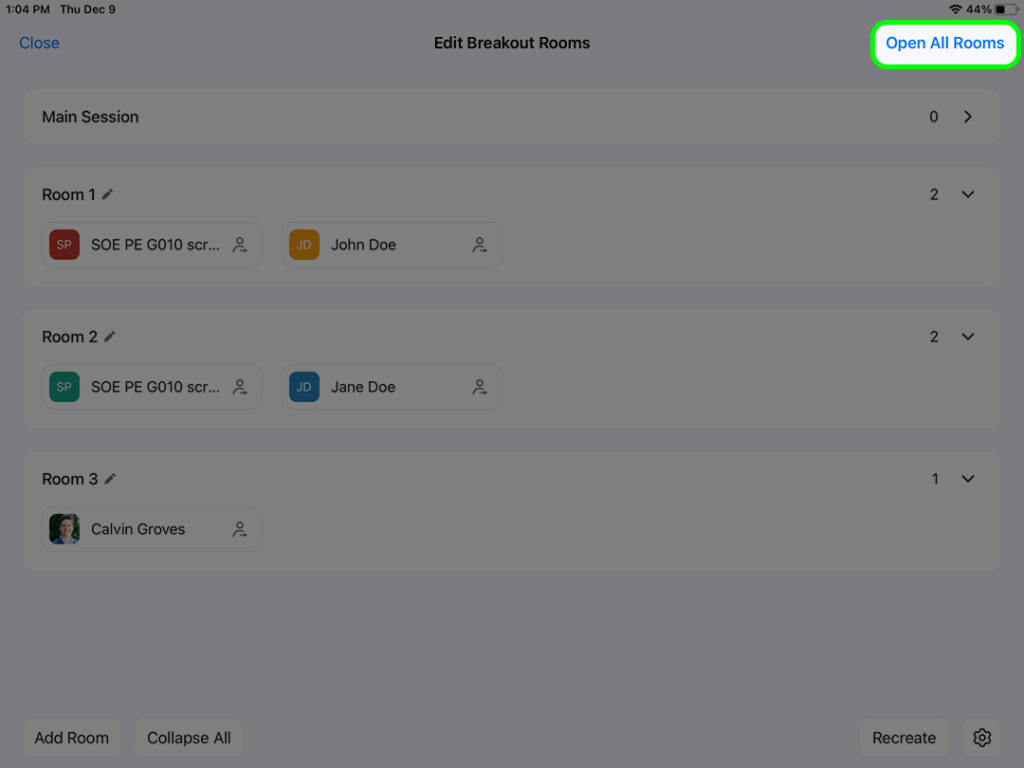
Next, you’ll need to ensure each screen joins their assigned breakout room.
Join the Breakout Room: Screen 2
Since Screen 2 uses the main Zoom Room, you’ll use the main Zoom iPad to join the breakout room.
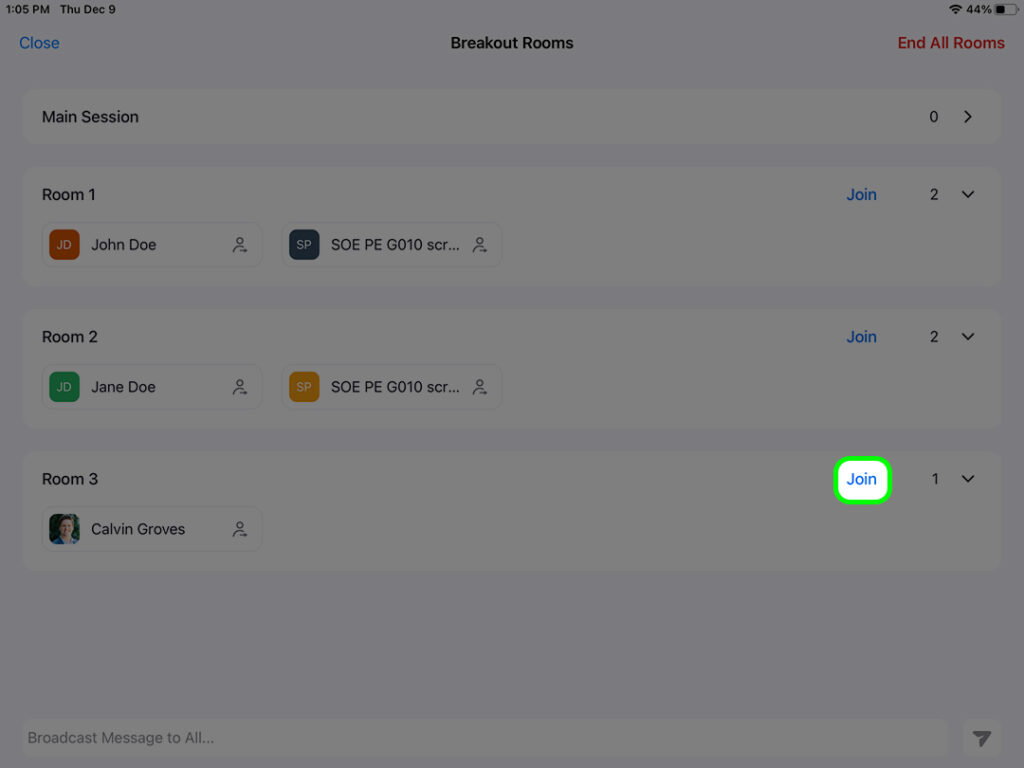
1. As the host, you are not automatically added to a breakout room. To join your breakout room, push “Join” for the breakout room without one of the other Zoom Rooms:
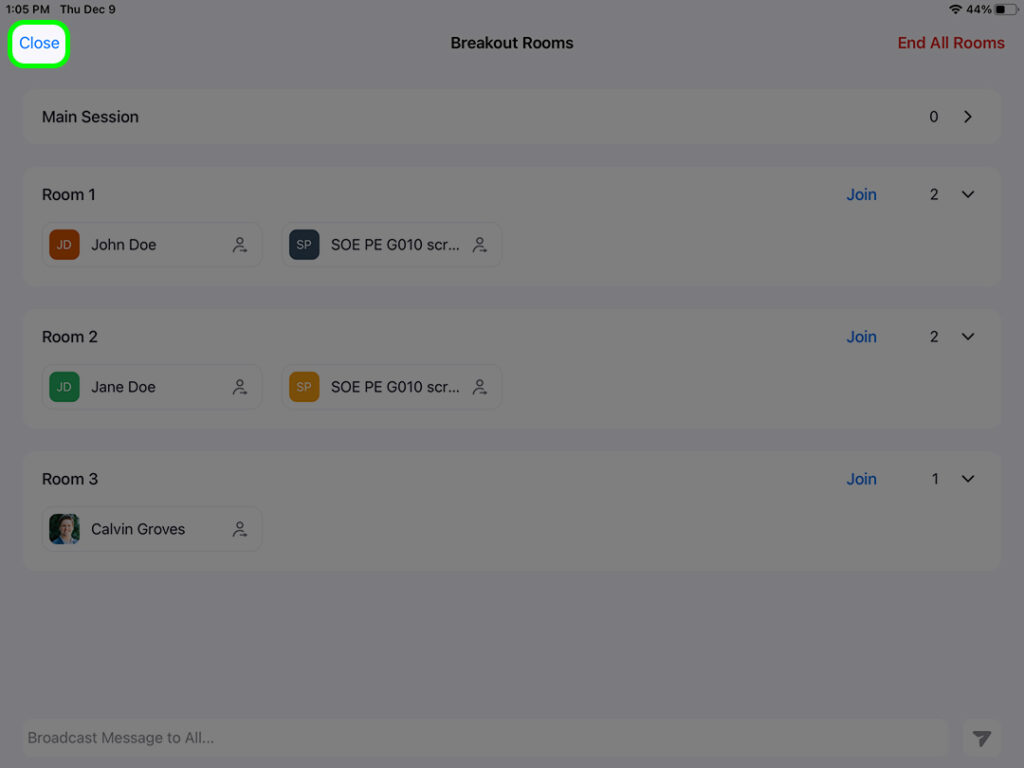
2. Push “Close” to return to the Zoom controls:
Join the Breakout Room: Screens 4 & 7
1. From each breakout screen Zoom iPad, click “Join” to accept the invitation:
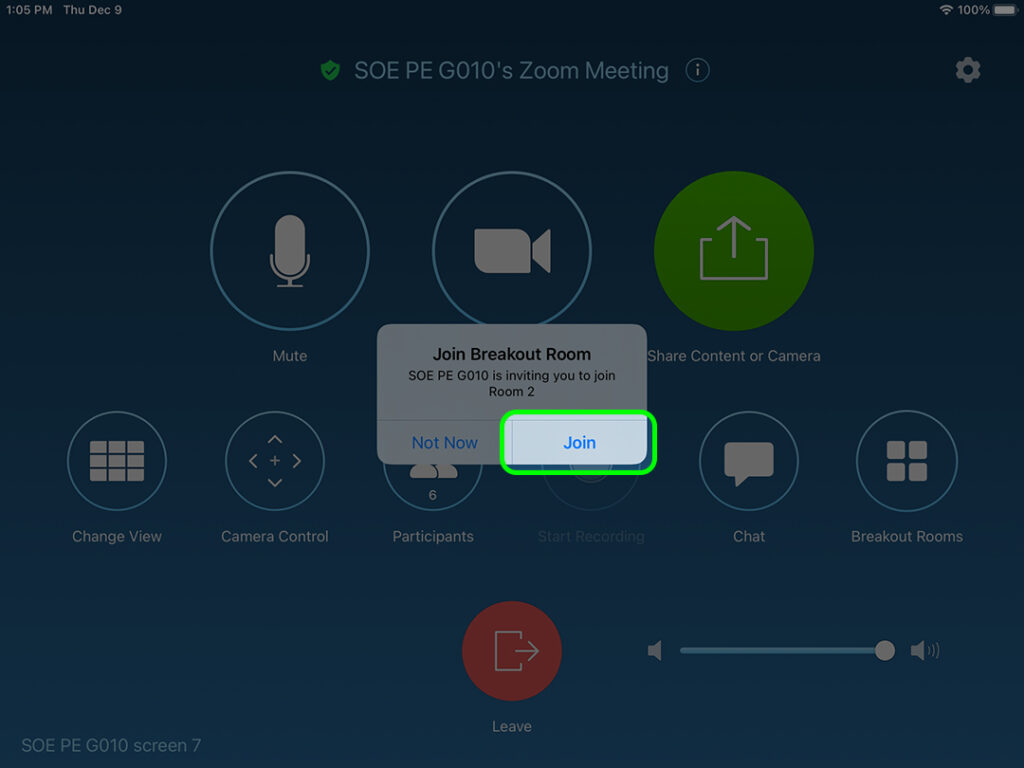
Note: At this point the Zoom Rooms will all be in the appropriate breakout room, but the remote participants in the breakout rooms with Screens 4 & 7 will not be able to hear the in-room participants until step 3 is complete.
Step 3: Change the Room Mode to Breakout: HyFlex
Now that the breakout rooms are open, you must change the room mode to show the proper content on each screen and route the audio correctly. This can be done via the AV touch panel, or via the main Zoom iPad:
Change the Room Mode via the AV Touch Panel
1. Push the “Room Mode” button in the common controls area:

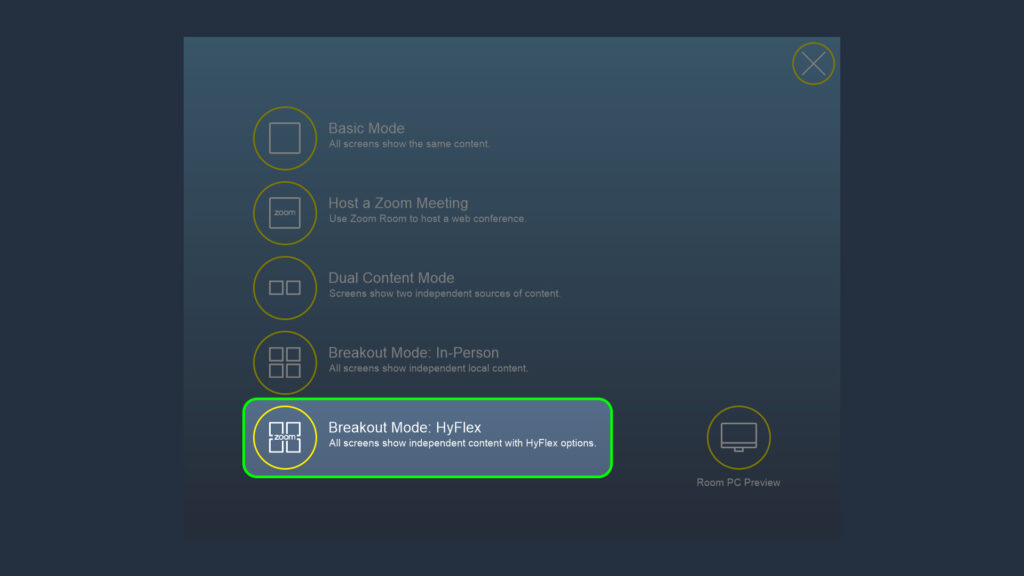
2. Select “Breakout Mode: HyFlex” as the room mode:
Change the Room Mode via the Main Zoom iPad
1. Push the “Room Controls” button, which appears at the top right when a meeting is in progress:

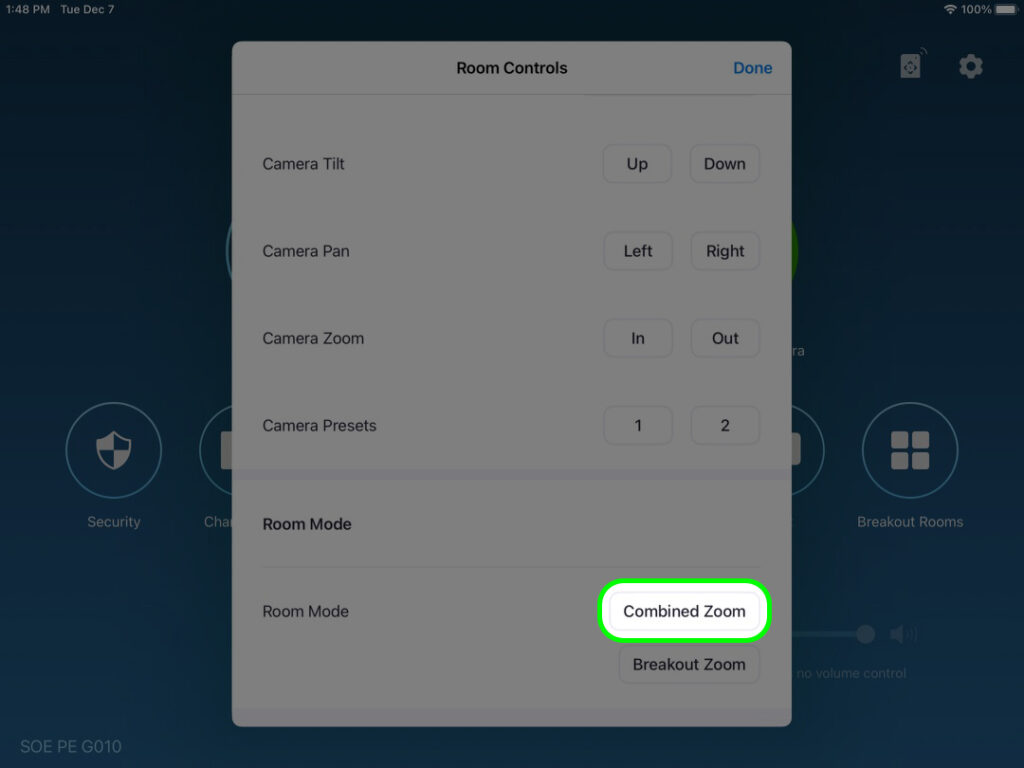
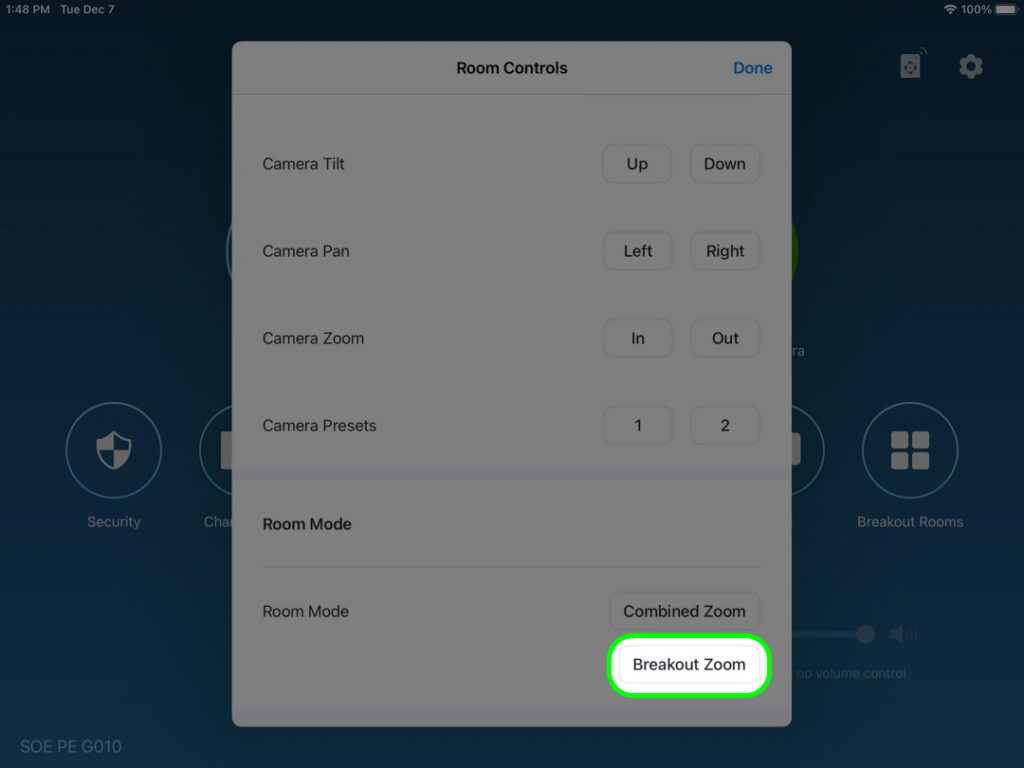
2. Scroll to the bottom of the Room Controls menu to the “Room Mode” section, and push the “Breakout Zoom” button:
Step 4: Conduct Breakout Discussions
Along with any additional in-room only breakout groups, screens 2, 4, & 7 can now conduct HyFlex breakout discussions.
Controlling Zoom at Screen 2
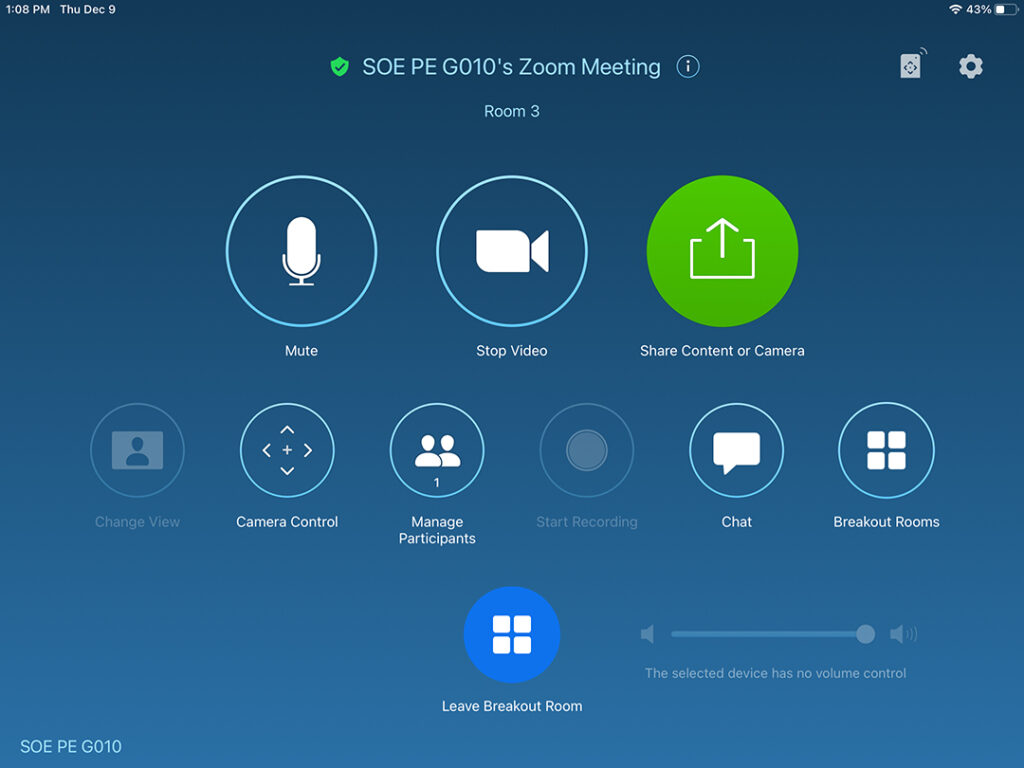
Screen 2 is controlled via the main Zoom iPad, and controls within the breakout room in Zoom are very similar to the non-breakout Zoom controls:
Controlling Zoom at Screens 4 & 7
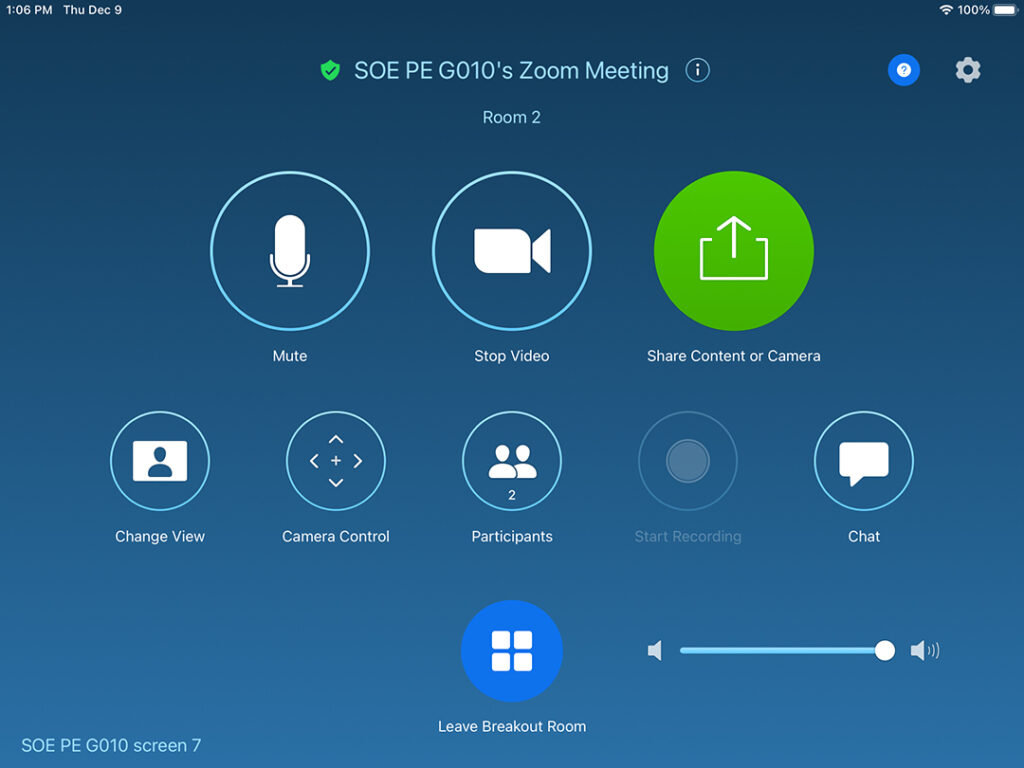
Controls for screens 4 & 7 are available at the iPads mounted near the TVs, and the controls will look similar to those for screen 2, without the ability to manage the breakout rooms:
Adjusting Zoom Volume
Volume adjustments for all screens are made via the AV touch panel.
1. Push the “Advanced Controls” button:

2. Push the “Audio Mixer” button:
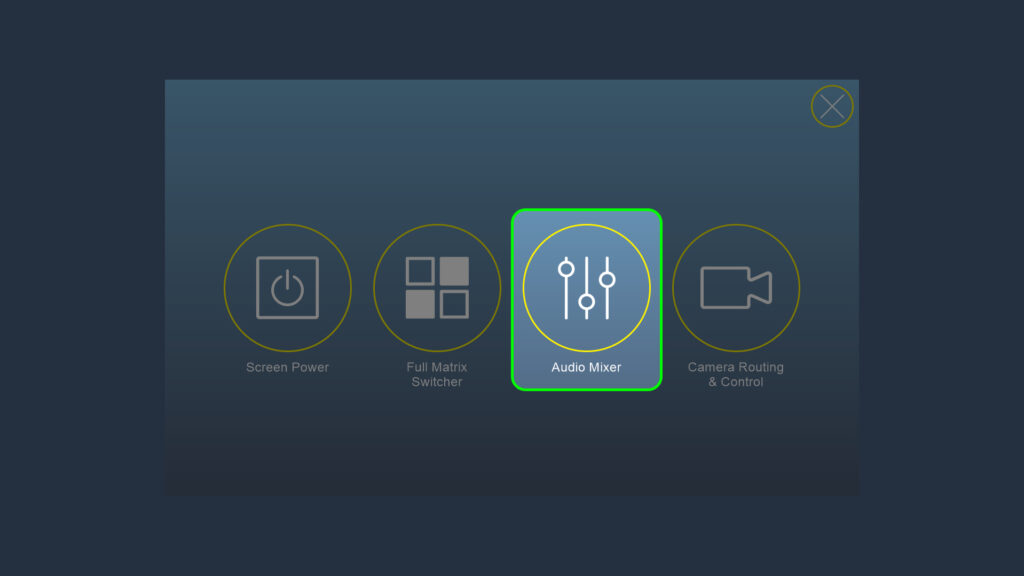
3. Adjust the volume at the desired screen:
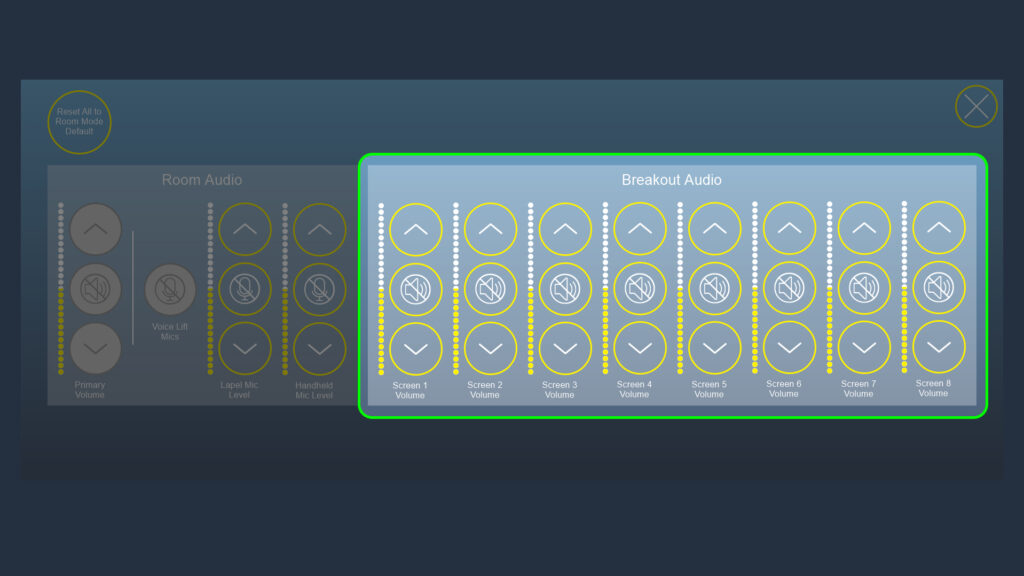
Individual screen volume adjustments are also available via the “Screen Controls” buttons for each screen on the Breakout Mode main screen.
Ending Breakout Groups
When you are ready to reconvene for a full-room discussion, you’ll need to return everyone to the main Zoom meeting.
Step 1: Close Zoom Breakout Rooms
First you need to close the Zoom breakout rooms to bring all the remote participants back together:
Closing the Zoom Breakout Rooms
1. Push the “Breakout Rooms” button from the main Zoom iPad:

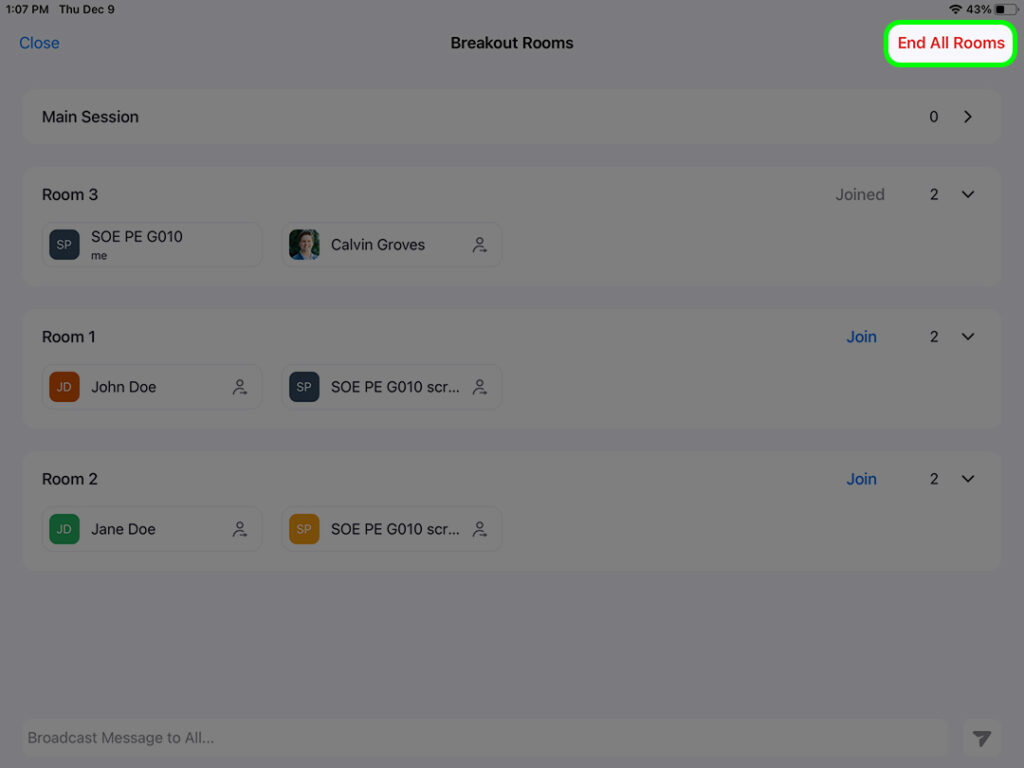
2. Push “End All Rooms” at the top right:
3. Push “Close” at the top left:
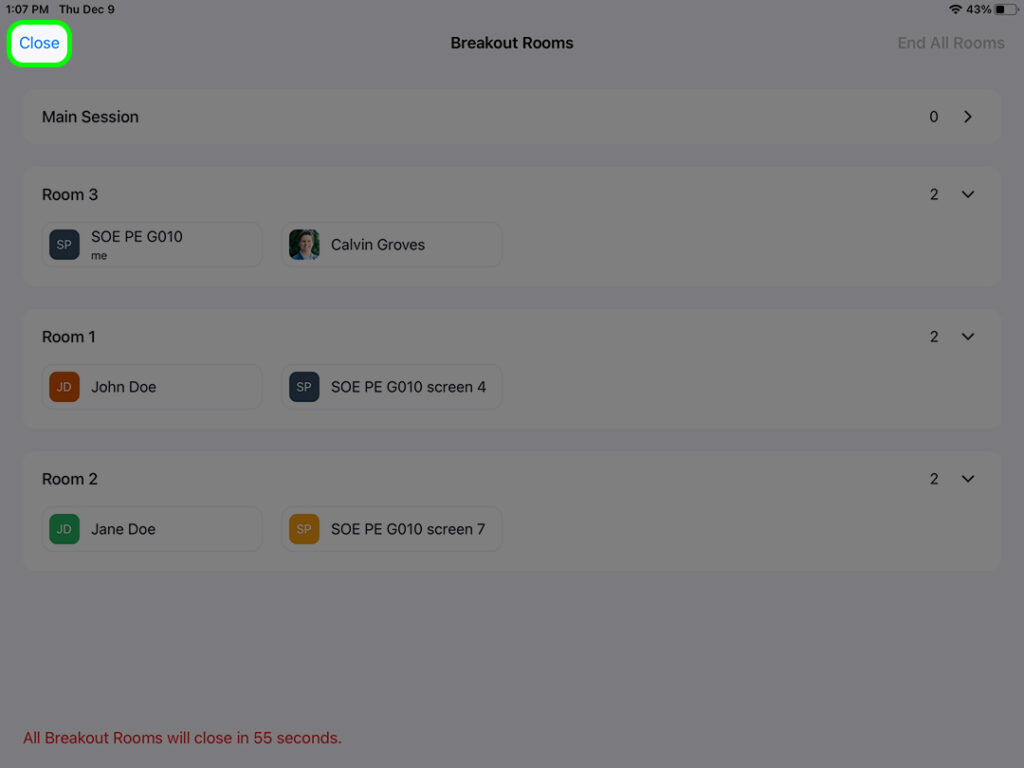
After a minute, the rooms will automatically close. Alternatively, you can also leave the rooms early.
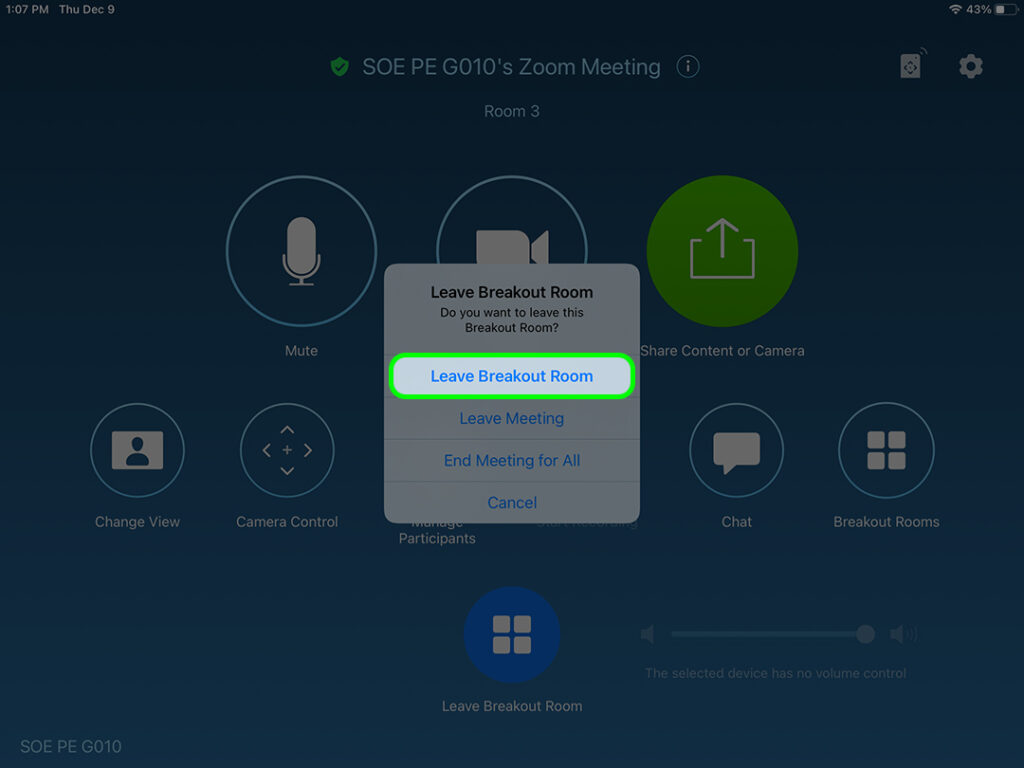
Screen 2: Leave the Breakout Room
1. Push the “Leave Breakout Room” button:
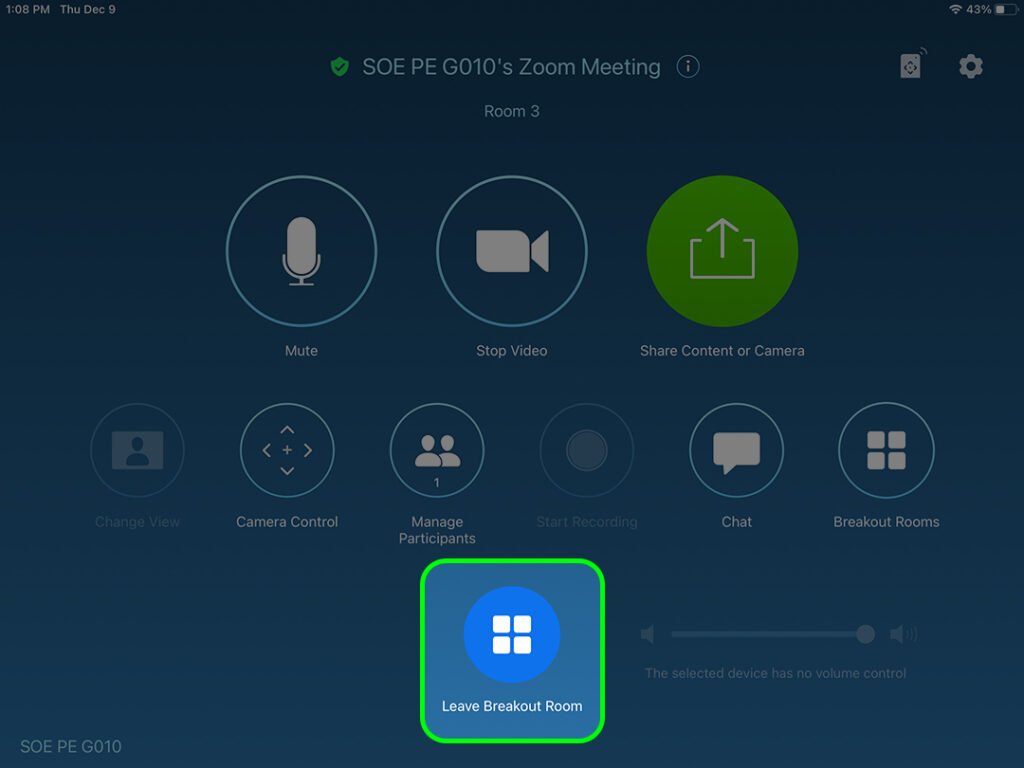
2. Select “Leave Breakout Room” from the prompt:
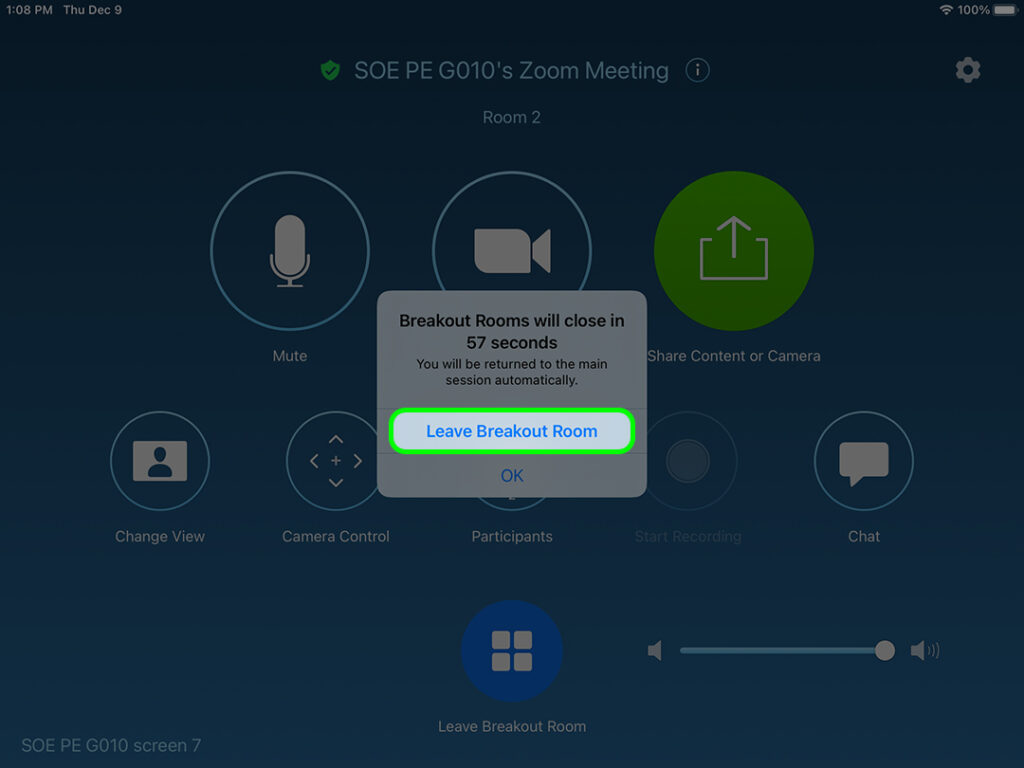
Screens 4 & 7: Leave the Breakout Room
1. Select “Leave Breakout Room” from the prompt:
Step 2: Change the Room mode to Host a Zoom Meeting
Now that the breakout rooms are closed, we still need change the room mode back to facilitate full-room discussions. This can be done via the AV touch panel, or via the main Zoom iPad:
Change the Room Mode via the AV Touch Panel
1. Push the “Room Mode” button in the common controls area:

2. Select “Host a Zoom Meeting” as the room mode:

Change the Room Mode via the Main Zoom iPad
1. Push the “Room Controls” button, which appears at the top right when a meeting is in progress:

2. Scroll to the bottom of the Room Controls menu to the “Room Mode” section, and push the “Breakout Zoom” button:
