School Agile Classrooms | Task-Based Guide
Overview
This guide is designed to help you walk through specific tasks you’d like to accomplish in the Agile Classrooms. It is recommended you leverage the table of contents above to find the specific information you are looking for. If the task you are looking for help on is not included here, you can reference the Comprehensive Guide and/or request the addition of a task to this guide by submitting a request via: SOE EdIT Services
Need Help?
If you need immediate assistance, please call EdIT at: 919-966-6220
If you’re interested in a training or consultation, please submit a help request via: SOE EdIT Services
I want to…
Show the in-room PC on screen
Instructions for showing the in-room PC
To show the in-room PC on screen:
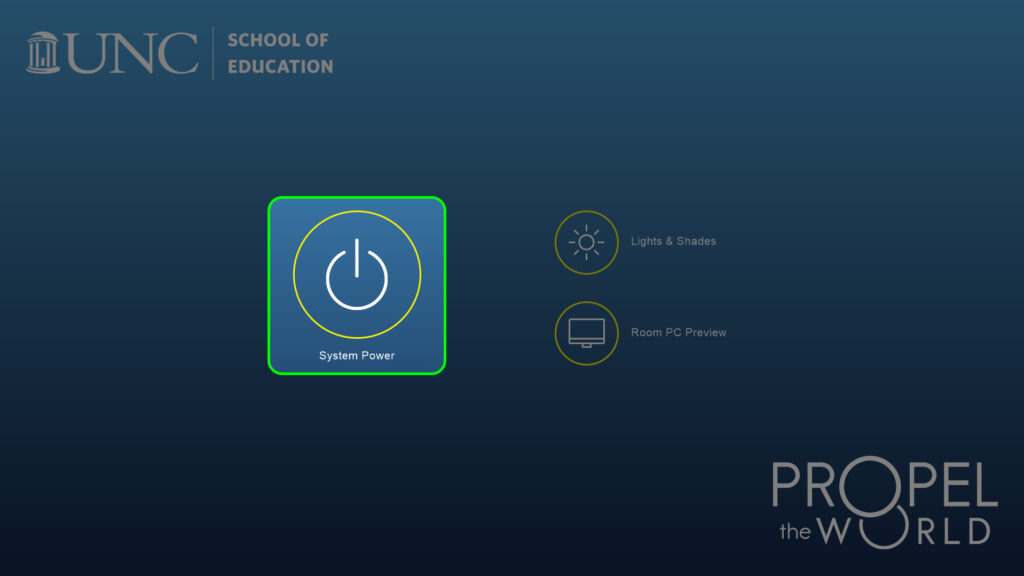
1. Push the “System Power” button:
2. Select “Basic Mode” from the menu:
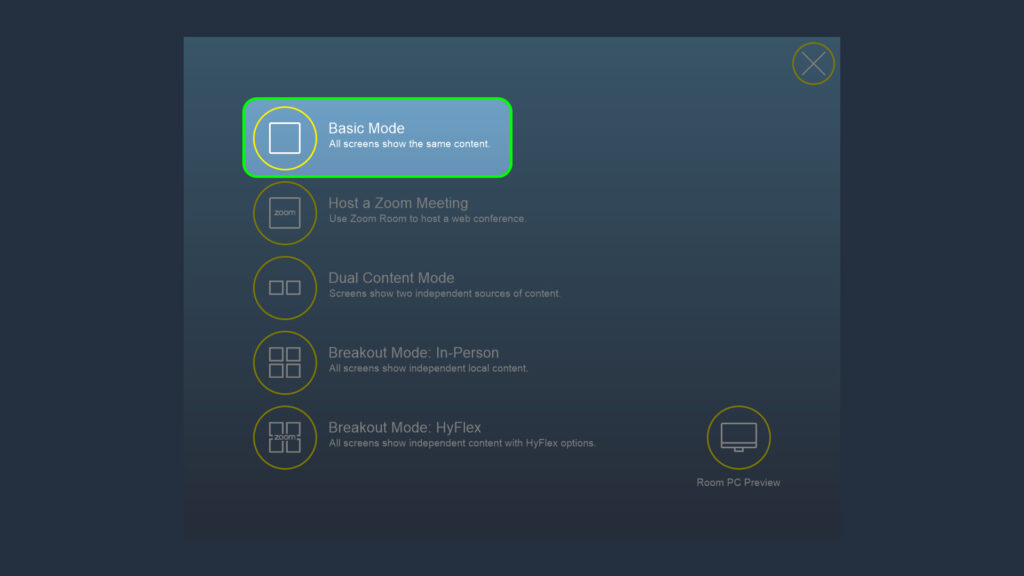
3. The room is now setup to use the in-room PC. The wireless keyboard and mouse located within the room are used for control, and a preview will be displayed on screen.
Show my laptop on screen
Instructions for projecting wirelessly
To show your laptop on screen:
1. Push the “System Power” button:

2. Select “Basic Mode” from the menu:

3. Select “ShareLink” (1 or 2) from the input options on the left:
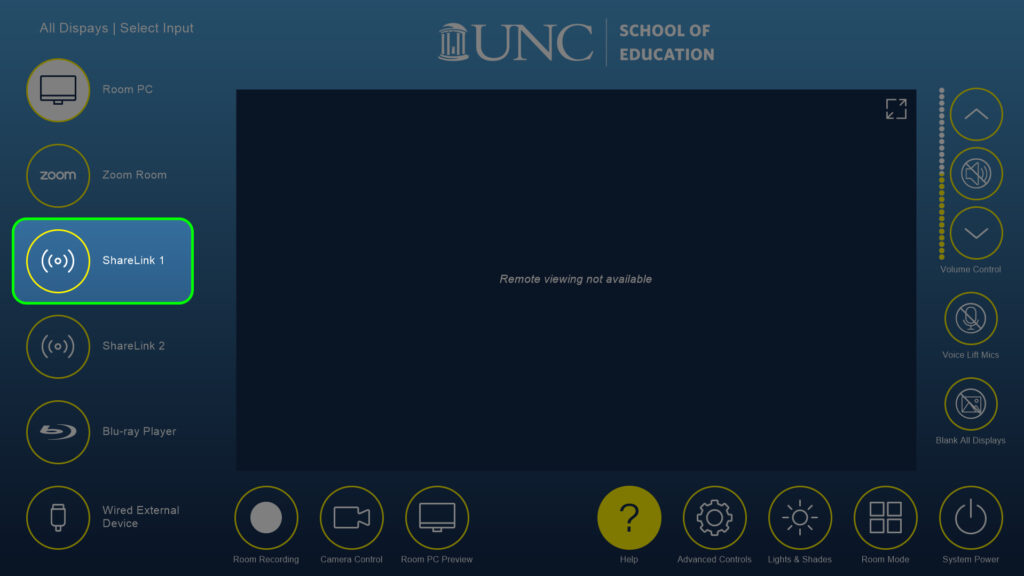
4. Follow the on-screen prompts to connect. For additional information, see Using Wireless Collaboration with ShareLink
Instructions for projecting via wired connections
To show your laptop on screen:
1. Push the “System Power” button:

2. Select “Basic Mode” from the menu:

3. Select “Wired External Device” from the input options on the left:
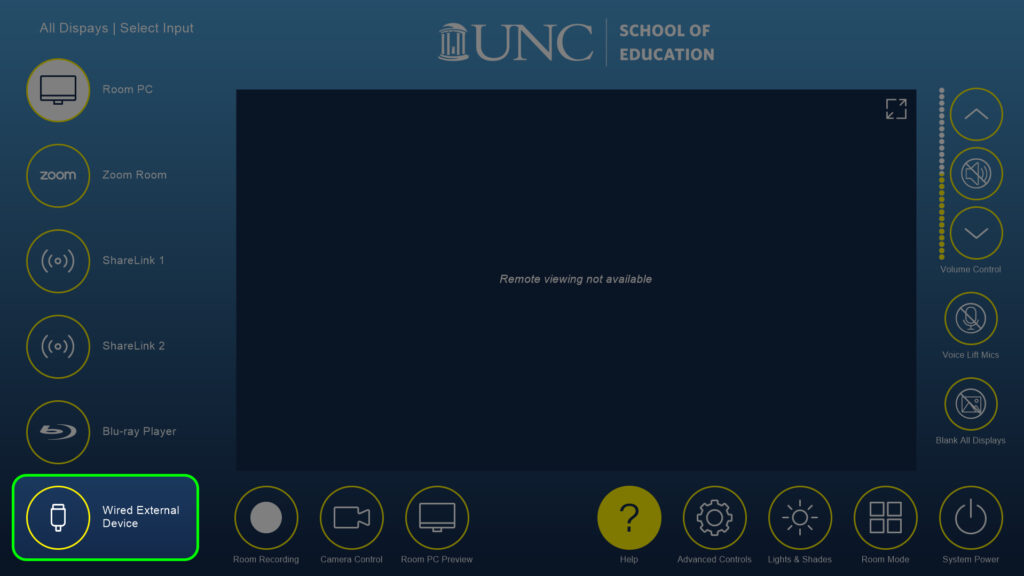
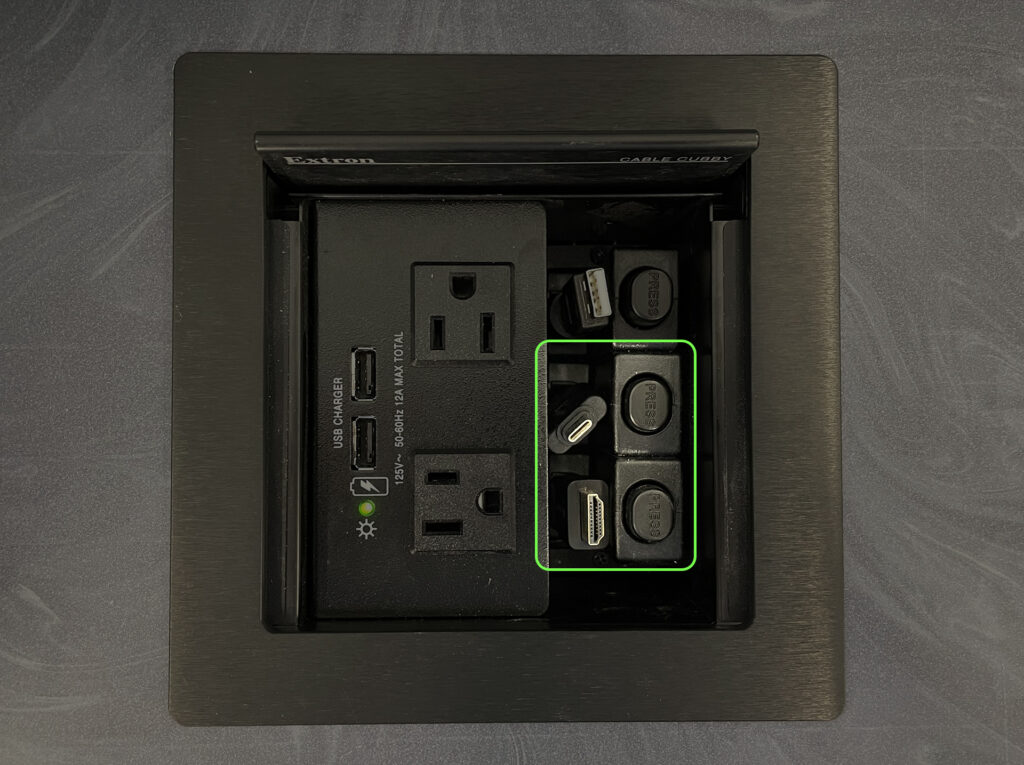
4. Plug either the HDMI or USB-C cable from the cable cubby on the top of the credenza into your laptop:
Host a Zoom Meeting
Instructions for showing Zoom on screen
To show Zoom on screen:
1. Push the “System Power” button:

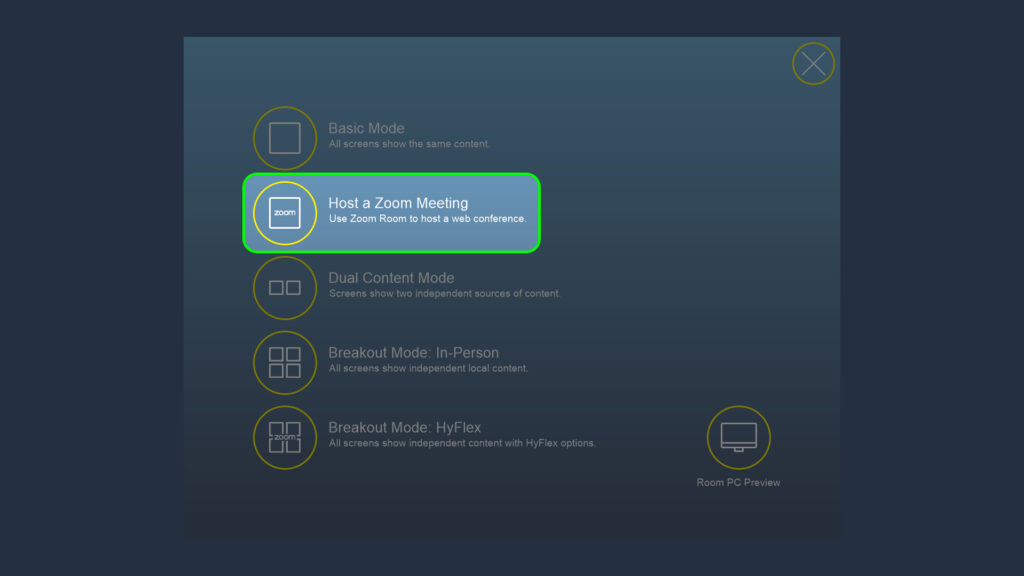
2. Select “Host a Zoom Meeting” from the menu:
Instructions for starting or joining a Zoom meeting
Once you have Zoom displayed on screen, you join and manage your Zoom meetings via the Zoom iPad stored on top of the credenza:
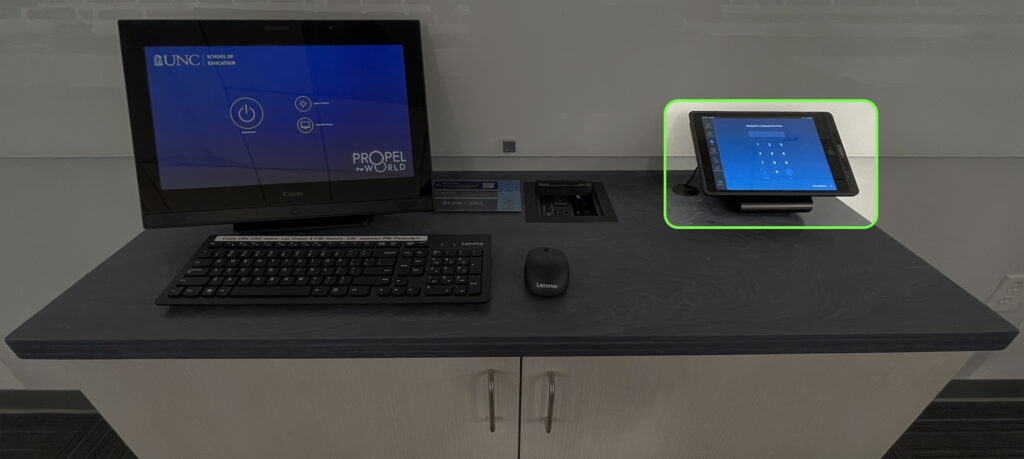
Please return the iPad to the charging dock when you are finished with the room.
From the iPad, you will join your meeting via the meeting ID:
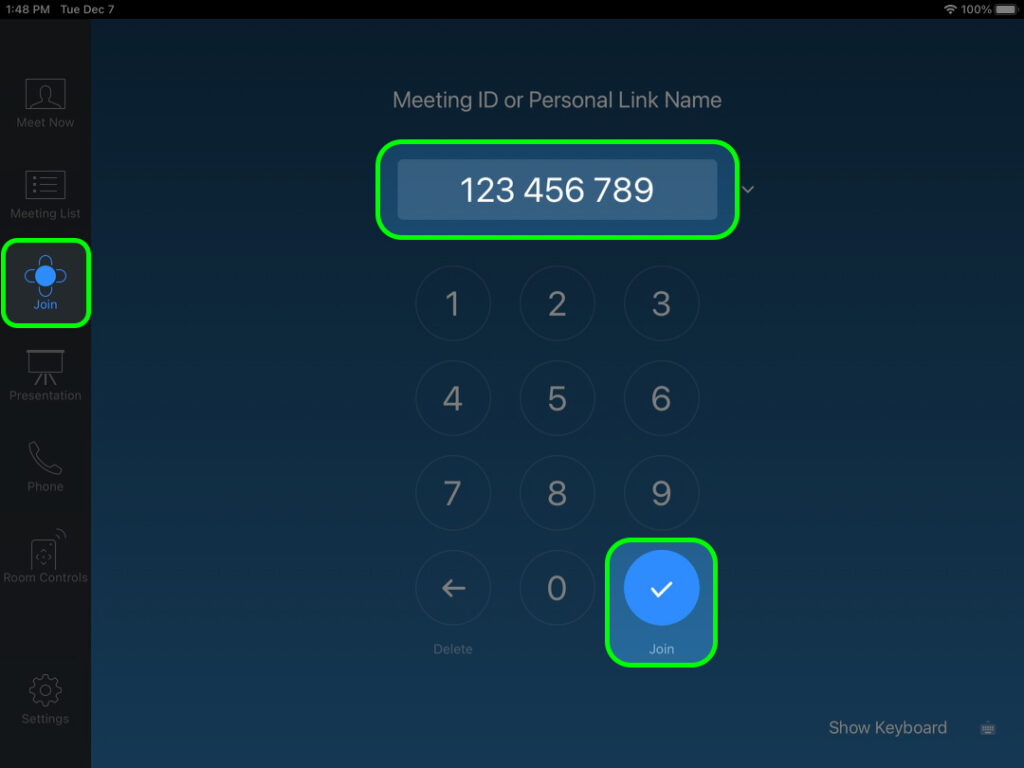
- Select “Join” from the options on the left
- Type the “Meeting ID” of your meeting via the number pad
- Click “Join” at the bottom right
If you would like to invite the Agile Classrooms to your Zoom meeting so they show up in the meeting list, please see the Host a Zoom Meeting section of the School Agile Classrooms | Comprehensive Guide.
Instructions for conducting a Zoom meeting
Once you have started/joined a meeting, the Zoom iPad enables you to control the meeting:
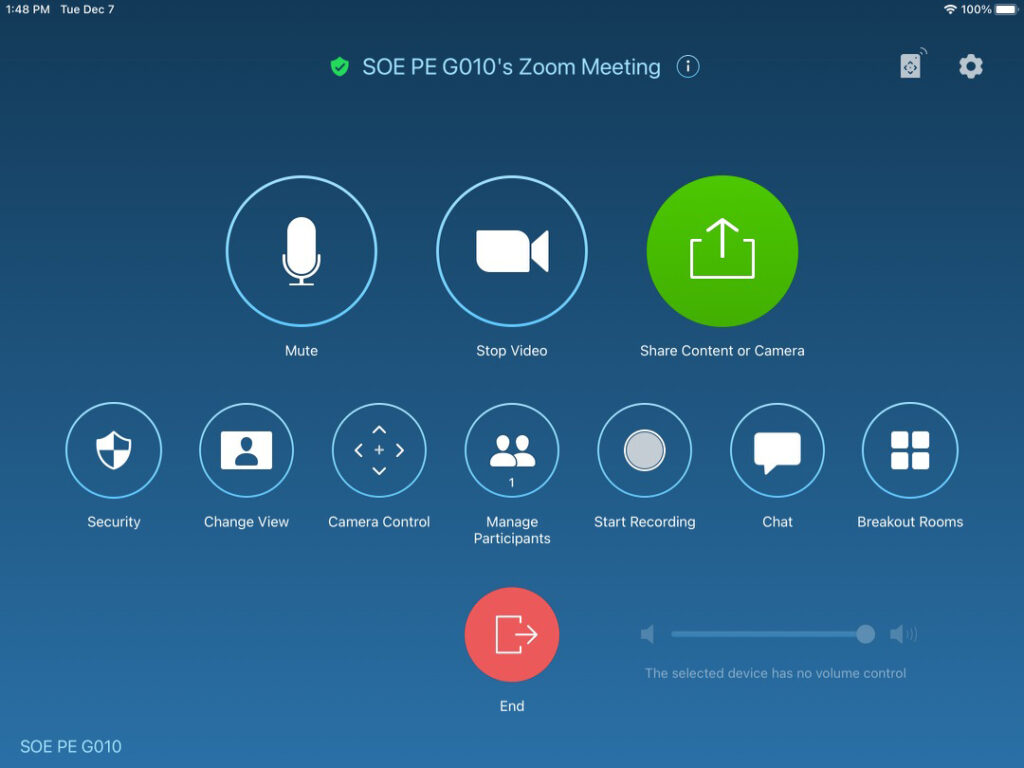
- Mute Microphone: Enables you to toggle the microphone mute on/off.
- Stop/Share Video: Enables you to toggle the camera sharing on/off.
- Share Content or Camera: Documentation Needed.
- Change View: Enables you to switch between various views of the meeting participant webcams
- Camera Control: Due to the way the cameras interact with the AV system, camera control via this button is not available. Please see the two “Camera Control” sections below.
- Chat: Allows you to view and contribute to the meeting chat.
- Host Controls: The following controls are only enabled if the Zoom Room is set as the host.
- Manage Participants: Allows you to invite/remove participants, and manage participant audio and video.
- Record: Enables you to start/stop Zoom cloud recording
- Breakout Rooms: Enables you to open Breakout Rooms. For more information, please see: School Agile Classrooms | HyFlex Breakout Guide
Camera Control via the AV Touch Panel
Due to the way the cameras interact with the AV system, camera control via the “Camera Control” button from the main Zoom control screen is not available. The most user friendly way for controlling the cameras is via the the AV touch panel.
1. Open the Camera Routing & Control menu by pushing the button at the bottom of the Basic or Dual Content screens:

2. Select the camera you would like to use and adjust the view via the controls on the right. Also included is a preview of the selected camera:
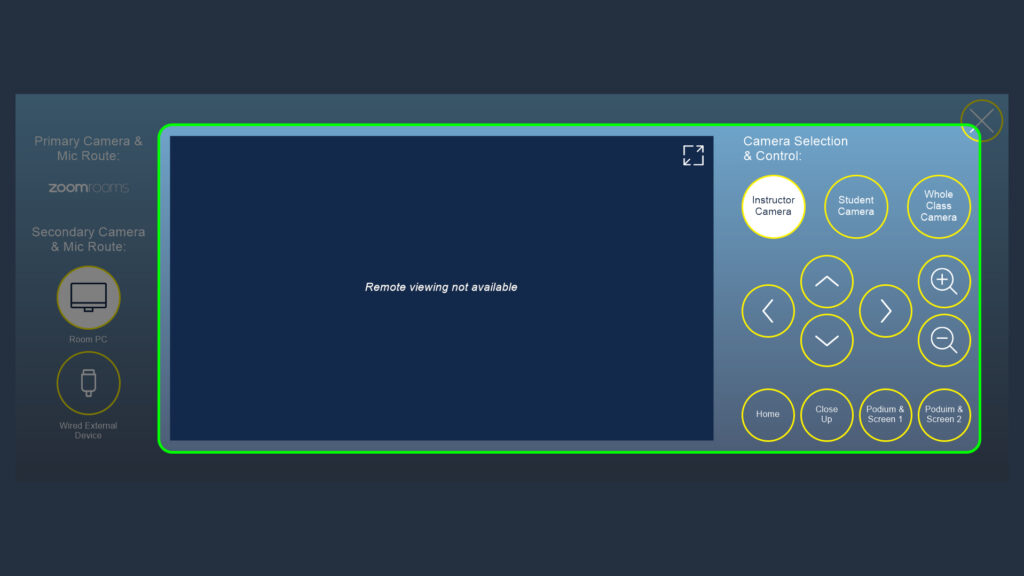
- Cameras:
- Instructor Camera: Controllable camera mounted at the back of the room facing the front.
- Student Camera: Controllable camera mounted at the front of the room facing the back.
- Whole Class Camera: Static wide angle camera mounted at the front of the room facing the back.
- Directional Arrows: Moves the selected controllable camera up/down/left/right.
- Magnifying Glasses: Zooms the selected controllable camera in/out.
- Preset Buttons: Specific to each camera.
Camera Control via Zoom iPad
Due to the way the cameras interact with the AV system, camera control via the “Camera Control” button from the main Zoom control screen is not available. The most user-friendly way to control the camera is via the AV system, which is covered above.
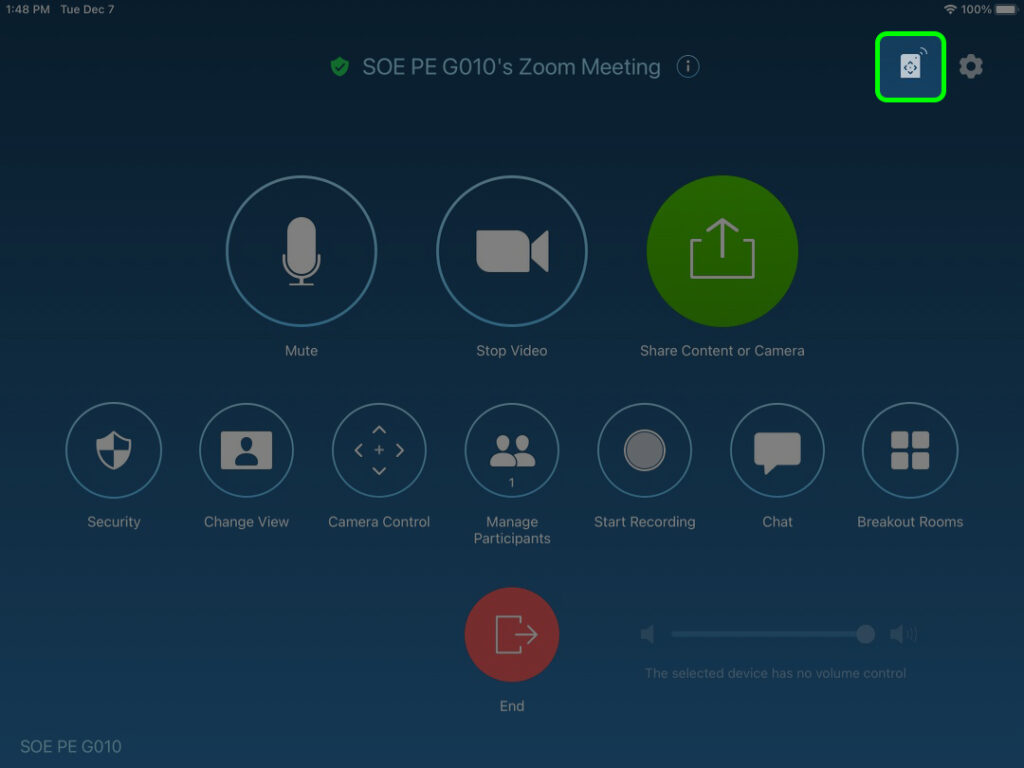
Camera control is also available via the Zoom iPad via the “Room Controls” button, which appears at the top right when a meeting is in progress:
This will bring up the Room Controls menu, and “Camera Control” is the first section:
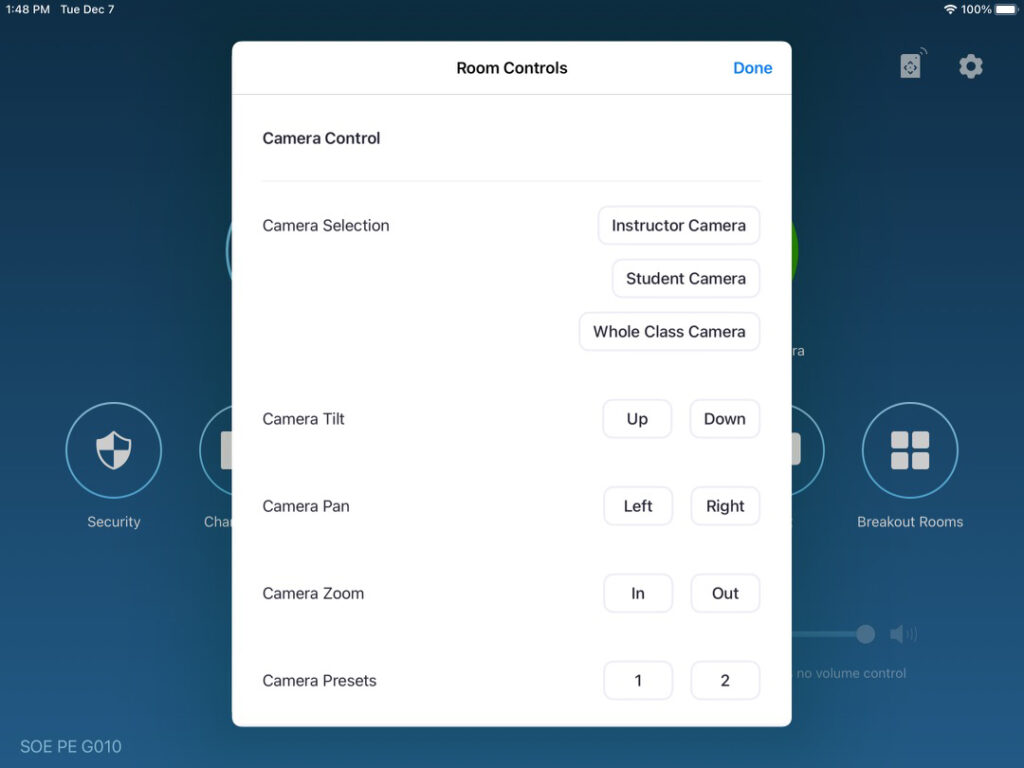
- Instructor Camera: Controllable camera mounted at the back of the room facing the front.
- Student Camera: Controllable camera mounted at the front of the room facing the back.
- Whole Class Camera: Static wide angle camera mounted at the front of the room facing the back.
- Camera Tilt: Tilts the selected controllable camera up/down
- Camera Pan: Pans the selected controllable camera right/left
- Camera Zoom: Zooms the selected controllable camera in/out
- Camera Presets: Recalls helpful presets for the selected controllable camera
Show two things at once
Instructions for showing two things at once
To show separate things on the left/right displays:
1. Push the “System Power” button:

2. Select “Dual Content Mode” from the menu:
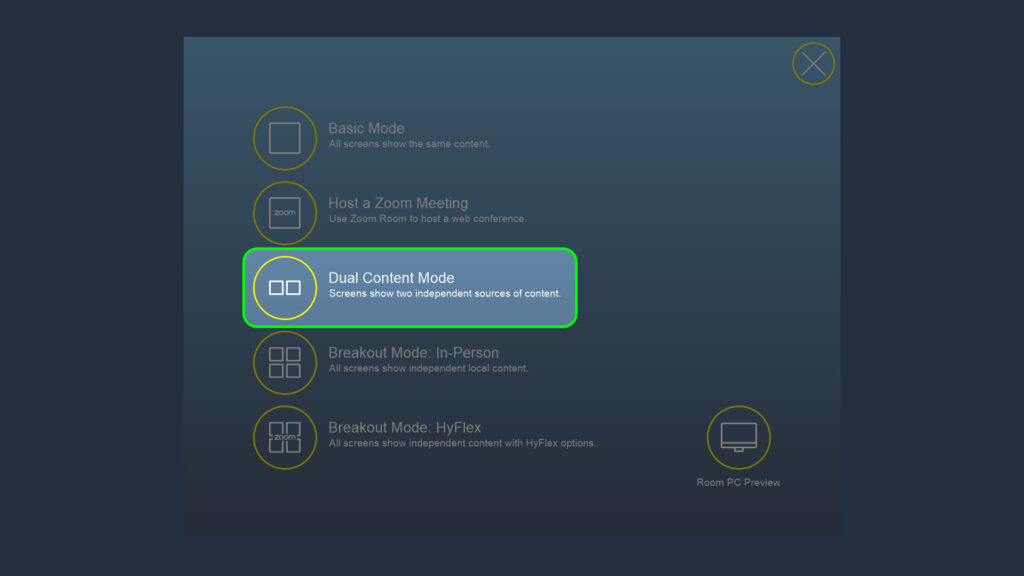
3. Select a separate device to drive content delivery for Display A (left screens) and Display B (right screens) from the input options on the left:
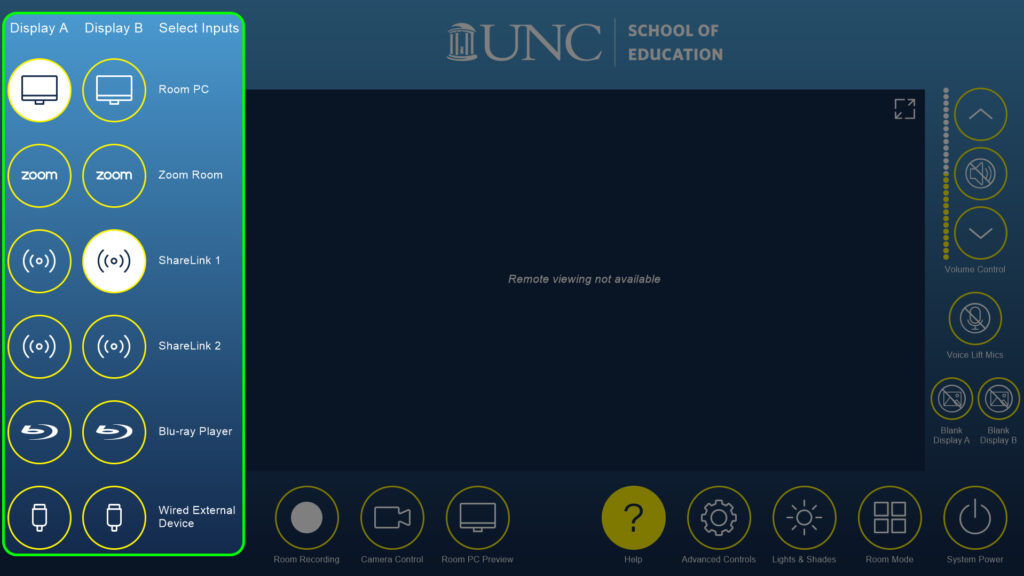
- Room PC: (Display A initial input) Computer dedicated to the classroom. Wireless keyboard and mouse located within the room for control, and a preview will be displayed on screen.
- Zoom Room: Used to conduct video conferences. See Host a Zoom Meeting section for details.
- ShareLink 1 & ShareLink2: (Display B initial input) Collaboration devices used for displaying content from any device wirelessly. See Using Wireless Collaboration with ShareLink for additional information.
- Blu-ray Player: Located within the credenza at the front of the room. Controls and a preview are displayed on screen.
- Wired External Device: Wired (HDMI & USB-C) options to connect a laptop (or other external device) are available in the cable cubby on top of the credenza at the front of the room. Note: Both HDMI & USB-C leverage the same input. Only one wired external device can be displayed at a time.
Conduct breakout group discussions
Instructions for conducting breakout group discussions
To show conduct a breakout group discussion on screen:
1. Push the “System Power” button:

2. Select “Breakout Mode: In-Person” from the menu:
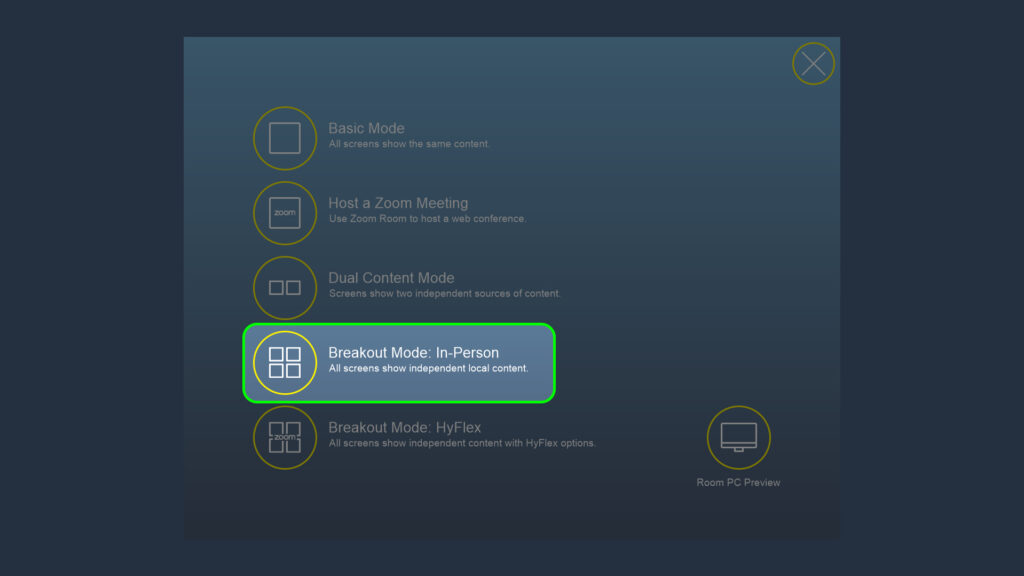
3. Each screen will now show a separate ShareLink device selected as the initial input for each screen to enable wireless collaboration:
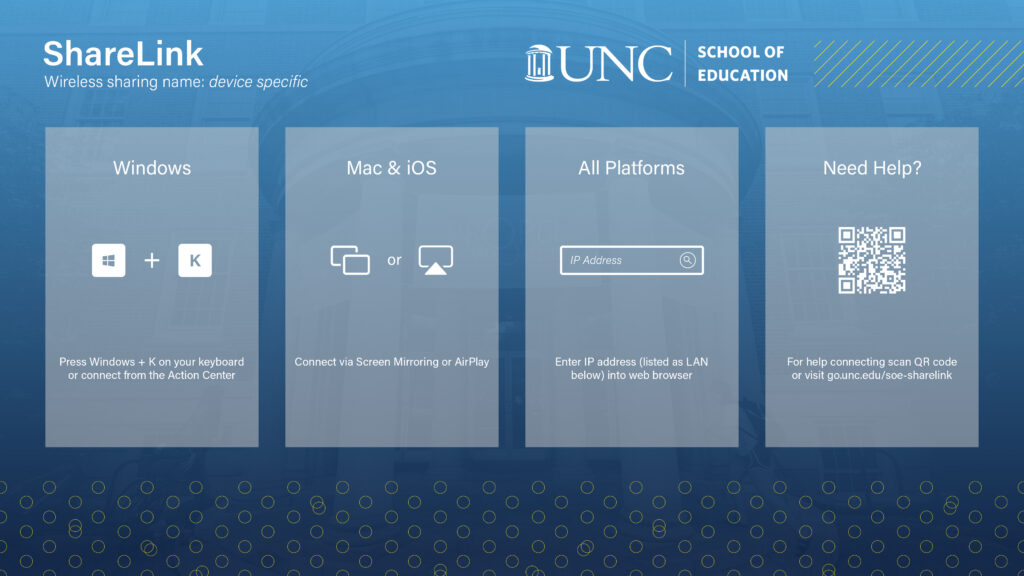
For additional information about connecting, please see: Using Wireless Collaboration with ShareLink
Conduct HyFlex breakout group discussions
Conducting HyFlex breakout group discussions is complex, and has its own guide. Please see: School Agile Classrooms | HyFlex Breakout Guide
Something missing?
If the task you are trying to accomplish is not included here, please describe it via: SOE EdIT Services to request it be added to this guide.
In the meantime, please see the Comprehensive Guide for information about all available functionality.
Need Help?
Need Help? If you need immediate assistance, please submit a help request via help.unc.edu and search for EdIT or Teams message EdIT team member(s). This allows requests for assistance to get to EdIT staff members regardless of their current location.
EdIT does have a support line 919-966-6220 that rings all EdIT members’ office phones. Corresponding tickets are expected within 24 hours for all requests if direct communication is used.