School of Education Advanced Conference Rooms
Overview
Each advanced conference room is setup the same way. Rooms have either single or dual screens and are controlled via a touch panel either mounted on the wall or located on the table. Advanced conference rooms have a dedicated computer, built in Zoom functionality, and a variety of wired and wireless options to connect a laptop.
Advanced Conference Room List
- Dual Screen Rooms
- Single Screen Rooms
- Peabody G002A (Research Commons Conference Room)
Need Help?
If you need immediate assistance, please call EdIT at: 919-966-6220
If you’re interested in a training or consultation, please submit a help request via: SOE EdIT Services
Room Guide
Room Basics
This section covers the basics of operating the School of Education advanced conference rooms.
Powering the Room On and Off
To power the room on, simply push the green power button on the touch panel:

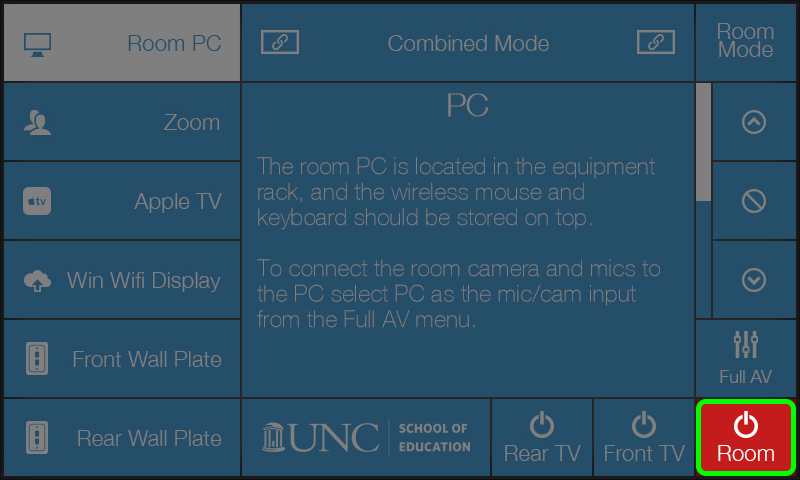
To power the room off:
1. Push the red power button on the touch panel:
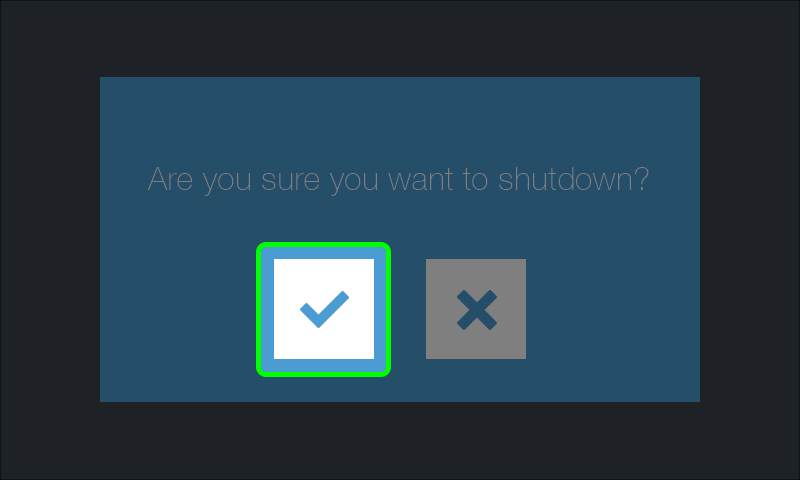
2. Confirm you want to shutdown:
Inputs
By default, the room will boot up and select the room PC as selected input. If you do not see anything on screen, use the mouse/keyboard to ensure the PC is awake.
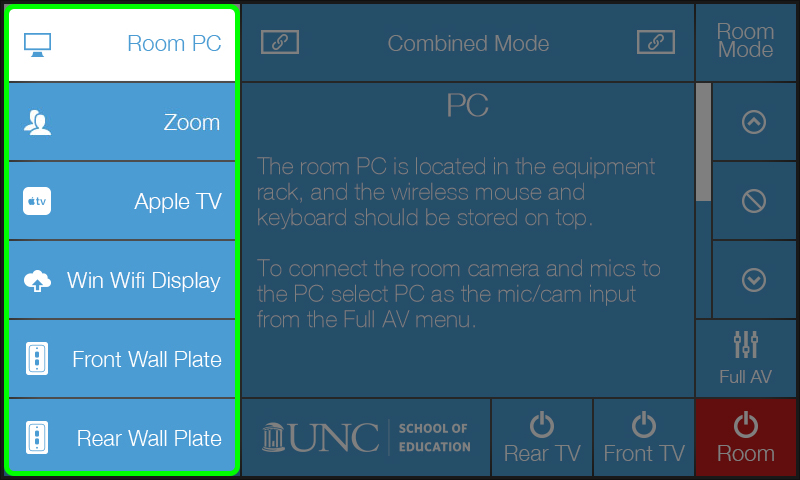
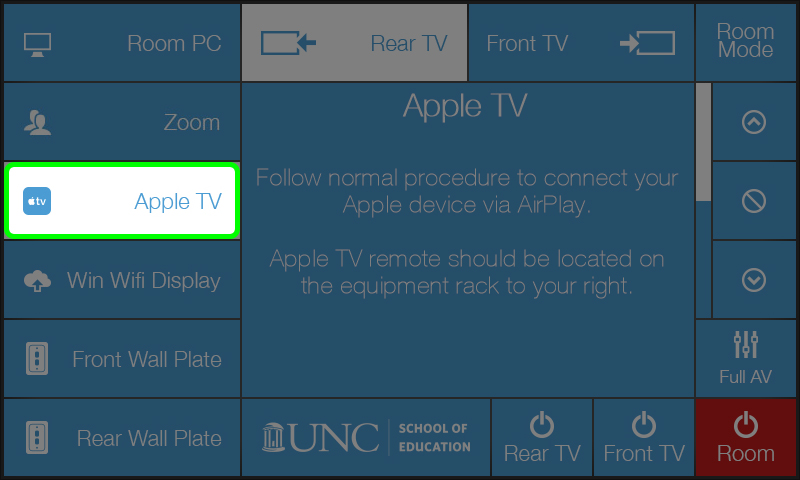
To select a different input, simply push the button corresponding to the desired input on the left side of the touch panel:
Inputs include:
- Room PC: PC dedicated to the conference room. Wireless keyboard and mouse located within the room used for control.
- Zoom: Zoom Room used to conduct video conferences. See Zoom Video Conferencing section for details.
- Apple TV: Used primarily for displaying Mac devices wirelessly via AirPlay. See Using AirPlay for additional information.
- Win Wifi Display: Used for displaying Windows 10 devices wirelessly. See Using Windows Wireless Display for additional information.
- Front/Rear Wall Plate: Wired inputs located at the front or rear of the room for connecting a laptop.*
- Table Wired: Wired inputs located in the table cable cubby for connecting a laptop.*
* Rooms will have either wall plates or table wired inputs depending on if the furniture in the room is mobile. For all wired inputs there are multiple options (HDMI, USB-C, and/or VGA) and the system will auto select whichever is connected. Note: The USB-A cable is for the webcam only and cannot be used to display a device on screen. Each cable is labeled appropriately.
Volume & Display Control
Basic volume and display control is available from the main screen on the touch panel:
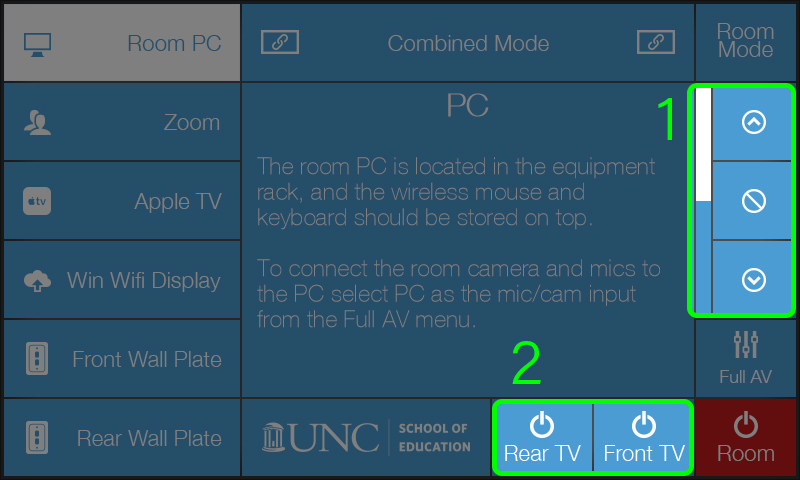
- Volume Control: The bar to the left displays the volume level, the up arrow turns the master volume up, the mute button (middle right) mutes the master volume, and the down arrow turns the master volume down.
- Display Control: The TV power buttons independently turn the displays on and off. All displays power on by default.
Full AV Control
Advanced AV controls are available via the Full AV menu. To open the menu, push the Full AV button from the main screen:
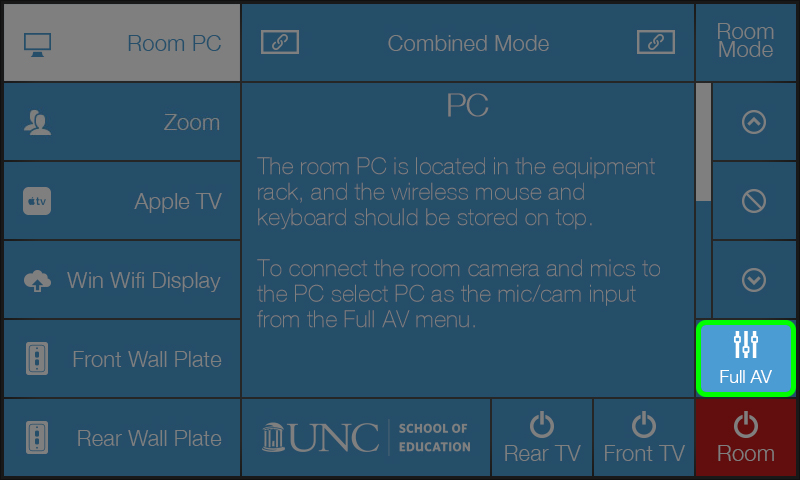
Available controls include:
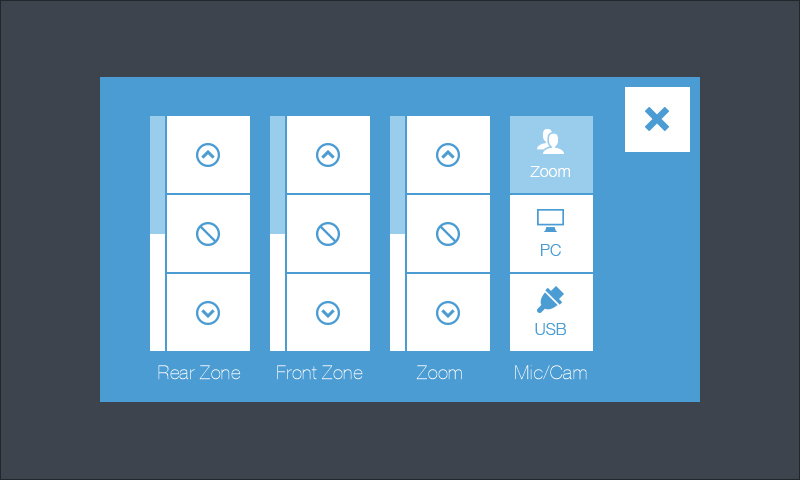
- Master/Zone Volume: Controls the master volume, or independent volume zones where available.
- Zoom Volume: Controls the volume for the Zoom room.
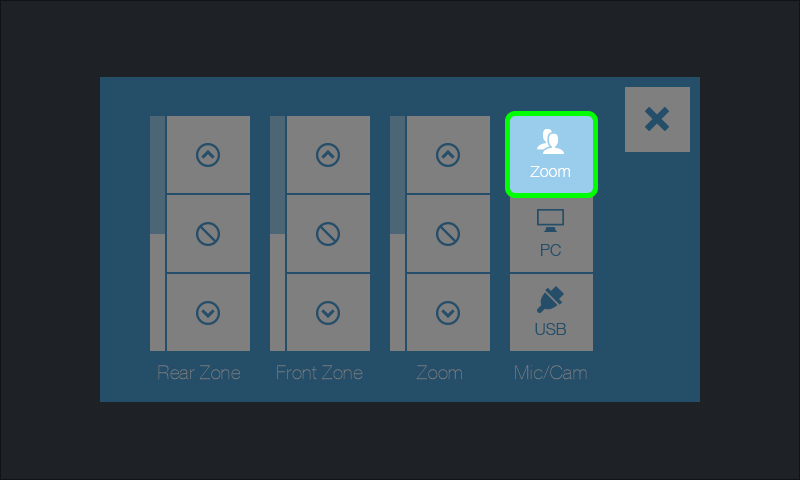
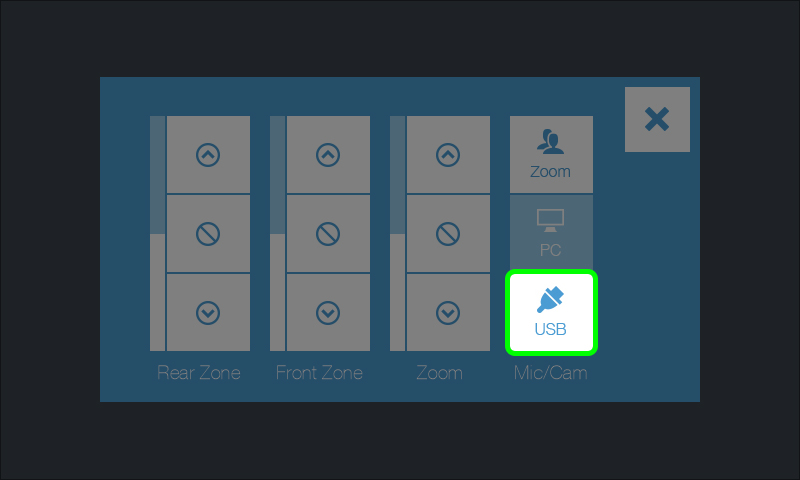
- Mic/Cam Input: Controls which device the room microphones and webcam are connected to.
Combined/Divided Room Mode (dual screen rooms only)
This section covers how to display the same content (Combined Mode) or independent content (Divided Mode) on the dual screens in School of Education advanced conference rooms equipped with this feature.
Changing the Room Mode
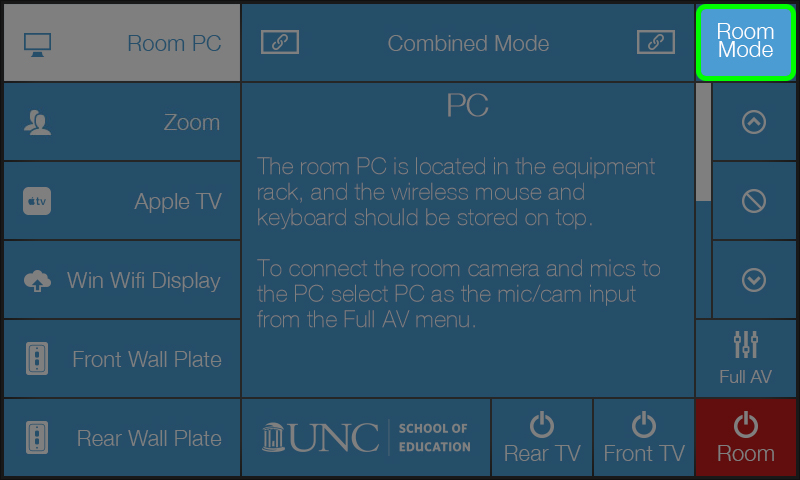
By default, the room will boot up into Combined Mode. To change the room mode:
1. Push the Room Mode button from the main screen:
2. Select the desired mode from the menu:
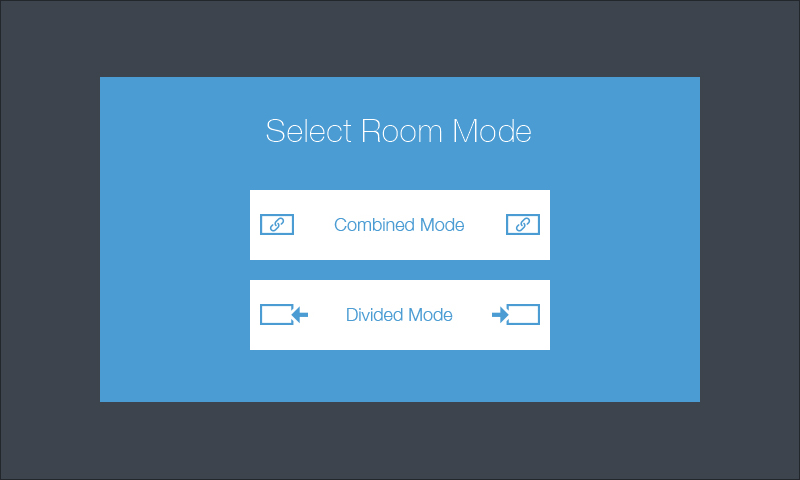
Combined Mode (screens show the same content)
When operating in Combined Mode, whatever input selected from the left side of the touch panel will be displayed on both screens:

Divided Mode (screens show independent content)
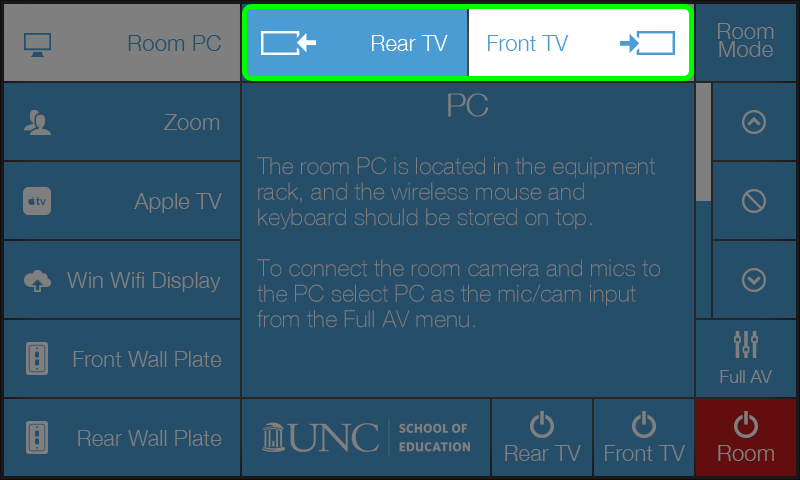
When operating in Divided Mode, to change the display inputs:
1. Select which display to control; the selected display will be highlighted:
2. Select the appropriate input:
Note: Where available, independent audio zones correspond to the front and rear screens. Where not available, the audio will always follow the front screen.
Zoom Video Conferencing
School of Education advanced conference rooms are equipped as a Zoom Room. This enables you to easily join Zoom meetings and participate via the in-room screens, webcam, and microphones.
Starting Up the Zoom Room
The first piece required to bring the Zoom Room up on screen, is to select the Zoom input from the touch panel on the wall by the door.
- Power on the system (if not already on)
- Select Zoom from the list of inputs on the left:
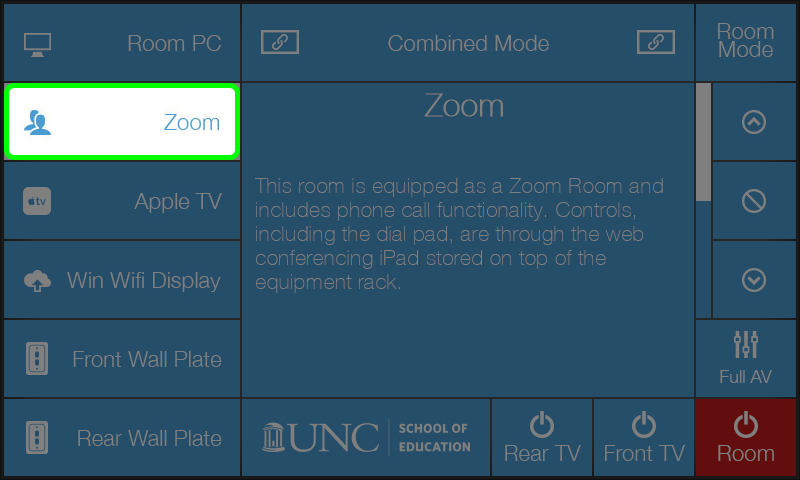
The remainder of the Zoom controls are conducted via the Zoom iPad controller. See the sections below for additional instructions.
Starting or Joining a Meeting
Once the room has been turned on and you have set the room to the Zoom input, you’ll be able to join and manage Zoom meetings via the iPad controller. This iPad should be located in the charging cradle on top of the equipment rack, or on the table near the room control touch panel. Please be sure to replace the iPad in the charging cradle when you’re finished with your meeting!
To join a meeting:
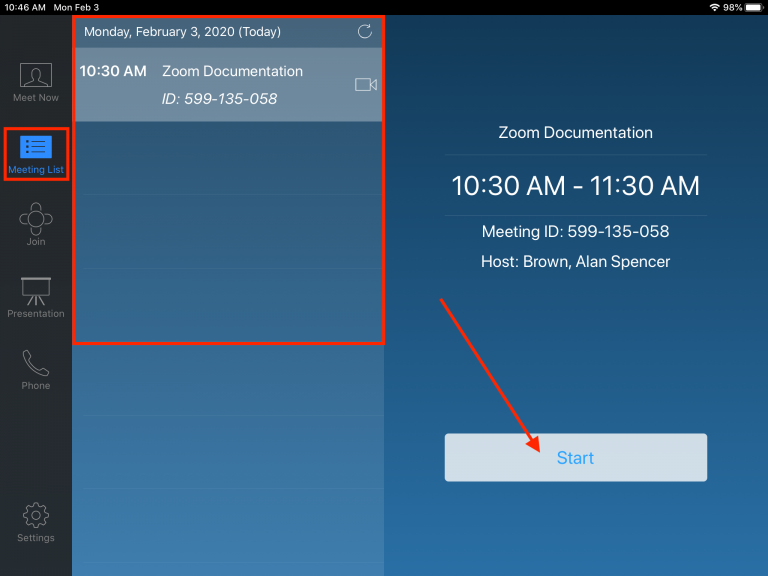
From the Meeting List
- Select “Meeting List” from the options on the left. All meetings that are scheduled in 2010D will appear on this list. If the Zoom Meeting URL or meeting invitation text was included in the Outlook meeting invite when the room was scheduled, a button to start the Meeting will appear.
- Click “Start” at the bottom right. The meeting will start and the room will automatically be joined to the meeting as a meeting host.
Via a Meeting ID
Once the room has been turned on and set to the Zoom input, you’ll be able to join and manage Zoom meetings via the iPad controller. This iPad should be located in the charging cradle on top of the equipment rack. Please be sure to replace the iPad in the charging cradle when you’re finished with your meeting!
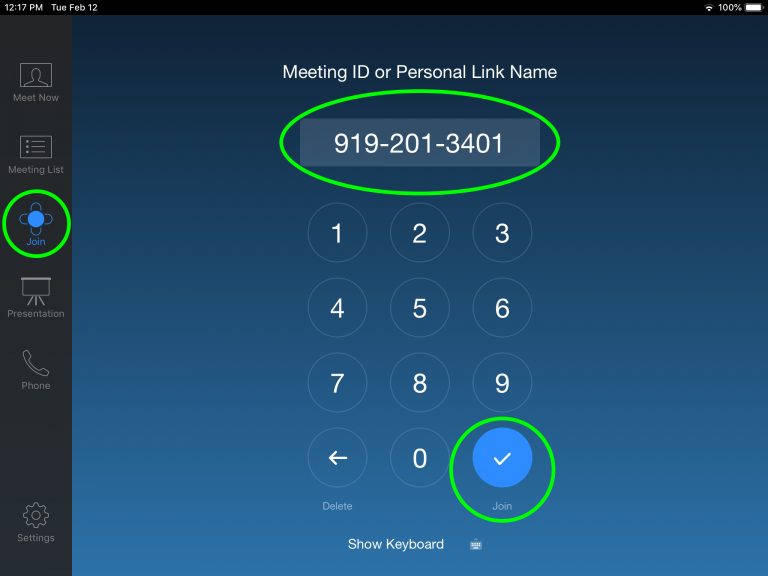
- Select “Join” from the options on the left
- Type in the “Meeting ID” of your meeting via the number pad
- Click “Join” at the bottom right
NOTES:
The SOE Zoom rooms are set to join a Zoom meeting as host for any meeting that was created by a School of Education faculty or staff member.
For users outside the faculty and staff of the School of Education (including students), you will need to take one of the following actions to connecting SOE Zoom rooms to an existing meeting:
- Enabled the setting to “Enable join before host” within the Zoom meeting settings for the meeting. This will allow the room to connect to the Zoom meeting as a participant prior to the host starting a meeting.
- On another device (computer, mobile device), log in to Zoom and start the meeting as the host. Then connect the SOE Zoom Room using the Zoom Meeting ID. The Zoom Room will join the meeting as a participant. If you would like the Zoom room to have the role of meeting host, on the device used to start the meeting, you will need to go to the meeting participant list, choose the Zoom Room and select “Make Host” in the options to the right of the name in the participant list. After the Zoom Room is made the host, you can leave the meeting on the device that was used to start the meeting.
Conducting a Meeting
Once you are in a meeting, the iPad enables you to control the meeting:
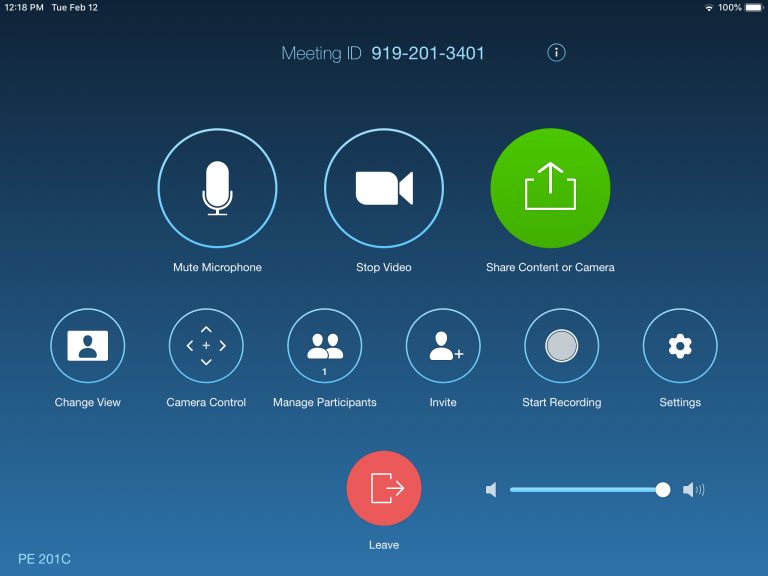
- Mute Microphone: Enables you to mute the room microphones so that remote participants cannot hear you
- Stop/Share Video: Enables you to toggle on/off whether the room camera video is shared with remote participants
- Share Content or Camera: See Zoom: Sharing Content or Camera with a Zoom Room Meeting
- Change View: Enables you to switch between various views of the meeting participant webcams
- Camera Control: Enables control of the in room web cam so you can pan/tilt/zoom
- Host Controls: The following controls are only enabled if the Zoom Room is set as the host. (See note in “Starting or Joining a Meeting section on how to ensure the room is a host.)
- Manage Participants: Allows you to manage audio and video for meeting participants
- Invite: Enables you to invite additional participants
- Start Recording: Enables you to record the meeting
Solutions to Common Problems
Zoom Room shows either webcam and/or microphone is unavailable.
To resolve, follow these steps in sequential order:
- Power cycle the room
- Turn the room technology off via the red power button on the touch panel next to the light switches
- Wait 30 seconds
- Turn the room back on, and switch back to the Zoom input
- If still unavailable, power cycle the equipment rack
- Turn the room technology off via the red power button on the touch panel next to the light switches
- Ensure you’ve powered the room technology off first!
- Unplug the equipment rack in the front corner of the room from the wall
- Wait 30 seconds
- Plug the equipment rack back in
- Turn the room back on, and switch back to the Zoom input
Webcam is stuck pointed at the ground and will not pan/tilt/zoom.
Note: all resolutions to this issue will cause you to temporarily see the “webcam and/or microphone unavailable” error above temporarily, and therefor lose connection to any meeting in progress.
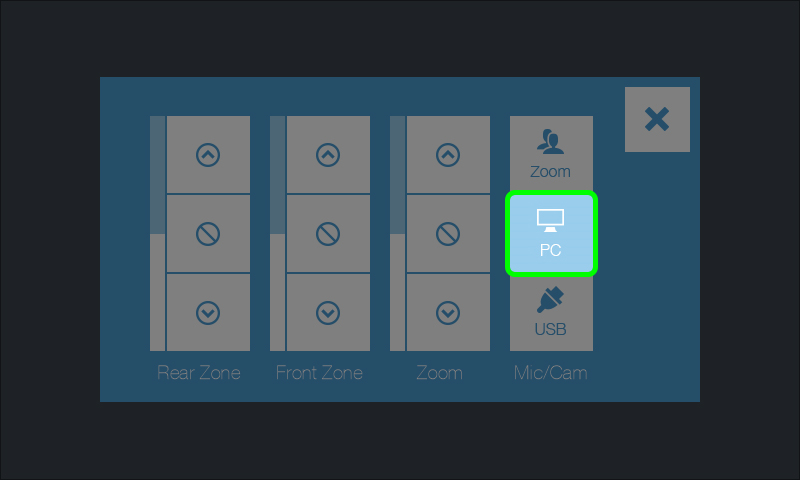
- Open up the “Full A/V” control from the touch panel next to the light switches:

- Toggle Mic/Cam connection off of Zoom to PC or USB and back to Zoom
- If still unresponsive, there is a cable plugged into the back of the webcam. Unplug this cable and plug it back in.
For more information about using Zoom, please visit the UNC Zoom software site.
Connecting the Webcam & Mics to the PC or a Laptop
By default, the webcam and microphones in the SOE advanced conference rooms are connected to the Zoom room. This is required for Zoom conferencing or telephone calls, however it is possible to connect them to either the room PC or a laptop to host video conferences from the platform of your choice.
Connecting Webcam/Mics to the PC
1. Open the Full AV menu:

2. Select PC from the Mic/Cam Input button group:

Connecting Webcam/Mics to a Laptop
1. Connect your laptop to the USB cable labeled “webcam only” at either the front wall plate, or table wired inputs.
2. Open the Full AV menu:

3. Select USB from the Mic/Cam Input button group:
Need Help?
Need technical help? If you need immediate assistance, please submit an EdIT help request or Teams message EdIT team member(s). This allows requests for assistance to get to EdIT staff members regardless of their location. EdIT also has a support line — 919-966-6220 — that rings all EdIT members’ office phones.
If you contact EdIT via Teams or phone, please also submit a help ticket within 24 hours of your help request.