School Agile Classrooms | Comprehensive Guide
Overview
This guide is designed to be a comprehensive overview of all features of the Agile Classrooms, and as such can be overwhelming. It is recommended you use this guide in bite-sized chunks, leveraging the table of contents above to find the specific information you are looking for.
If you would prefer a task-based approach, please see: School Agile Classrooms | Task-Based Guide
Need Help?
If you need immediate assistance, please call EdIT at: 919-966-6220
If you’re interested in a training or consultation, please submit a help request via: SOE EdIT Services
Room Guide: The Basics
Room Basics
This section covers the basics of operating the School of Education Agile Classrooms.
The Credenza

- AV system control touch panel – the majority of this guide focuses on the controls available here. This can also be used as the Room PC monitor, please see “Room PC Monitor” below for additional information.
- Mouse and keyboard for the Room PC.
- Cable cubby with power options and wired connections. Please see “Wired Connections” below for additional information.
- Zoom iPad control. Please see Host a Zoom Meeting for additional information.
- Stored inside the credenza:
- Wireless microphones. Please see In-Room Microphones for additional information.
- Coming Soon: iPad for mobile AV control. Please see Mobile AV Control iPad for additional information.
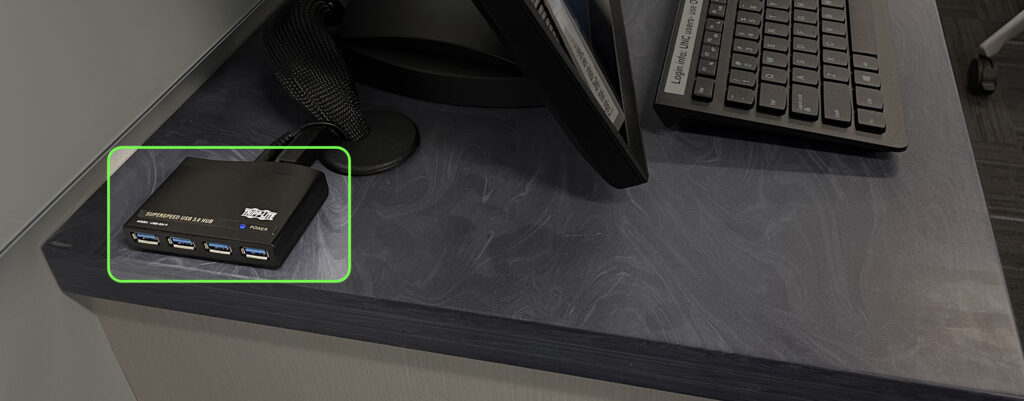
There is also a USB hub available for easy connection to the in-room computer available behind the main touch panel:
Room PC Monitor
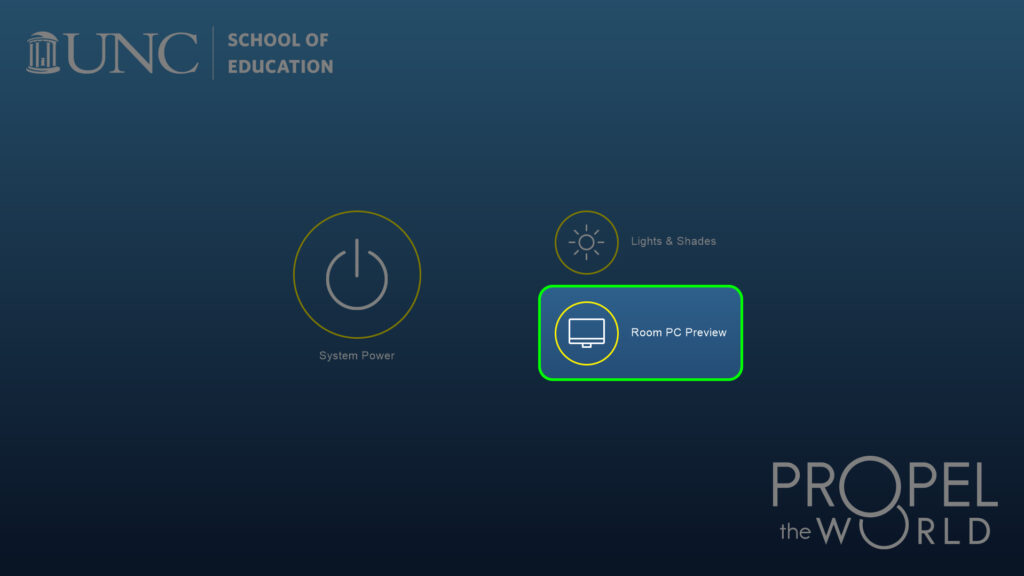
Similar to the General Purpose Classrooms on campus, the Agile Classrooms do not have a dedicated monitor for the room PC. The AV system control touch panel can be used as a monitor when needed. To use the touch panel as a full screen PC preview, look for the “Room PC Preview” button. This button can be found on the following screens:
The Start Screen:
The Common Controls Area:

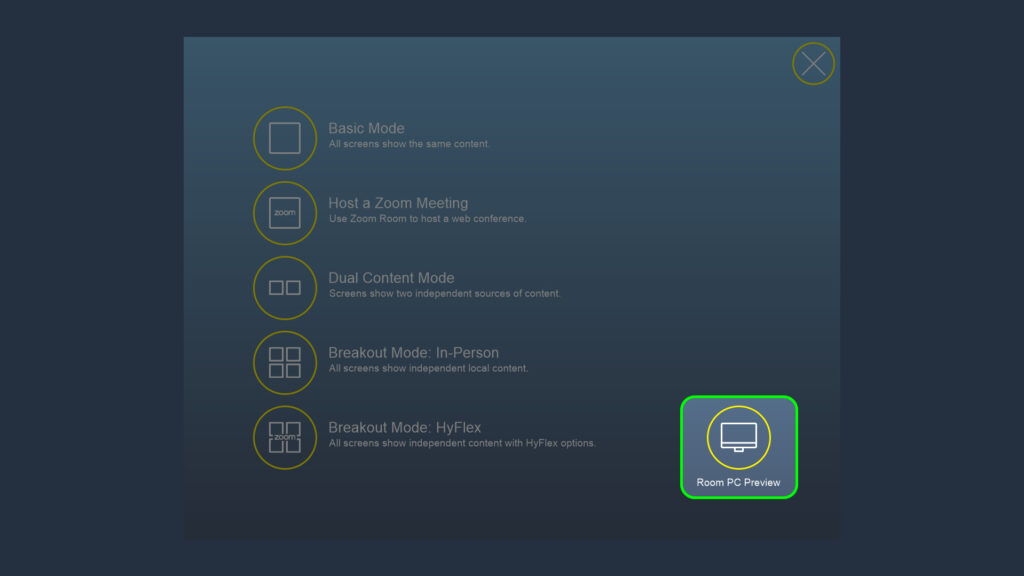
The Room Mode Screen:
Pushing this button will present a full screen preview of the PC on the touch panel, but not automatically share it on any of the screens in the room. To exit this preview, tap anywhere on the screen.
The Start Screen
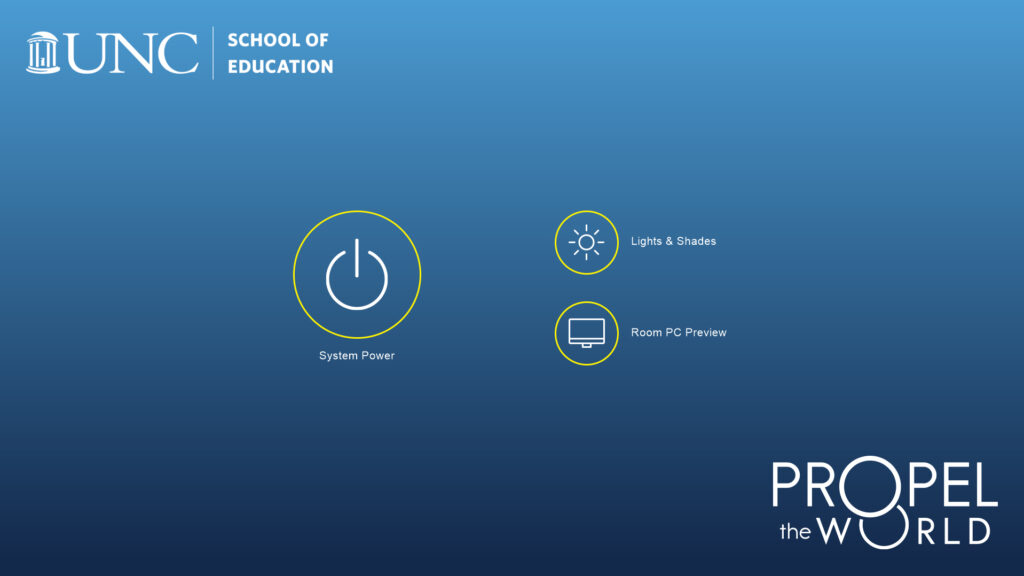
Powering The Room On
1. Push the “System Power” button:
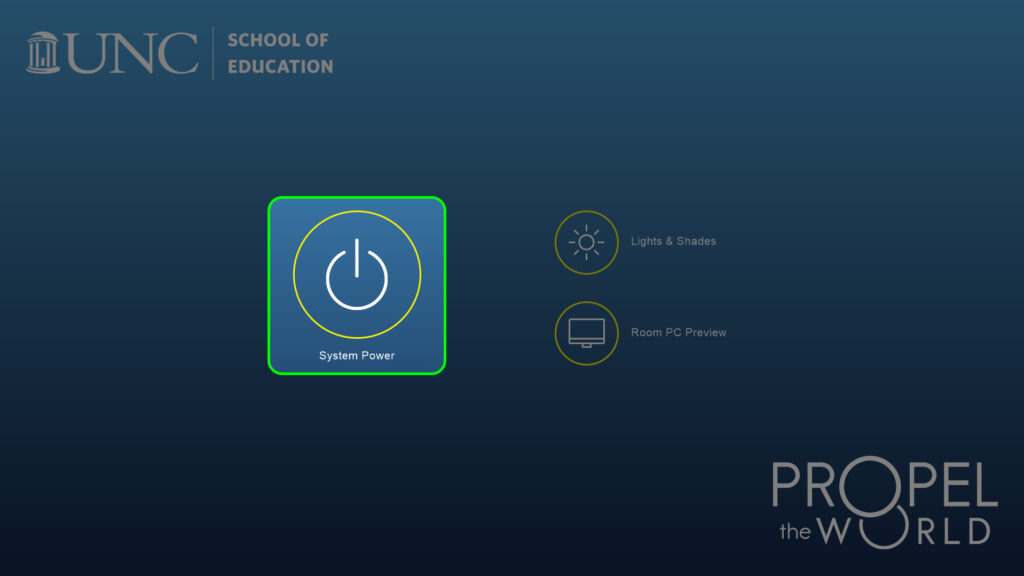
2. Select the room mode you would like to use:
Other Start Screen Controls
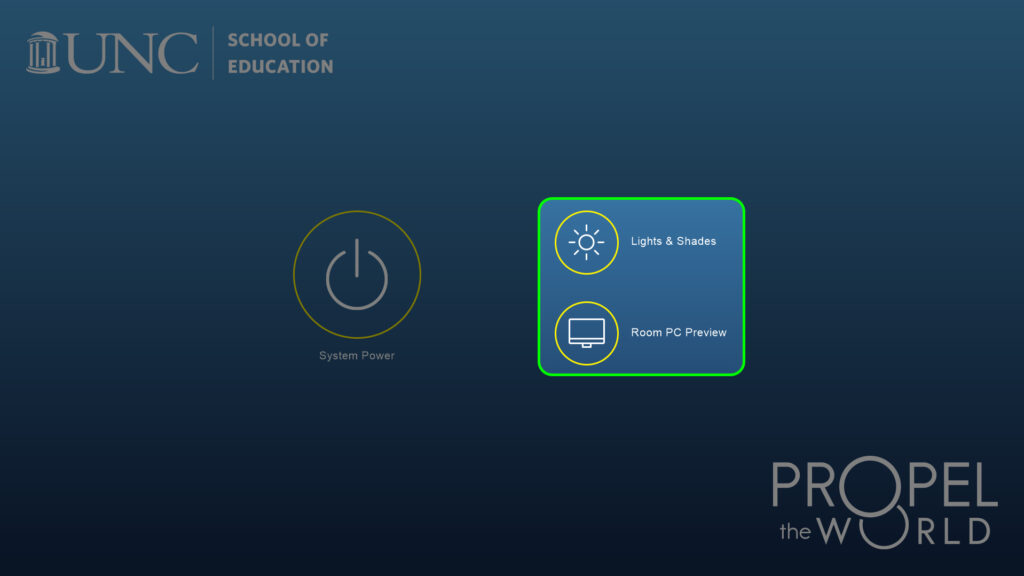
- Lights & Shades: Brings up the lighting and shade controls without starting the AV system.
- Local PC Preview: Agile Classrooms do not have a dedicated monitor for the Room PC. This will bring up a full screen preview of the PC without starting the AV system.
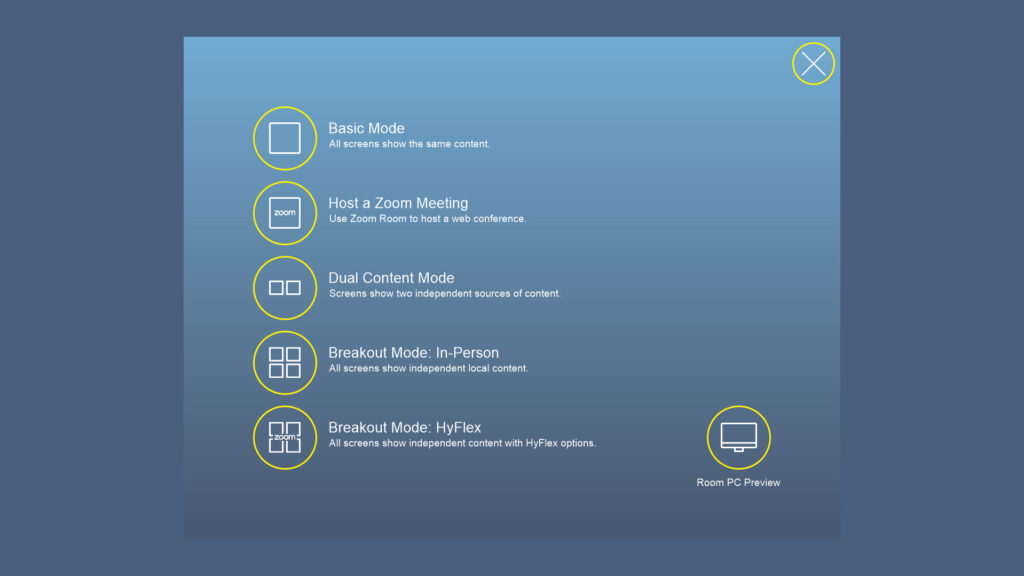
Room Modes Explained
Room modes are the different ways in which the room can be used. When starting up the room, you will be prompted to select a room mode, and you can also change room modes from the common controls at the bottom right:

Once you access the Room Mode menu, you will be presented with the following options:
Basic Mode
In Basic Mode, all eight screens show the same content. This mode will start with the Room PC selected as the initial input, but additional options are available. For more information about inputs and controls, see: Basic Mode
Host a Zoom Meeting
This mode functions exactly the same as Basic Mode, except it will start with Zoom Room selected as the initial input. For information on how to host your meeting, please see: Host a Zoom Meeting
Dual Content Mode
In Dual Content Mode, Display A (the left screen on each wall) shows one source of content and Display B (the right screen on each wall) can show a second source. The Room PC will start as the initial input for Display A and ShareLink 1 as the initial input B, but additional options are available. For information about inputs and controls, please see: Dual Content Mode
Breakout Mode: In-Person
In Breakout Mode: In-Person, all eight screens show independent local content to facilitate breakout activities. This mode will start with a separate ShareLink device selected as the initial input for each screen to enable wireless collaboration. For information about inputs and controls, please see: Breakout Mode: In-Person
Breakout Mode: HyFlex
Breakout Mode: HyFlex functions the same as Breakout Mode: In-Person, except some screens are Zoom capable to facilitate breakout activities with a combination of in-person and remote students. The only difference in the two breakout modes are the initial inputs. In Breakout Mode: HyFlex the initial input for each screen is either Zoom or a ShareLink device, depending on capabilities. For information about inputs and controls, please see: Breakout Mode: HyFlex
Room PC Preview
Agile Classrooms do not have a dedicated monitor for the Room PC. This will bring up a full screen preview of the PC.
Wired Connections
The recommended approach for connecting your laptop (or another external device) to the system is wirelessly via one of the various ShareLink devices. Simply select “ShareLink” as your input and follow the on screen prompts to connect, or visit Using Wireless Collaboration with ShareLink for additional information.
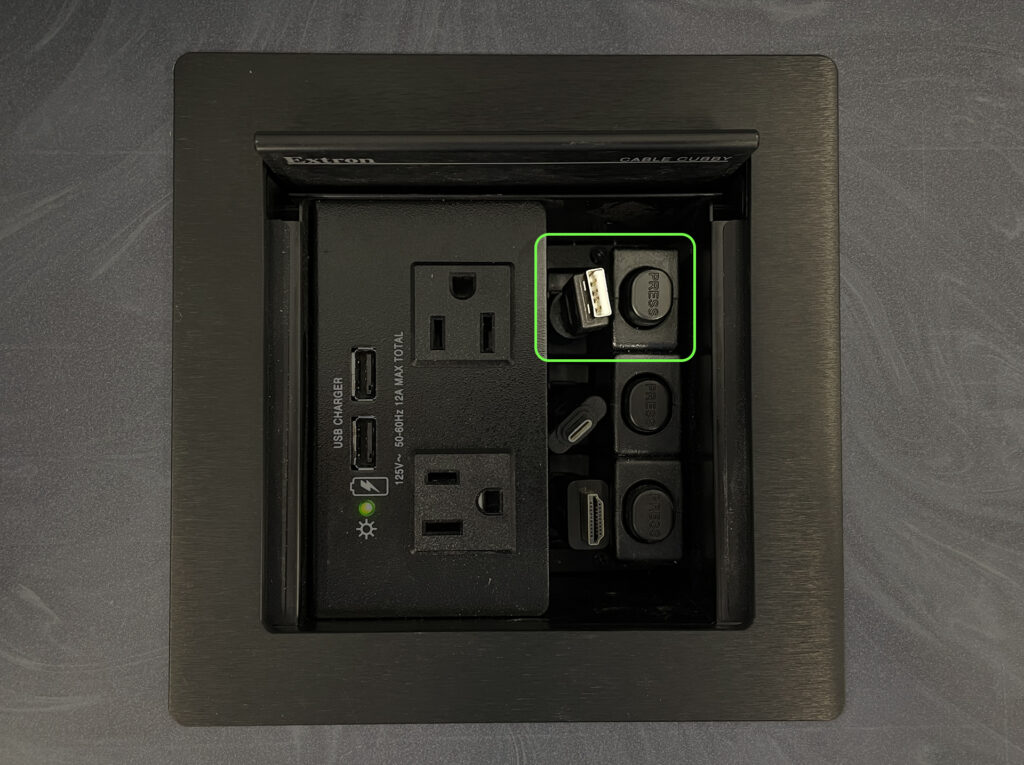
That said, wired connections are available via the cable cubby on the credenza at the front of the room:
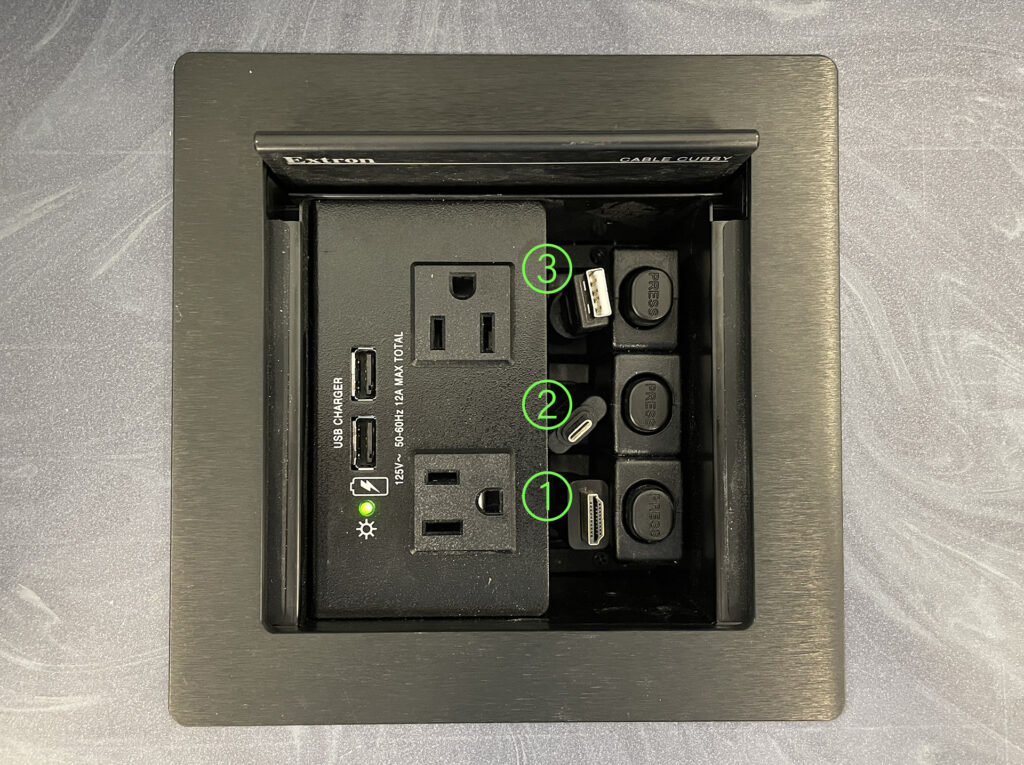
- HDMI connection for projecting audio and video via “Wired External Device” input*
- USB-C connection for projecting audio and video via “Wired External Device” input*
- USB cable for connecting the in-room cameras and microphones to an external device. Note: This connection does not provide the ability to project audio or video to the screens.
*Only one “Wired External Device” input is available at a time.
Common Controls
There are five common buttons at the bottom right of the screen in the same location, regardless of room mode. These are referred to as the common controls:
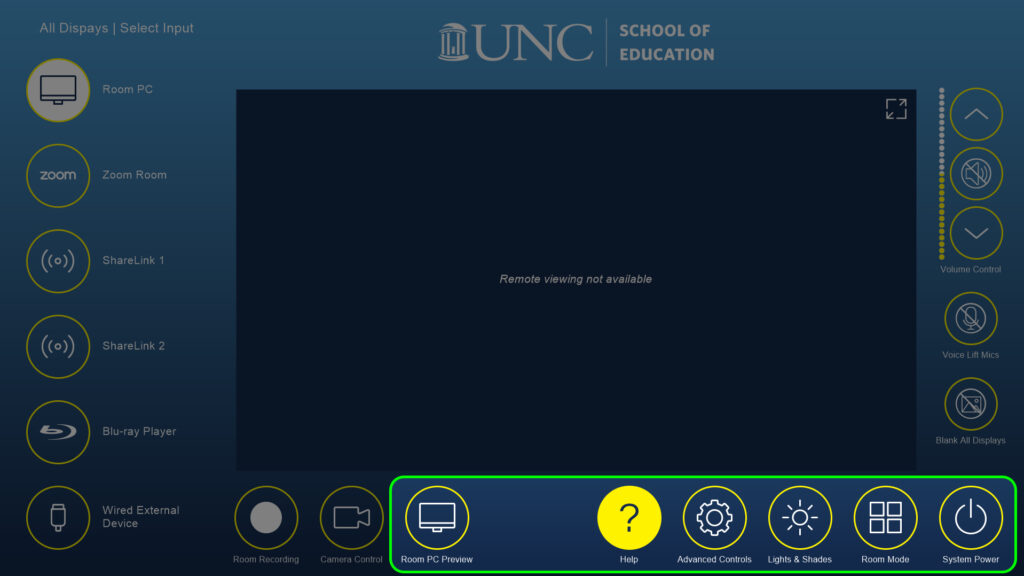
- Room PC Preview: Brings up a full screen preview of the Room PC.
- Help: Brings up the contact information for EdIT to request immediate assistance, as well as a link to this resource.
- Advanced Controls: Brings up the advanced controls menu. For more information please see: Advanced Controls
- Lights & Shades: Brings up the lighting and shade controls. For more information, please see: Lights & Shades
- Room Mode: Brings up the room mode menu. For more information, please see the “Room Modes Explained” section above.
- System Power: Begins the shutdown process.
Voice Lift
When operating the room in Basic or Dual Content Modes, the ceiling microphones amplify the voices of people in one area of the room just enough so that those in other areas can hear them clearly. The results are very subtle, but effective – so keep side conversations to the hallway! Voice Lift is enabled in Basic and Dual Content modes, and is disabled in Breakout Mode.
If you would like to mute/unmute the Voice Lift function from Basic or Dual Content modes, simply push the Voice Lift Mics mute button:
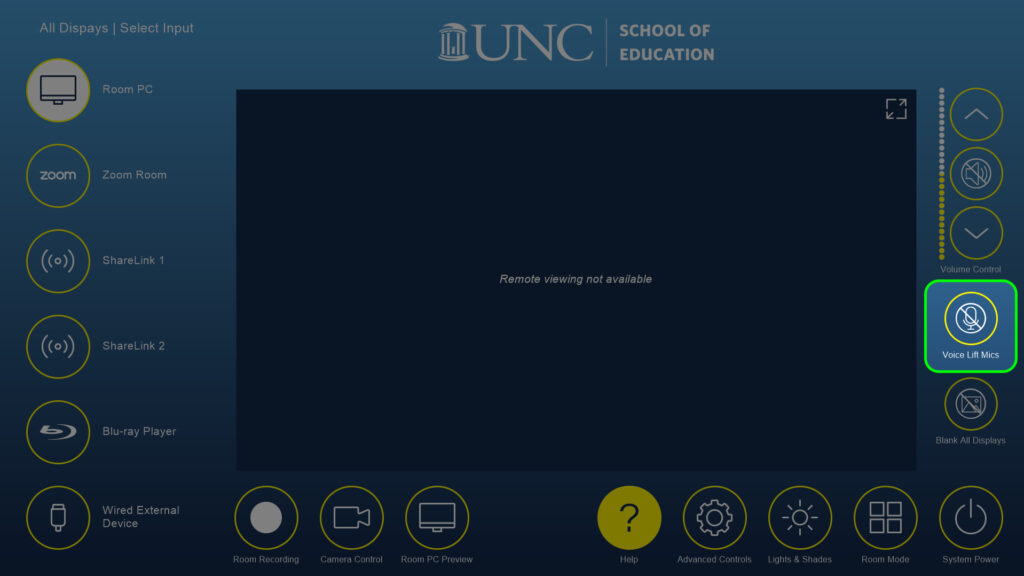
Voice Lift mute/unmute is also available on the Audio Mixer screen.
Lights & Shades
The lights and shades in the room can be controlled via the wall switches or the AV system. Powering on/off the AV system will not automatically make any changes to the lights or shades.
Wall Switch: Lights
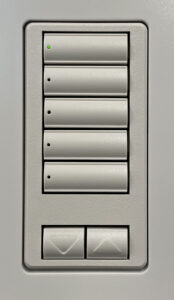
Top Buttons
- (Top) Sets all lights to 100%
- Sets all lights to 75%
- Sets all lights to 50%
- Sets all lights to 25%
- (Bottom) Turns all lights off
Arrow Buttons
- Down: Dims all lights
- Up: Brightens all lights
Wall Switch: Shades
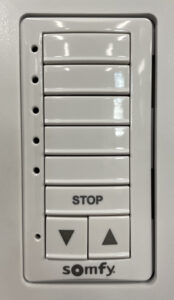
To operate the shades via the light switch:
- Select which shade(s) you would like to control by pushing the top buttons. The left most shade will be the top button, and moving left to right for the shades, the button selection is top to bottom.
- Push the up or down button to raise or lower the shade(s).
- Optional: Push stop if you would like to stop the shades mid-way up or down.
AV System: Full Room Control
1. Open the “Lights & Shades” menu from the common controls at the bottom right of the screen:

2. Utilize the “Full Room” section at the top of the Lights & Shades menu:
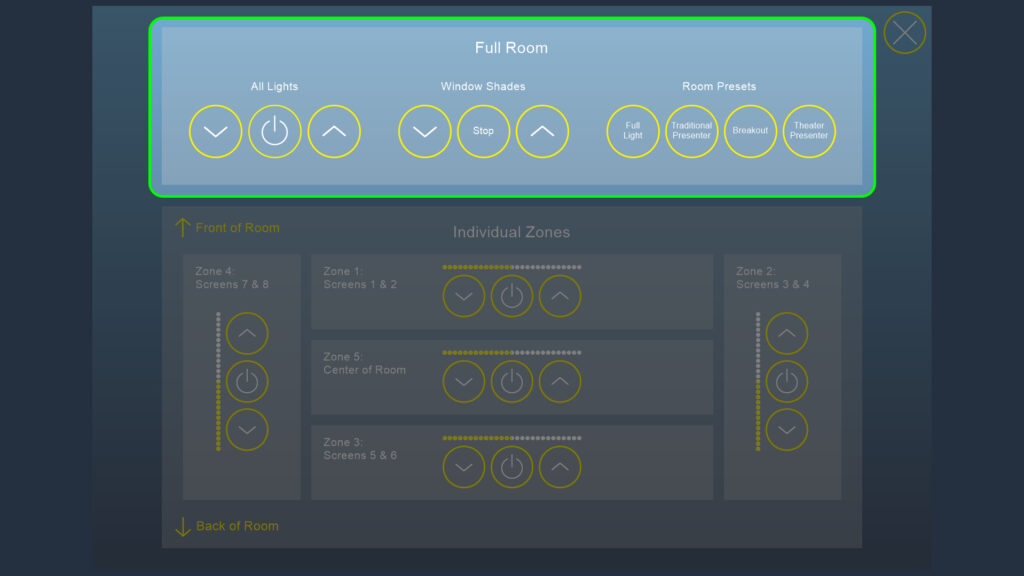
- All Lights: Turns all lights on/off and adjusts brightness as needed.
- Window Shades: Raises/lowers all window shades (with the ability to stop partially up/down).
- Room Presets: Recalls common lighting/shade combination room presets.
- Full Light:
- Sets all lights in the room to 100%
- Opens the shades
- Traditional Presenter:
- Sets the lights at the front of the room to 25%, and the rest to 75%
- Opens the shades
- Breakout:
- Sets the lights at all screens to 25%, and the center of the room to 75%
- Closes the shades
- Theater Presenter:
- Sets the lights at the front of the room to 100%, and turns the rest off
- Closes the shades
- Full Light:
AV System: Individual Lighting Zone Control
1. Open the “Lights & Shades” menu from the common controls at the bottom right of the screen:
2. Utilize the “Individual Zones” section at the bottom of the Lights & Shades menu:
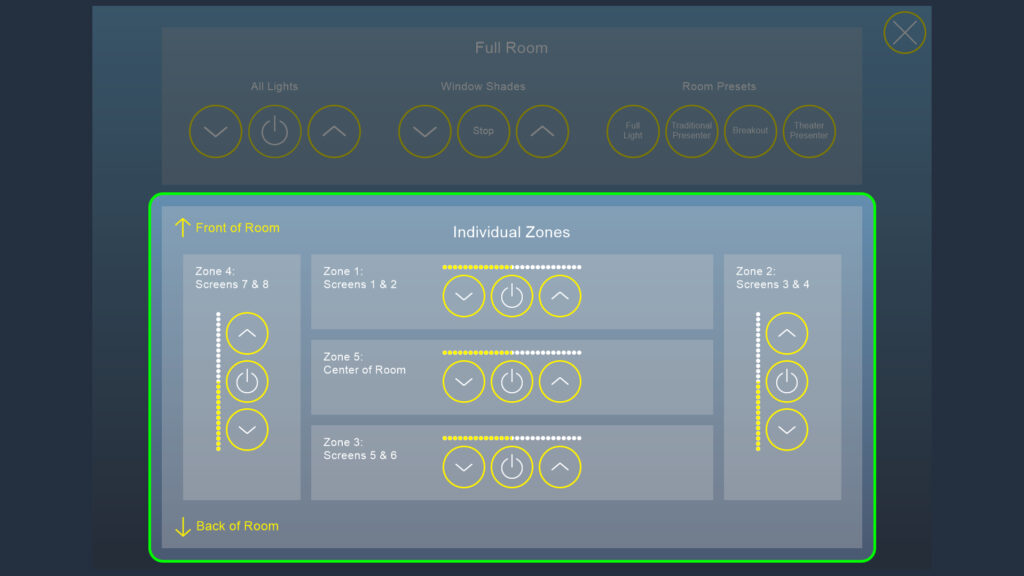
This portion of the menu can be viewed as a map of the room, with the front of the room at the top and the back at the bottom. Here you can control the power and brightness for lighting zones around the room independently:
- Zone 1: Front of the room; lights associated with Displays 1 & 2.
- Zone 2: Right of the room (facing front); lights associated with Displays 3 & 4.
- Zone 3: Back of the room; lights associated with Displays 5 & 6.
- Zone 4: Left of the room (facing front); lights associated with Displays 7 & 8.
- Zone 5: Center of the room; lights not associated with any displays.
Room Guide: Room Modes
Basic Mode
In Basic Mode, all eight screens show the same content. This mode will start with the Room PC selected as the initial input, but additional options are available. Below are details on available inputs and basic controls.
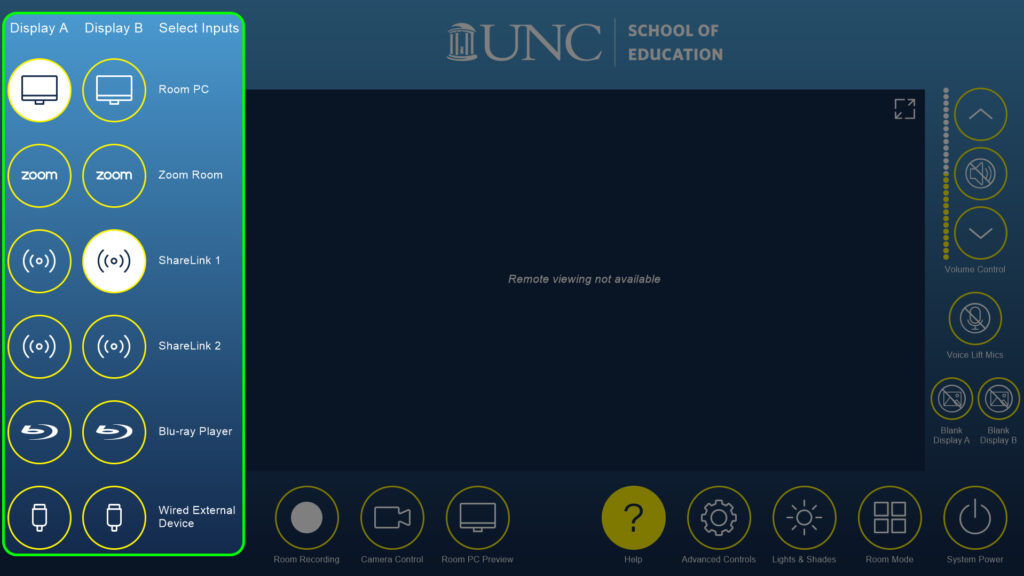
Inputs
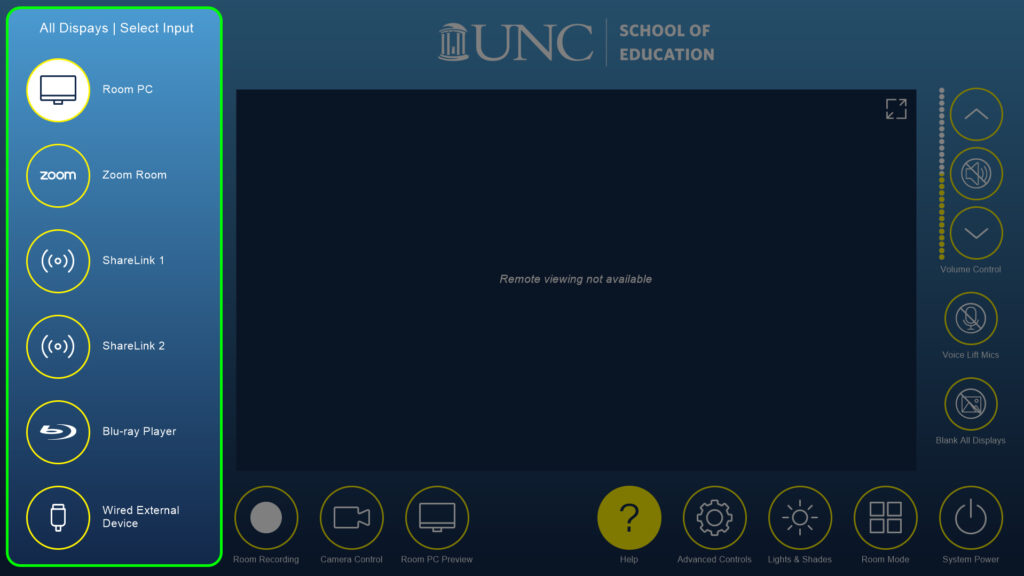
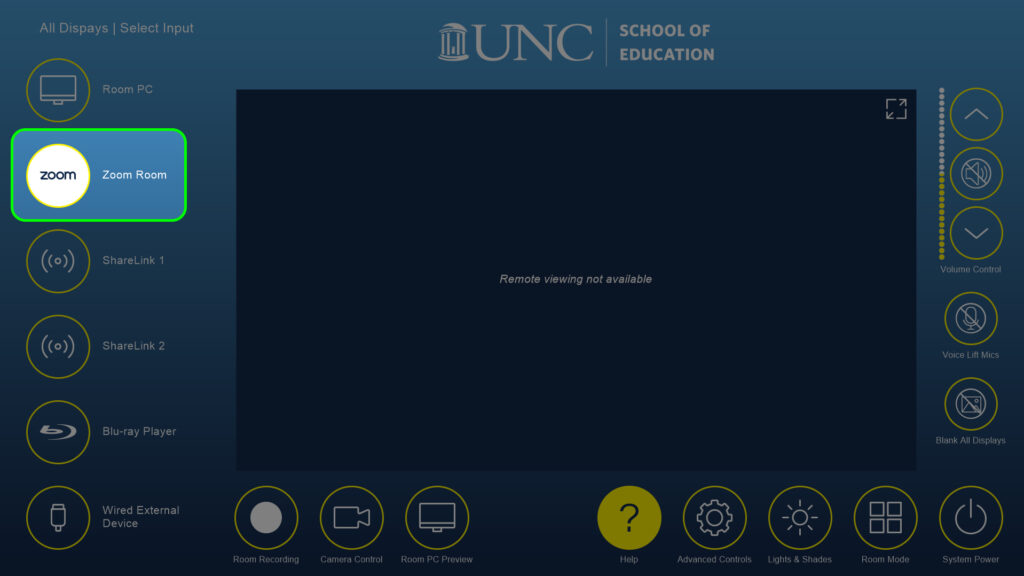
Available inputs are located on the left side of the Basic Mode screen. To change inputs, simply press the button next to your desired device:
- Room PC: (initial input) Computer dedicated to the classroom. Wireless keyboard and mouse located within the room for control, and a preview will be displayed on screen.
- Zoom Room: Used to conduct video conferences. See Host a Zoom Meeting section for details.
- ShareLink 1 & ShareLink2: Collaboration devices used for displaying content from any device wirelessly. See Using Wireless Collaboration with ShareLink for additional information.
- Blu-ray Player: Located within the credenza at the front of the room. Controls and a preview are displayed on screen.
- Wired External Device: Wired (HDMI & USB-C) options to connect a laptop (or other external device) are available in the cable cubby on top of the credenza at the front of the room.
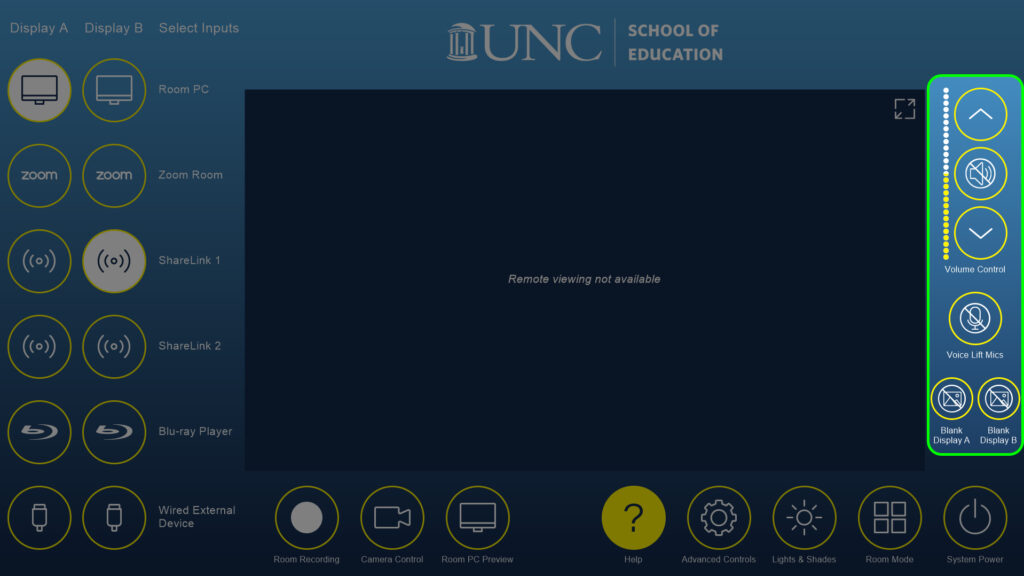
Volume & Display Control

Volume Control
Controls the volume (all inputs & microphones) and mute for all room audio. For additional volume control, including microphone control, please see the Audio Mixer section.
Voice Lift Mics
Mutes/unmutes the Voice Lift functionality. For information about Voice Lift, please see the Room Basics section.
Blank All Displays
Provides the ability to temporarily blank all the displays in the room, giving presenters the ability to hide on screen activity from participants. Note: This does not mute the volume.
For information on how to turn specific screens on/off and raise/lower projection screens, please see the Screen Power section.
Additional information about features available in Basic Mode can be found in the Room Guide: Advanced Features section.
Host a Zoom Meeting
This mode functions exactly the same as Basic Mode, except it will start with Zoom Room selected as the initial input. Below are details on how to host your meeting.
Inviting Agile Classrooms to Your Zoom Meeting
Note: This is optional, to make joining the meeting from the room easier.
For the meeting to show up in the meeting list, you must first invite the room to your meeting. Since the classrooms are scheduled centrally, this must be done separately by the meeting host. To invite the Agile Classrooms to your Zoom meeting, simply include the appropriate room in your outlook invitation that includes the Zoom information:
- Peabody G010: SOE_PE-G010.rmb@ad.unc.edu
- Peabody 2040: SOE_PE-2040.rmb@ad.unc.edu
Note: Inviting Agile Classrooms to your Zoom meeting is not a replacement for scheduling the room via the School Registrar. To reserve School of Education classrooms, please submit a request via: SOE Registrar Request
Showing Your Zoom Meeting On Screen
To show your Zoom meeting on screen, ensure “Zoom Room” is selected as your input. This is done for you automatically if you select “Host a Zoom Meeting” from the Room Mode screen, or can be done manually from the Basic Mode, or Dual Content Mode screens:
Starting or Joining a Meeting
Once you have “Zoom Room” selected as the input to display on screen, you join and manage your Zoom meetings via the Zoom iPad stored on top of the credenza:
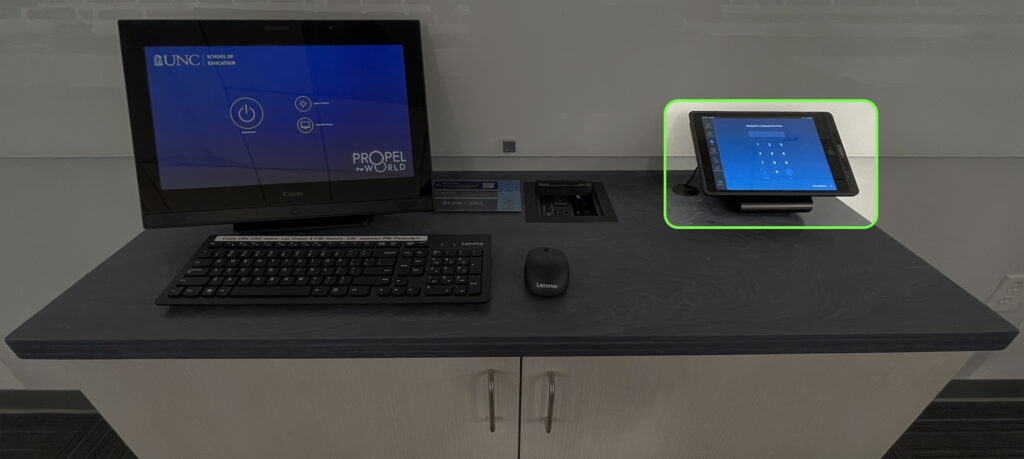
Please return the iPad to the charging dock when you are finished with the room.
To Join a Meeting From the Meeting List:
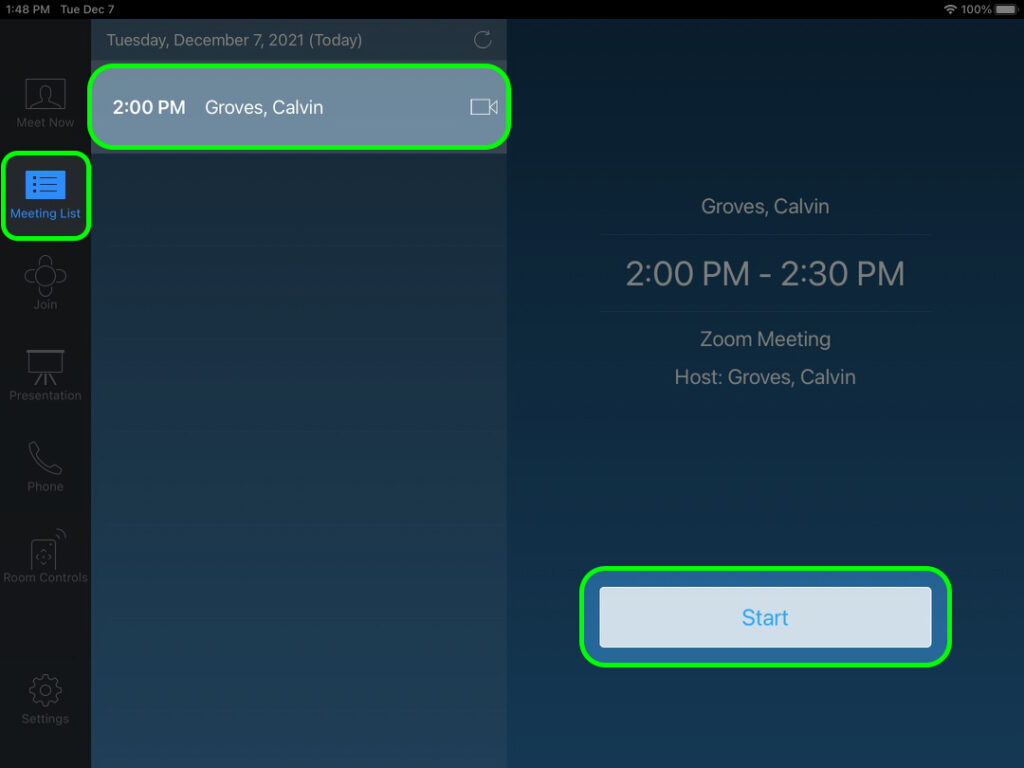
- Select “Meeting List” from the options on the left
- Select your meeting from the list in the center
- Click “Start” on the right
Note: For your meeting to show up in this list, you must invite the room to your meeting. Please see “Inviting Agile Classrooms to your Zoom Meeting” above.
To Join a Meeting via Meeting ID:
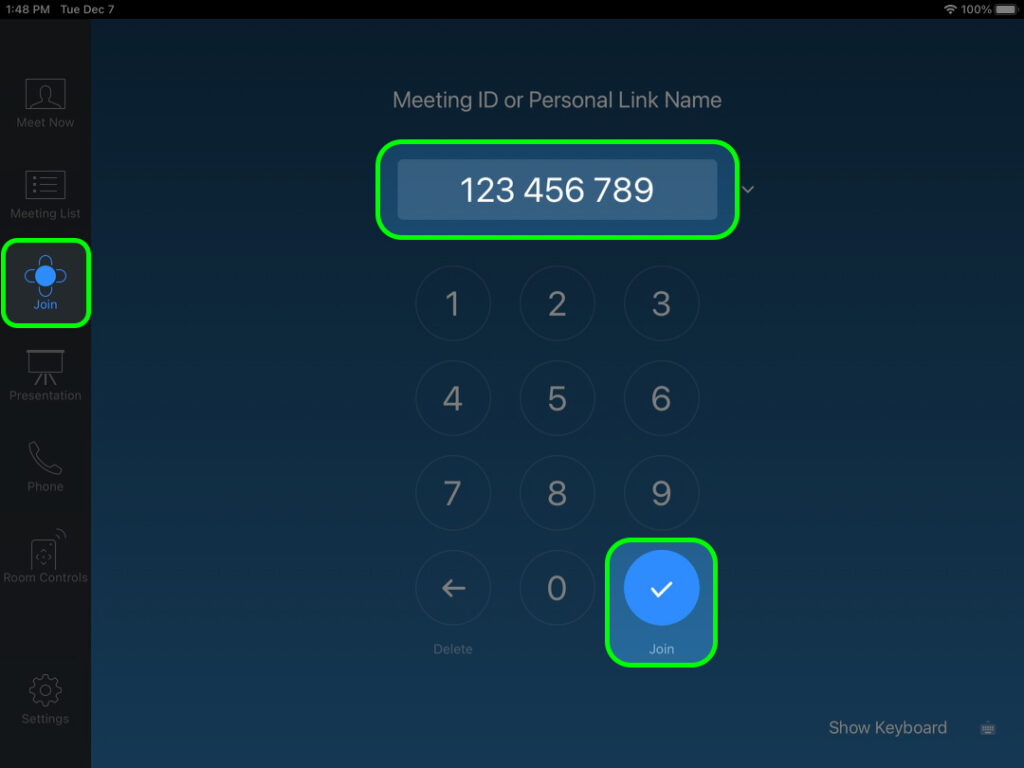
- Select “Join” from the options on the left
- Type the “Meeting ID” of your meeting via the number pad
- Click “Join” at the bottom right
Conducting a Meeting
Once you have started/joined a meeting, the Zoom iPad enables you to control the meeting:
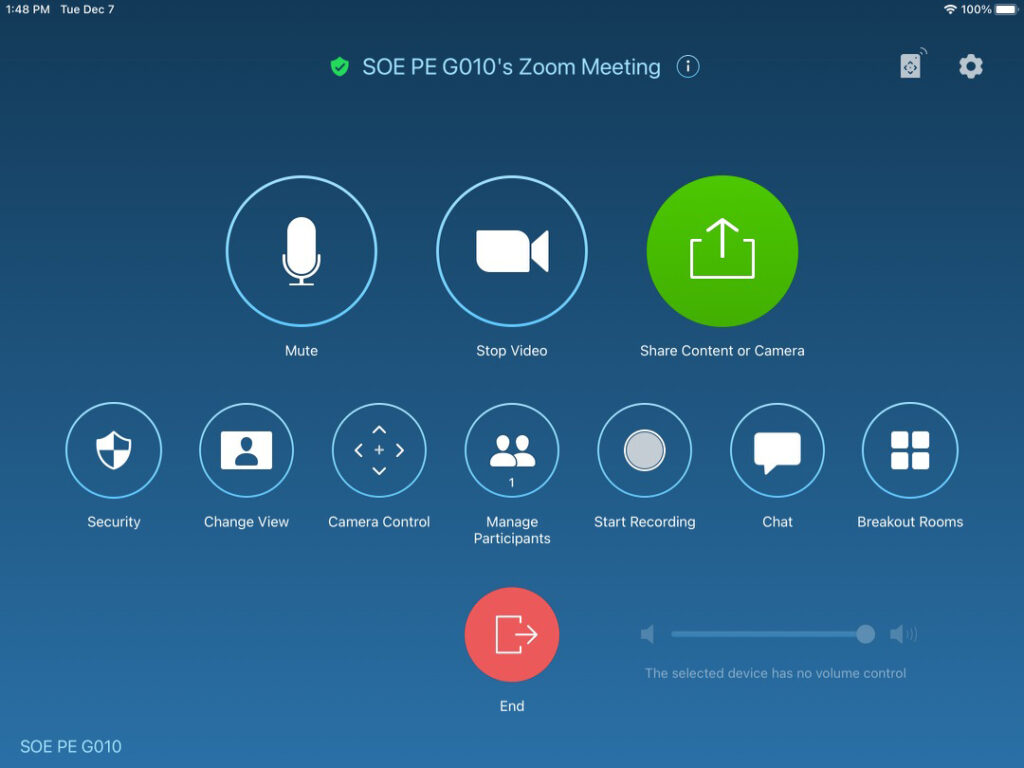
- Mute Microphone: Enables you to toggle the microphone mute on/off.
- Stop/Share Video: Enables you to toggle the camera sharing on/off.
- Share Content or Camera: Zoom: Sharing Content or Camera with a Zoom Room Meeting
- Change View: Enables you to switch between various views of the meeting participant webcams.
- Camera Control: Due to the way the cameras interact with the AV system, camera control via this button is not available. Please see the “Camera Control” section below.
- Chat: Allows you to view and contribute to the meeting chat.
- Host Controls: The following controls are only enabled if the Zoom Room is set as the host.
- Manage Participants: Allows you to invite/remove participants, and manage participant audio and video.
- Record: Enables you to start/stop Zoom cloud recording
- Breakout Rooms: Enables you to open Breakout Rooms. For more information, please see: School Agile Classrooms | HyFlex Breakout Guide
Camera Control
Due to the way the cameras interact with the AV system, camera control via the “Camera Control” button from the main Zoom control screen is not available. The most user-friendly way to change the camera selection and/or control the camera angle is via the AV system Camera Control screen.
Camera control is also available via the Zoom iPad via the “Room Controls” button, which appears at the top right when a meeting is in progress:
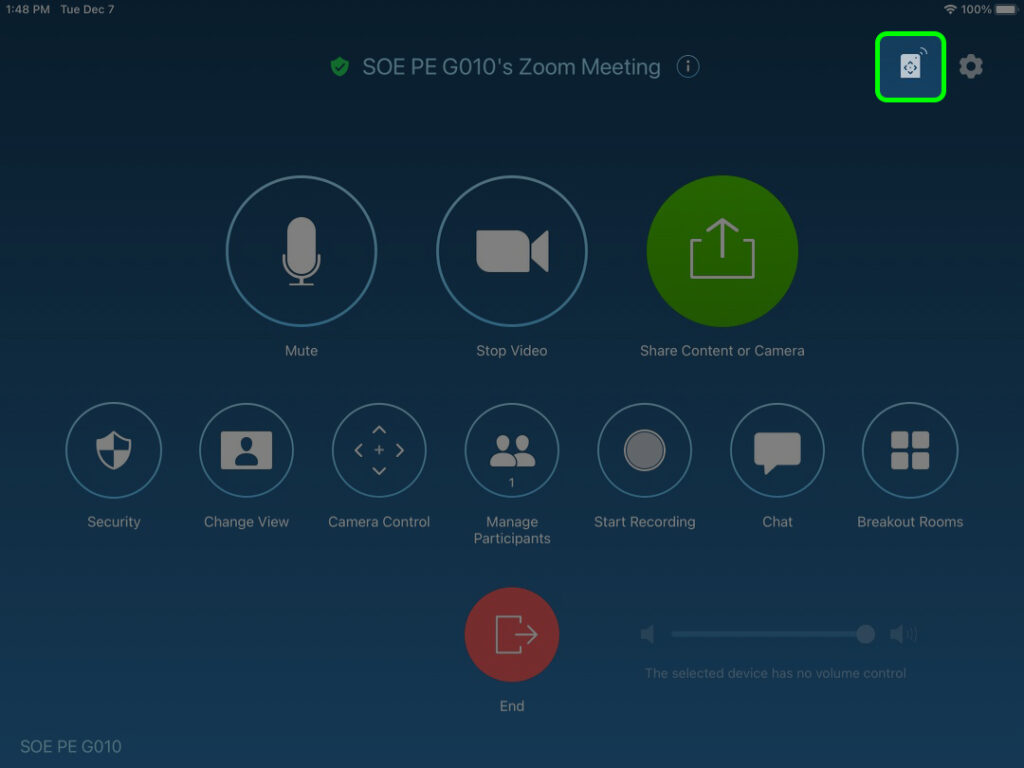
This will bring up the Room Controls menu, and “Camera Control” is the first section:

- Camera Selection:
- Instructor Camera: Controllable camera mounted at the back of the room facing the front.
- Student Camera: Controllable camera mounted at the front of the room facing the back.
- Whole Class Camera: Static wide angle camera mounted at the front of the room facing the back.
- Camera Tilt: Tilts the selected controllable camera up/down
- Camera Pan: Pans the selected controllable camera right/left
- Camera Zoom: Zooms the selected controllable camera in/out
- Camera Presets: Recalls helpful presets for the selected controllable camera
Dual Content Mode
In Dual Content Mode, Display A (the left screen on each wall) shows one source of content and Display B (the right screen on each wall) can show a second source. The Room PC will start as the initial input for Display A and ShareLink 1 as the initial input B, but additional options are available. Below are the details on available inputs and basic controls.
Inputs
Available inputs are located on the left side of the Dual Content Mode screen. Inputs have two buttons, one for Display A and one for Display B. To change inputs, simply press the button next to your desired device in the appropriate Display column:
- Room PC: (Display A initial input) Computer dedicated to the classroom. Wireless keyboard and mouse located within the room for control, and a preview will be displayed on screen.
- Zoom Room: Used to conduct video conferences. See Host a Zoom Meeting section for details.
- ShareLink 1 & ShareLink2: (Display B initial input) Collaboration devices used for displaying content from any device wirelessly. See Using Wireless Collaboration with ShareLink for additional information.
- Blu-ray Player: Located within the credenza at the front of the room. Controls and a preview are displayed on screen.
- Wired External Device: Wired (HDMI & USB-C) options to connect a laptop (or other external device) are available in the cable cubby on top of the credenza at the front of the room. Note: Both HDMI & USB-C leverage the same input. Only one wired external device can be displayed at a time.
Volume & Display Control
Volume Control
Controls the volume (all inputs & microphones) and mute for all room audio. If inputs for Display A and B are different, the audio is mixed and both will be audible simultaneously. For additional volume control, including microphone control, please see the Audio Mixer section.
Voice Lift Mics
Mutes/unmutes the Voice Lift functionality. For information about Voice Lift, please see the Room Basics section.
Blank Display A/B
Provides the ability to temporarily blank Display A and B respectively, giving presenters the ability to hide on screen activity from participants. Note: This does not mute the volume.
For information on how to turn specific screens on/off and raise/lower projection screens, please see the Screen Power section.
Additional information about features available in Dual Content Mode can be found in the Room Guide: Advanced Features section.
Breakout Mode: In-Person
In Breakout Mode: In-Person, all eight screens show independent local content to facilitate breakout activities. This mode will start with a separate ShareLink device selected as the initial input for each screen to enable wireless collaboration. Below are the details on ShareLink devices, and Breakout Mode controls.
ShareLink Wireless Collaboration
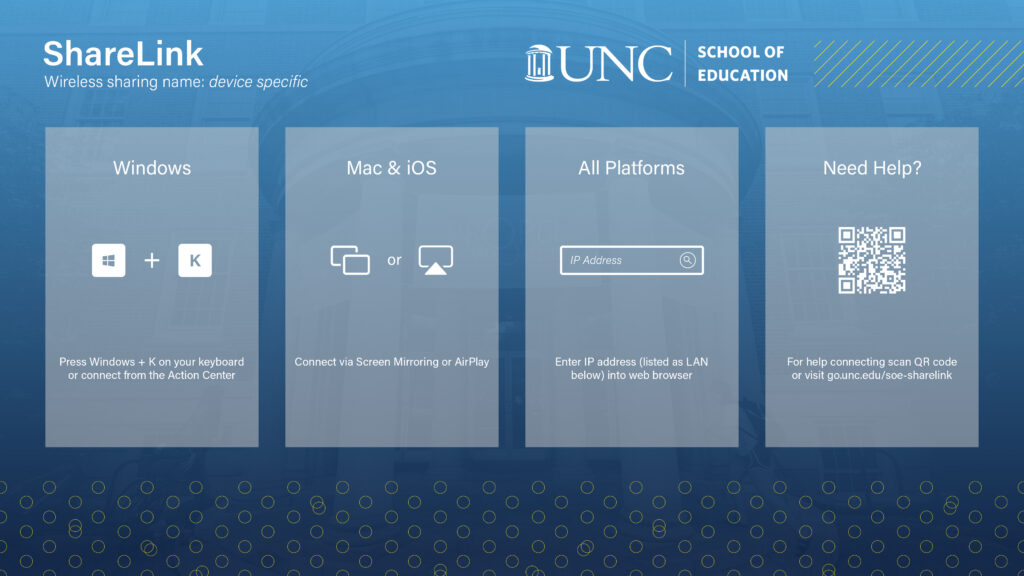
The initial input on each screen in Breakout Mode: In-Person is a separate ShareLink device. This enables us to facilitate breakout activities by allowing the groups at each screen to collaborate independently, and wirelessly. Simply starting Breakout Mode: In-Person will setup all displays to facilitate this, and the above image is what is shown on screen before anyone has connected to it.
For more information, please see: Using Wireless Collaboration with ShareLink
Breakout Mode: Main Page
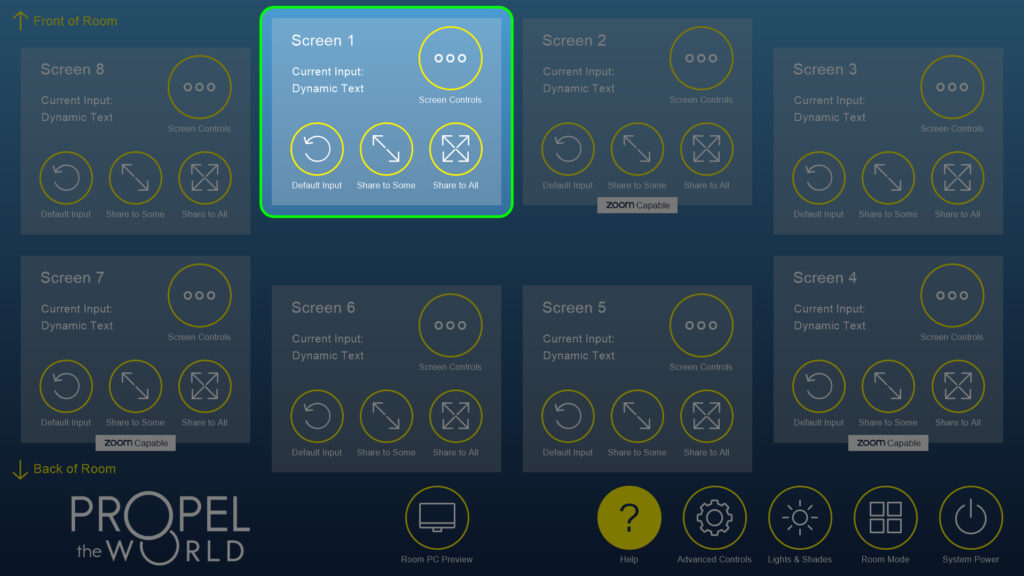
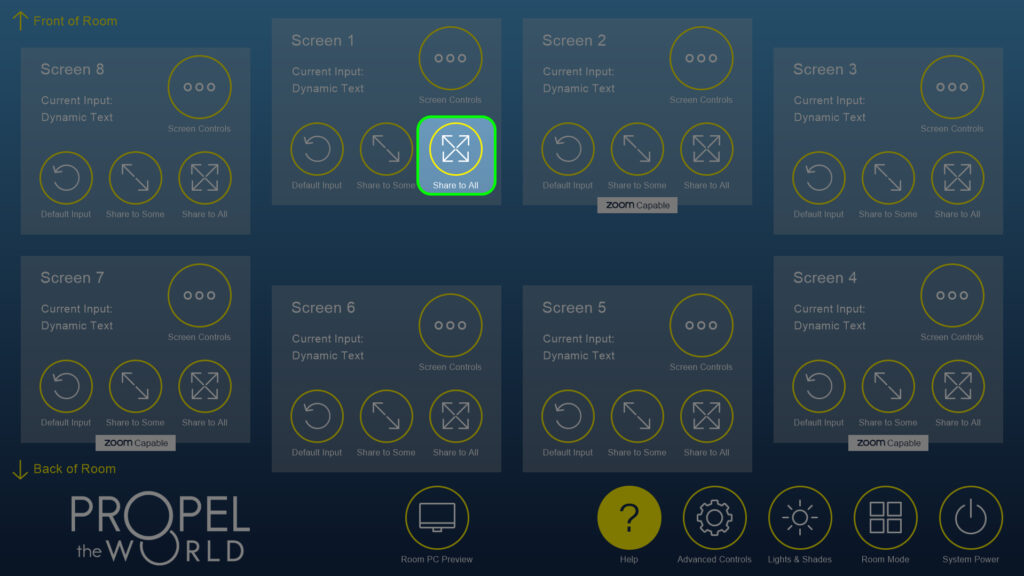
The main page in Breakout Mode is designed to quickly share content from any one screen to others in the room. This page can be viewed as a map of the room, with the front of the room at the top and the back at the bottom. Each screen within the room will also have a sign indicating what screen number it is.
The highlighted portion of the screen above highlights the controls for Screen 1, but the functionality is standard across all screens.
- Screen Controls: Opens individual controls for the applicable screen. See “Breakout Mode: Individual screen control” below.
- Default Input: Returns the applicable screen to its initial input.
- Share to Some: Enables sharing the current content from the applicable screen to select screens of your choice. See “Breakout Mode: Share one screen to select screens” below.
- Share to All: Shares the current content from the applicable screen to all screens. See “Breakout Mode: Share one screen to all screens” below.
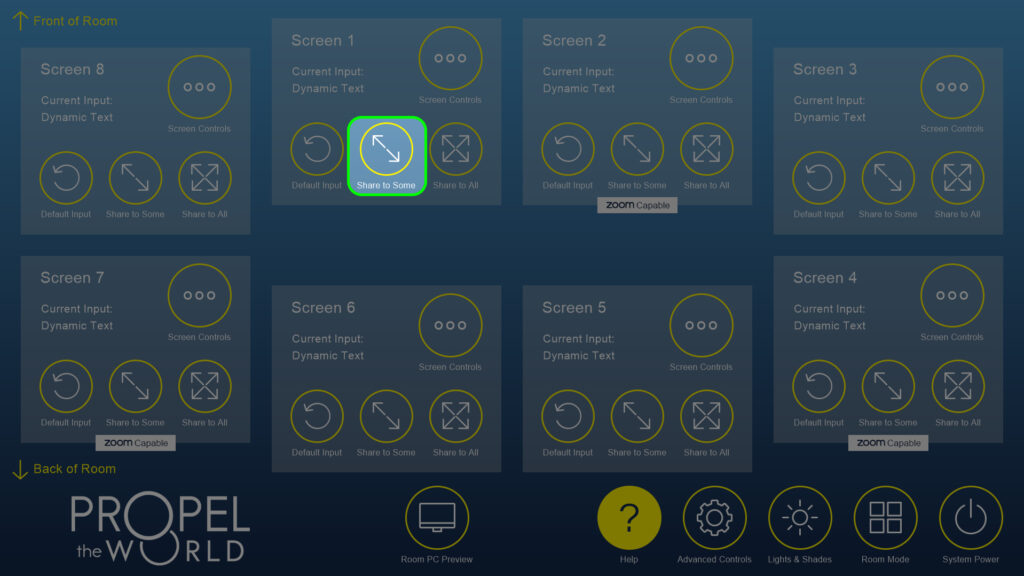
Breakout Mode: Share one screen to select screens
To share content currently displayed on any given screen to select screens of your choice, first click the “Share to Some” button for the applicable screen. This example uses Screen 1:
This will open the menu to share the applicable screen content to other screens:
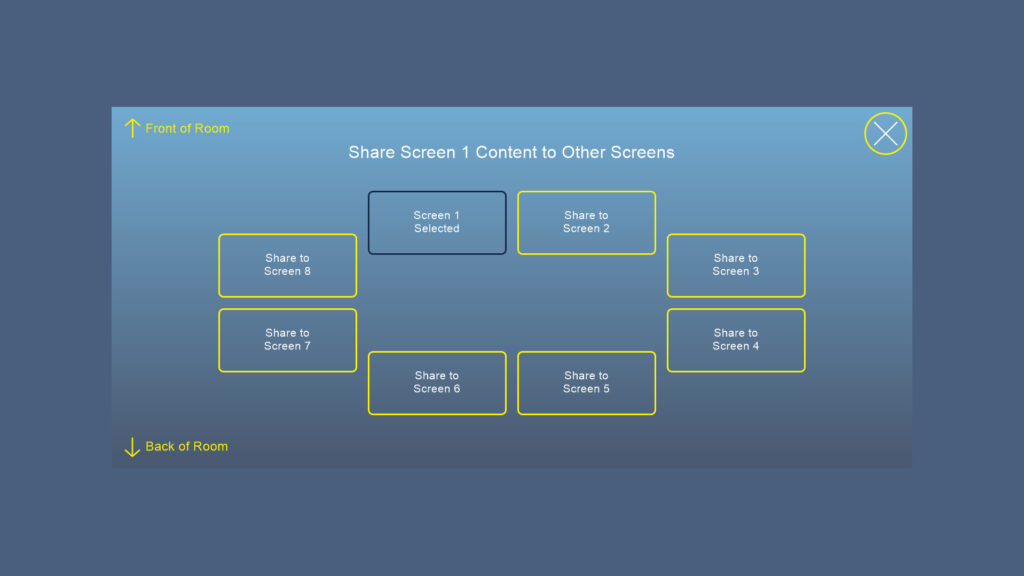
From here, select the screens you would like to share the content to.
Breakout Mode: Share one screen to all screens
To share content currently displayed on any given screen to all other screens, simply click the “Share to All” button for the applicable screen. This example uses Screen 1:
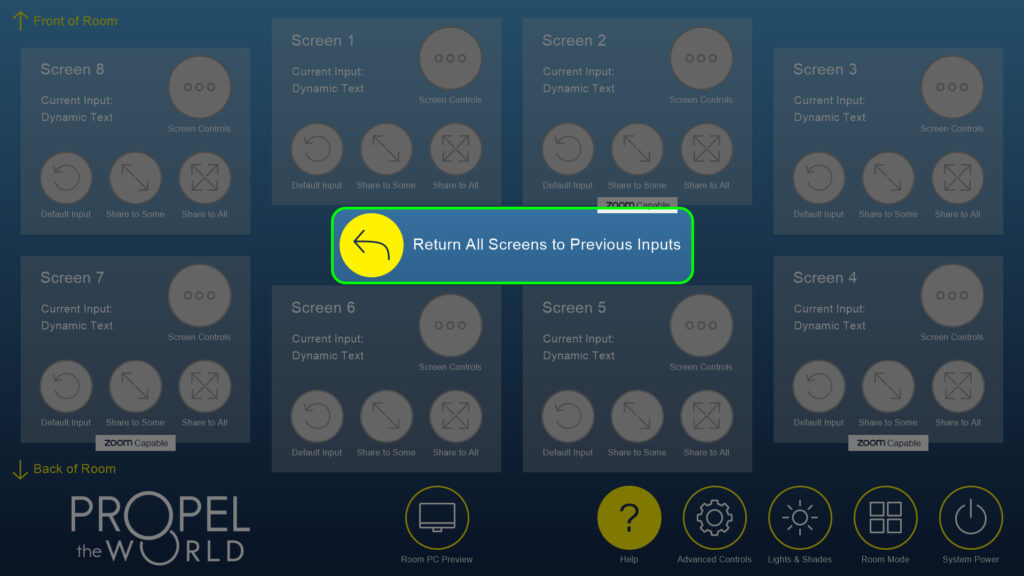
Sharing content in this way is intended to be temporary, and as such all screen control buttons are disabled. When you are ready to return all screens to their previous content, simply push the new “Return All Screens to Previous Inputs” button:
Breakout Mode: Individual screen control
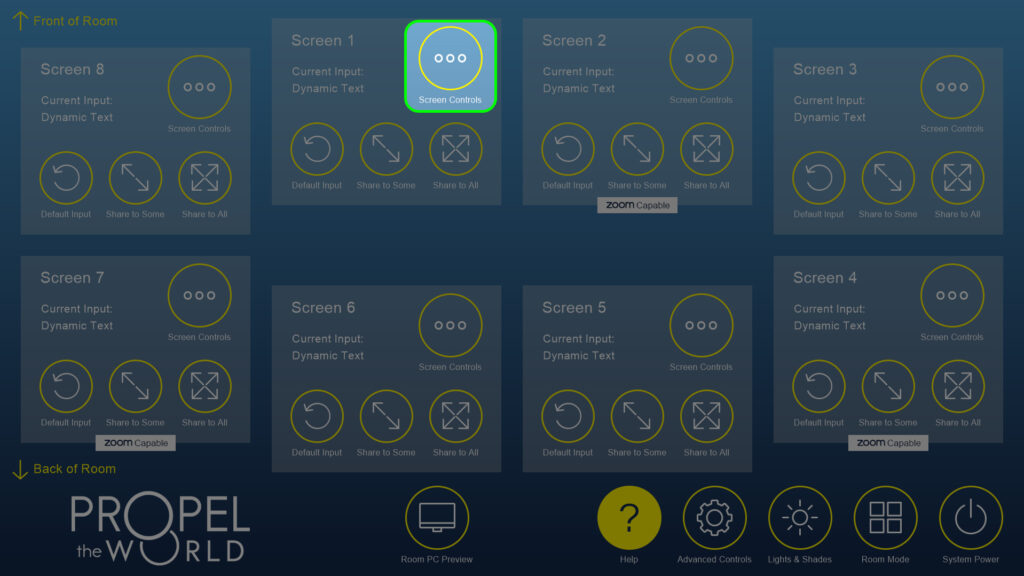
To open individual screen controls in Breakout Mode, first click the “Screen Controls” button for the applicable screen. This example uses Screen 1:
This will open the control for the screen you selected. The screen controls are laid out very similarly to the main page for Basic Mode:
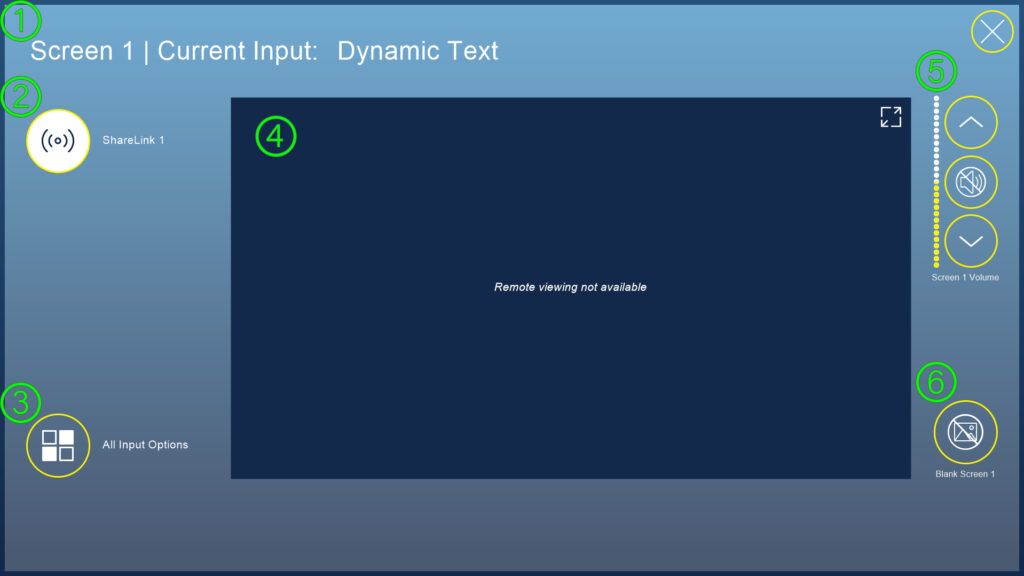
- Screen number & Current Input: Indicates which screen you are controlling and the current input displayed on screen.
- Available Inputs: Only the most applicable inputs for each screen are shown here.
- All Input Options: It is possible to display any input on any screen. This button brings up all the options via the advanced matrix switching menu. For more information see: Matrix Switcher
- Input Preview & Controls: This area shows a preview of the current input and/or the associated controls.
- Screen Volume: Controls the volume and mute for audio associated with the selected screen.
- Blank Screen: Provides the ability to temporarily blank the applicable screen.
Additional information about features available in Breakout Mode: In-Person can be found in the Room Guide: Advanced Features section.
Breakout Mode: HyFlex
Breakout Mode: HyFlex functions the same as Breakout Mode: In-Person, except some screens are Zoom capable to facilitate breakout activities with a combination of in-person and remote students. The only difference in the two breakout modes are the initial inputs. In Breakout Mode: HyFlex the initial input for each screen is either Zoom or a ShareLink device, depending on capabilities.
HyFlex Breakout Guide
The “Screen 2” and “Screens 4 & 7” sections below cover the technical components of this mode for the sake of completeness, but for information on how to conduct a HyFlex meeting with breakout groups we recommend the stand-alone guide:
Screen 2
Screen 2 leverages the main Zoom Room for breakouts, but because the main Zoom Room utilizes two displays, using it here will show a split screen view. Also, Screen 2 uses the “Student Camera” by default, but all three camera options are still available. For more information, please see: Camera Control
The controls for the main Zoom Room are covered in the Host a Zoom Meeting section.
Screens 4 & 7
Screens 4 & 7 leverage their own individual Zoom Rooms. These Zoom Rooms utilize a webcam mounted at the screen, and the nearest ceiling mounted microphone is targeted to only capture audio from a group gathered around the screen. Each screen has an iPad mounted nearby for Zoom control.
Screens 4 & 7: Joining a Meeting
This method requires someone to use the iPads mounted at screens 4 & 7 to join the meeting:
[add image once permanent iPads installed]
For each breakout screen iPad, the instructions are the same as starting/joining a meeting from the main Zoom iPad:
- Select “Join” from the options on the left
- Type the “Meeting ID” of your meeting via the number pad
- Click “Join” at the bottom right
Screens 4 & 7: Zoom Control
Once you are in a meeting, the touch panel control of the meeting is the same as the main Zoom Room:
- Mute Microphone: Enables you to toggle the microphone mute on/off.
- Stop/Share Video: Enables you to toggle the camera sharing on/off.
- Share Content or Camera: Documentation Needed.
- Change View: Enables you to switch between various views of the meeting participant webcams.
- Camera Control: No camera control is available at the breakout screens.
- Host Controls: The following controls are only enabled if the Zoom Room is set as the host.
- Manage Participants: Allows you to invite/remove participants, and manage participant audio and video.
- Record: Enables you to start/stop Zoom cloud recording
- Breakout Rooms: Enables you to open Breakout Rooms. For more information, please see: School Agile Classrooms | HyFlex Breakout Guide
Room Guide: Advanced Features
Mobile AV Control iPad
In addition to the touch panel on the credenza at the front of the classroom, there is also an iPad available for mobile control of the room stored inside the credenza. Please return the iPad to the charging dock when you are finished with the room.
Mobile AV Control iPad Details
Image coming soon, once feature is available.
The iPad enables mobile control of the room, providing the same control as the main touch panel. The only caveat when using the iPad for control is that the input previews are unavailable. The iPad is stored inside the credenza in a charging dock, not to be confused with the iPad stored on top of the credenza for Zoom control. Simply pickup the iPad follow the on screen prompts to start control.
Please return the iPad to the charging dock when you are finished with the room.
In-Room Microphones
Each Agile Classroom has a combination of ceiling and wireless microphones used for both local sound reinforcement and remote (web conferencing) audio.
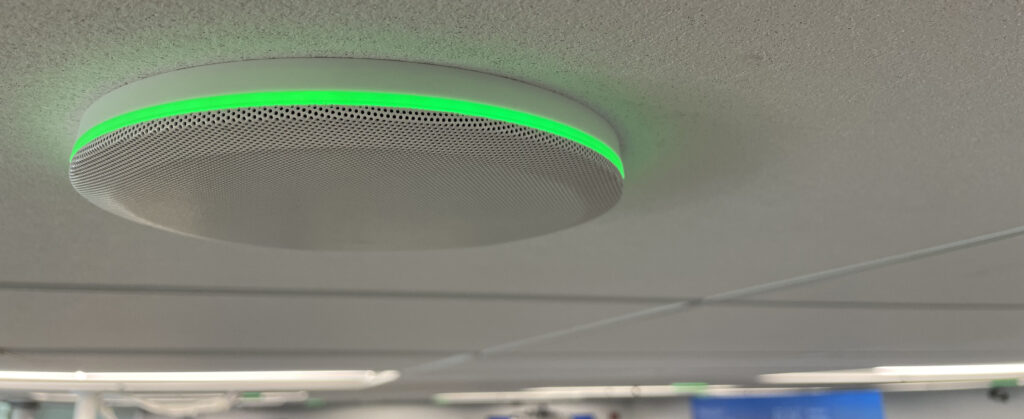
Ceiling Microphones
The ceiling microphones serve two purposes: Voice Lift and Web Conferencing. Voice Lift is covered in the Room Basics section.
Web Conferencing
When hosting a web conference for the entire room, all ceiling microphones are fed into the web conferencing system to enable seamless conversation between anyone in the room and the remote participants.
When leveraging Breakout Mode: HyFlex, specific ceiling microphones are associated with each Zoom capable screen, and they are targeted to only capture audio from the groups gathered around the screens.
Wireless Microphones
There are two wireless microphone options for in-room audio amplification: a lapel microphone and a handheld microphone. Both microphones can be used at the same time, and should be stored in the credenza at the front of the room. To use the microphones, simply turn them on:
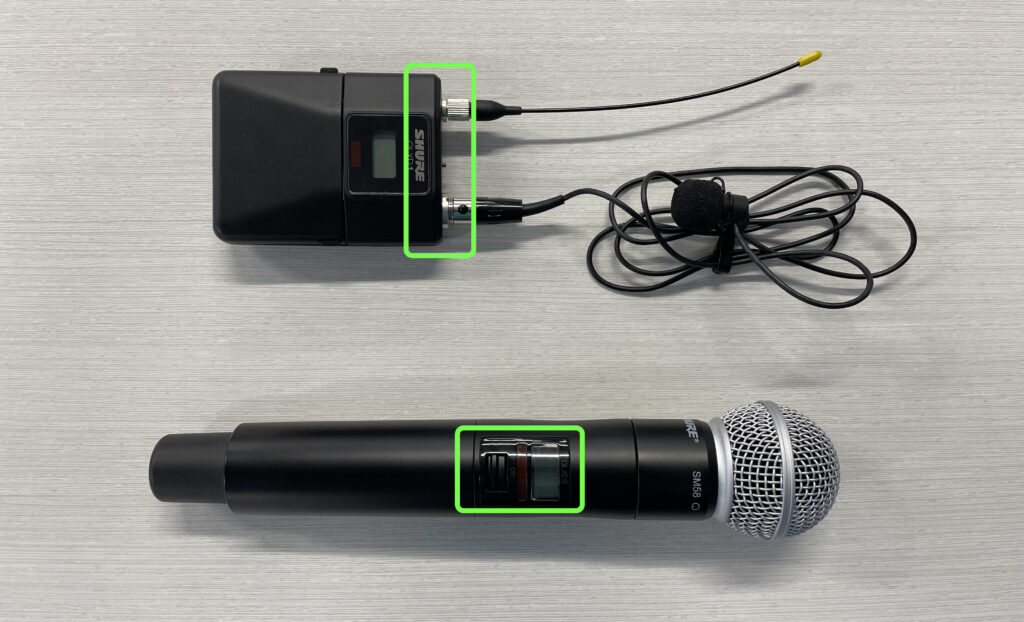
The in-room audio level for both microphones is optimized at startup, but if necessary adjustments can be made via the Audio Mixer.
Camera Control
The in-room cameras and ceiling microphones are used for web conferencing. Below is information on how to select and control the various cameras, and connect to them as needed.
Camera Control
1. Open the Camera Routing & Control menu by pushing the button at the bottom of the Basic or Dual Content screens:

2. Select the camera you would like to use and adjust the view via the controls on the right. Also included is a preview of the selected camera:
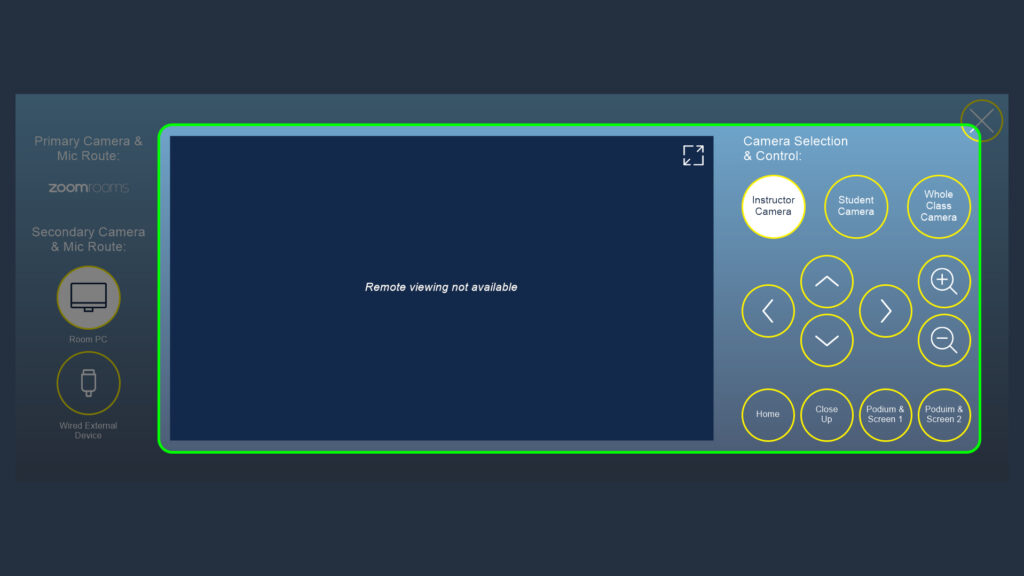
- Cameras:
- Instructor Camera: Controllable camera mounted at the back of the room facing the front.
- Student Camera: Controllable camera mounted at the front of the room facing the back.
- Whole Class Camera: Static wide angle camera mounted at the front of the room facing the back.
- Directional Arrows: Moves the selected controllable camera up/down/left/right.
- Magnifying Glasses: Zooms the selected controllable camera in/out.
- Preset Buttons: Specific to each camera – see “Camera Presets” below.
Camera Presets
Instructor Camera Presets
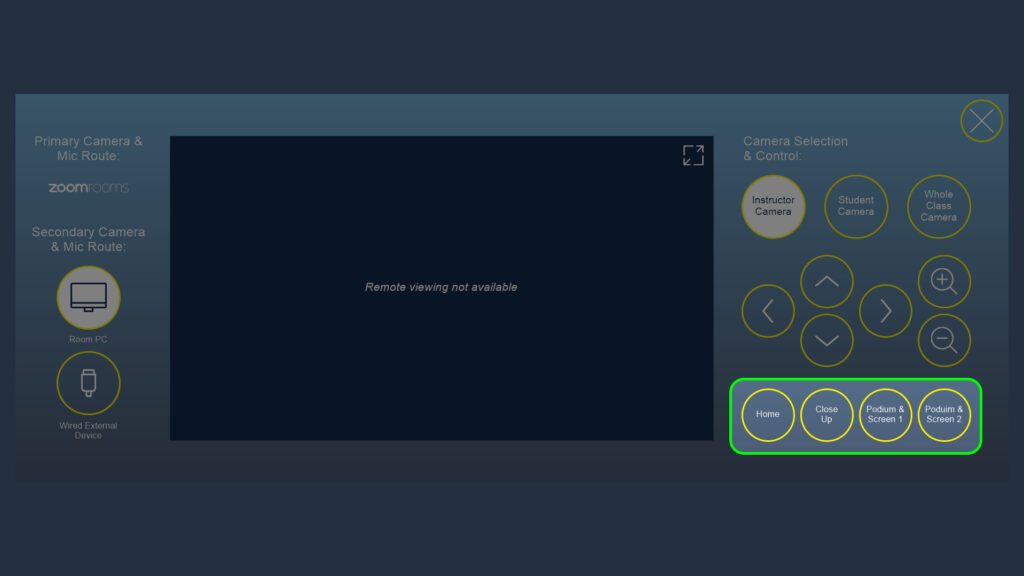
- Home: Centered on the front of the room and zoomed out as far as possible.
- Close Up: Framed to capture only the area between the front screens.
- Podium & Screen 1: Framed to capture all of screen 1 and the area between the front screens.
- Podium & Screen 2: Framed to capture all of screen 2 and the area between the front screens.
Student Camera Presets
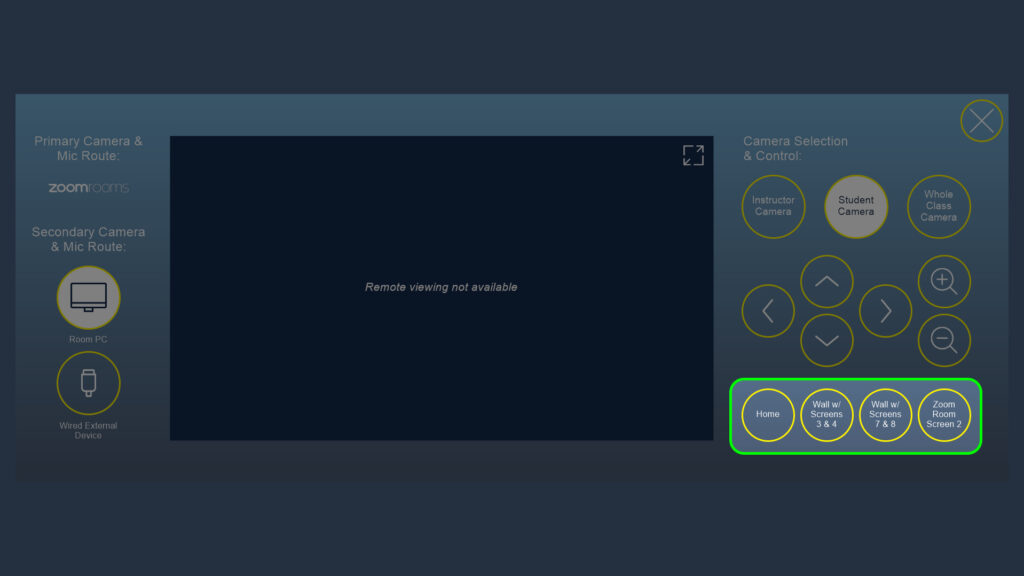
- Home: Centered on the back of the room and zoomed out as far as possible.
- Wall w/ Screens 3 & 4: Framed to capture the wall with screens 3 & 4 and surrounding area.
- Wall w/ Screens 7 & 8: Framed to capture the wall with screens 7 & 8 and the surrounding area.
- Zoom Room Screen 2: Framed to capture the area in front of screen 2 (used for Breakout Mode: HyFlex).
Connecting the Cameras to the Room PC or a Laptop
The cameras and microphones are always connected to Zoom, but there is a secondary connection to either the Room PC or a wired external device. To change the secondary route:
1. Open the Camera Routing & Control menu by pushing the button at the bottom of the Basic or Dual Content screens:
2. Select the device you would like to route the camera and microphones to from the section on the left:
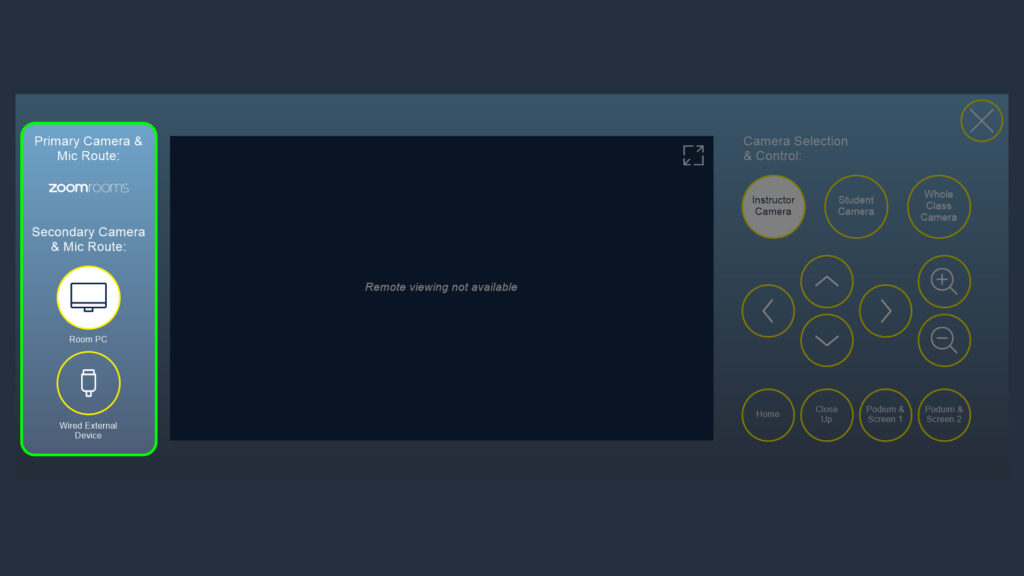
- Room PC: Routes to the Room PC to allow web conferencing via the Room PC.
- Wired External Device: Routes to the wired device you connect at the credenza via USB to allow web conferencing via a laptop. The USB connection is available in the cable cubby on top of the credenza at the front of the room:
Room Recording
School Agile Classrooms are equipped with the ability to create recordings of in room activities using a combination of the cameras and on-screen content. Note: This is different than a Zoom recording.
Accessing the Recording Controls & Recording Indicator
To open the Recording Controls, push the “Room Recording Controls” button at the bottom of the Basic or Dual Content screens:

The recording controls are covered in the sections below, but it is important to note that the “Room Recording Controls” button will flash to indicate when the room is actively recording:

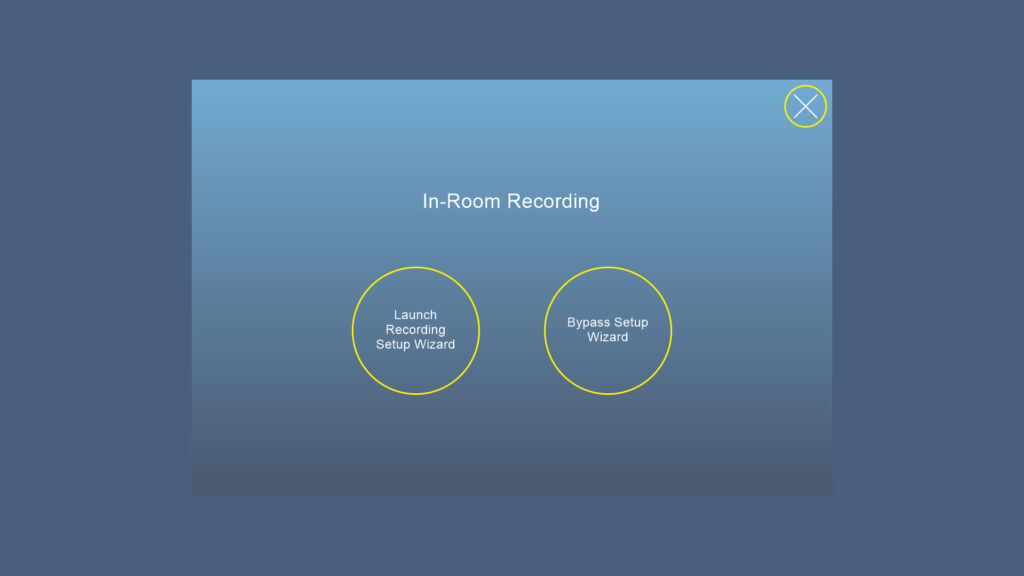
Recording Setup Wizard
The first time you push the “Room Recording Controls” button you will be prompted to either launch the recording setup wizard, or bypass it. Note: If a recording is active, it will bypass this prompt and go straight to the controls.
Once you launch the setup wizard, all information necessary to choose the appropriate options for your recording are included on screen. The setup wizard will walk you through:
- Number of Content Sources: Allows you to choose how many content sources, in addition to the cameras, you would like to use in your recording. This will change the room to either Basic and Dual Content mode.
- Content Source Selections: Allows you to choose which inputs you would like to use as content sources, in addition to the cameras. This will change the in-room, on-screen content.
- Recording Source Selections: Allows you to choose which two content sources you would like to use for your recording. Options include Display A content, Display B content, and a camera.
- Camera Selection & Adjustments: Allows you to select which in-room camera you would like to use, if you selected it as a recording source. It also gives you a preview of the camera and allows you to adjust the view.
- Recording Layout: Allows you to select the layout of your recording, based on the sources you selected, and gives a recording output preview.
Once you make the selections in the setup wizard, it establishes the settings for the recording controls. Once complete, you will see the recording controls and can make additional changes as needed.
Recording Controls
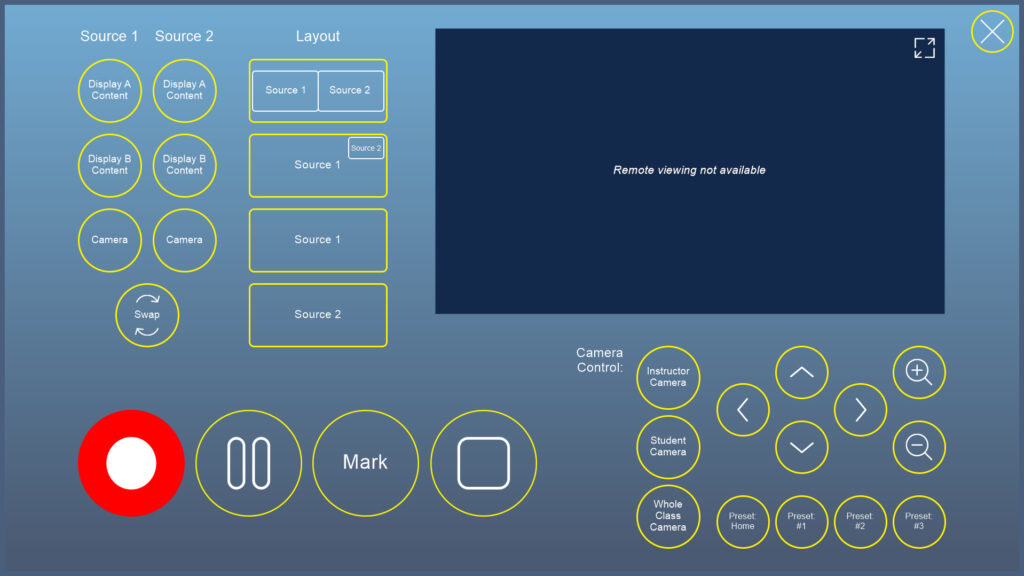
This menu gives you basic recording controls, the ability to adjust the recording sources and layout, camera selection and control, and gives you a preview of the recording output.
Basic Recording Controls
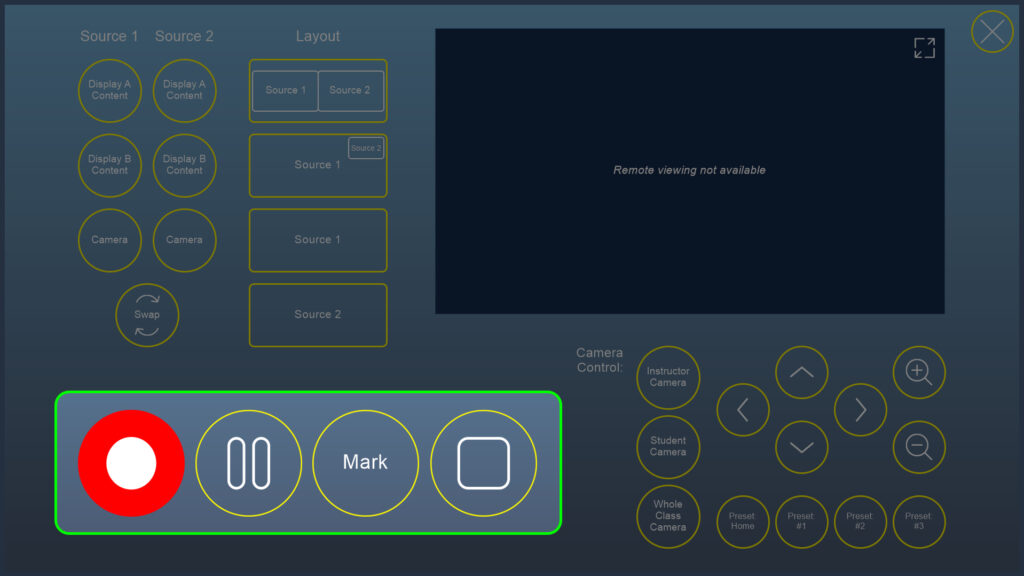
- Record Button: Starts/stops your recording. This button will also flash when a recording is active.
- Pause Button: Pauses/unpauses your recording, without ending it.
- Mark Button: Places a chapter marker in your recording for optional use in editing later.
- Stop Button: Stops your recording.
Source Selection
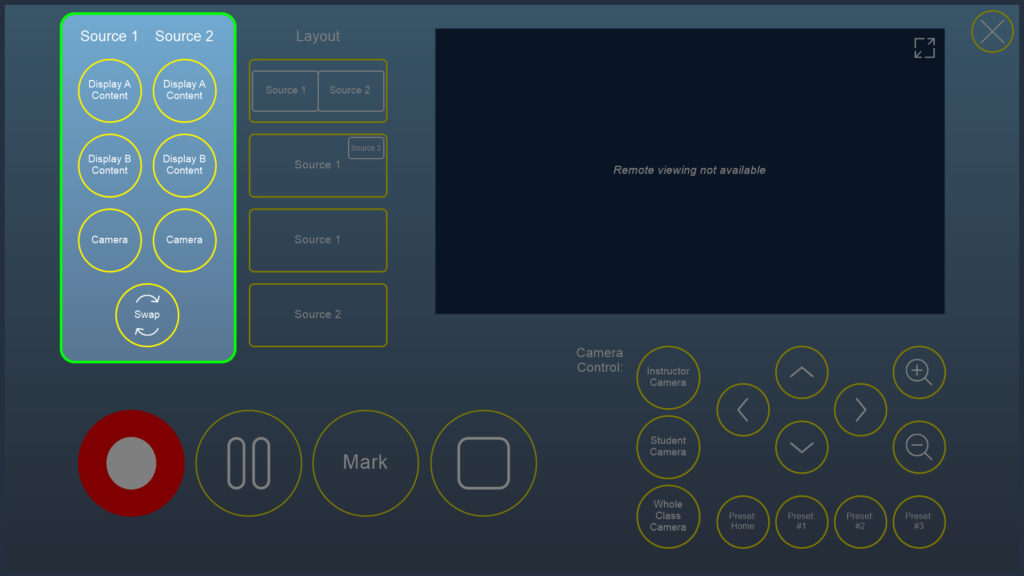
- Display A Content Buttons: Selects the content being shown on Display A as Source 1 or 2 respectively.
- Display B Content Buttons: Selects the content being shown on Display B as Source 1 or 2 respectively.
- Camera Buttons: Selects the camera as Source 1 or 2 respectively.
- Swap Button: Sets the current Source 1 content as Source 2, and the current Source 2 content as Source 1.
Layout Selection
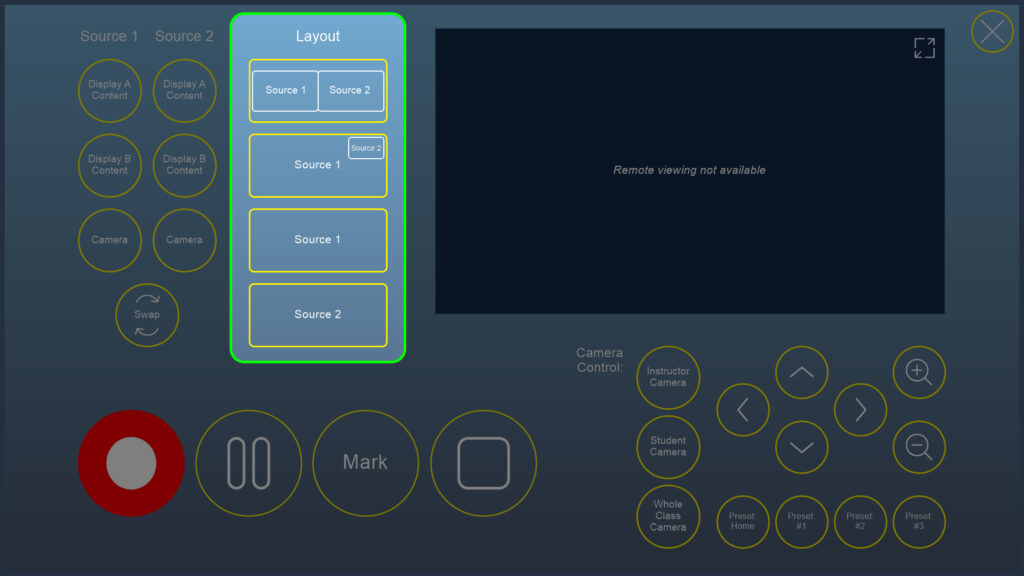
- Side-By-Side Button: Sets the recording layout to a side-by-side view of Source 1 and 2.
- Picture-In-Picture Button: Sets the recording layout to a picture-in-picture view with Source 1 as the large content, and Source 2 as the small content.
- Source 1 Full Screen Button: Sets the recording layout to a full screen view of Source 1.
- Source 2 Full Screen Button: Sets the recording layout to a full screen view of Source 2.
Camera Selection & Control
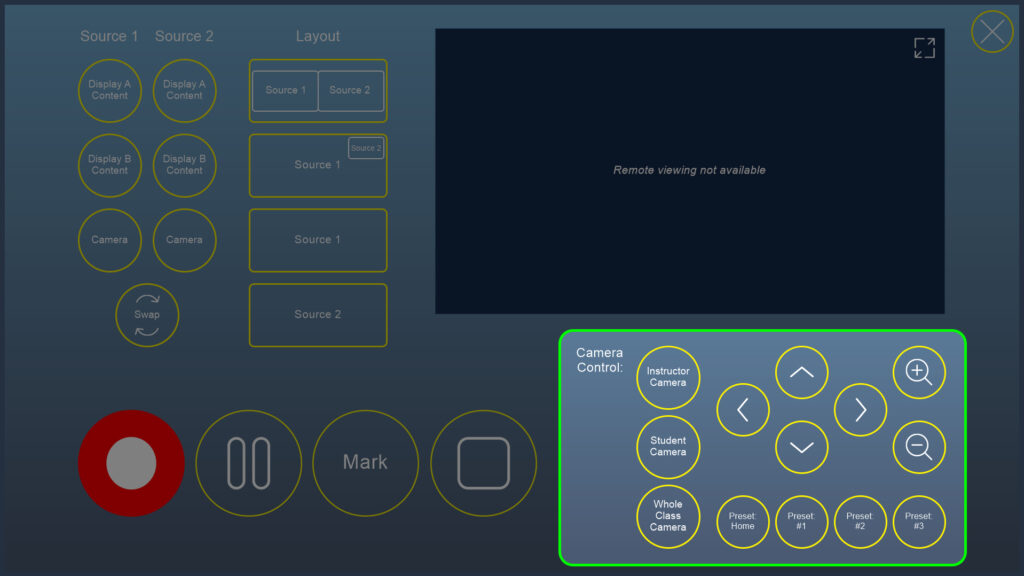
Allows camera selection and control that mirrors the options available in: Camera Control
Recording Preview
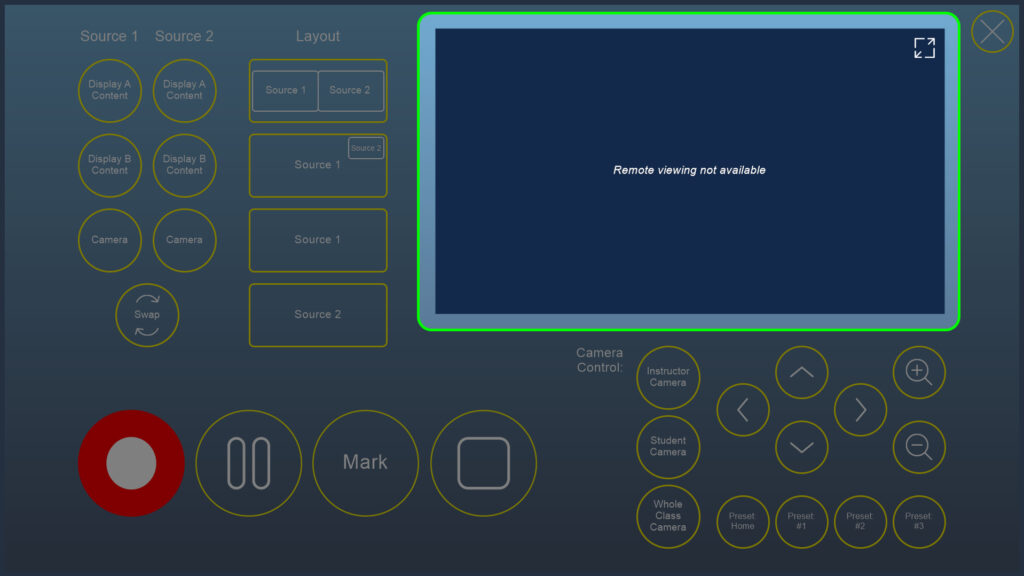
Provides a preview of the recording output with the current source and layout selections.
Accessing your Recording
This will eventually leverage Panopto, but that integration has not been setup yet.
For now, if you create a recording please reach out to Calvin (cbgroves@unc.edu) for access.
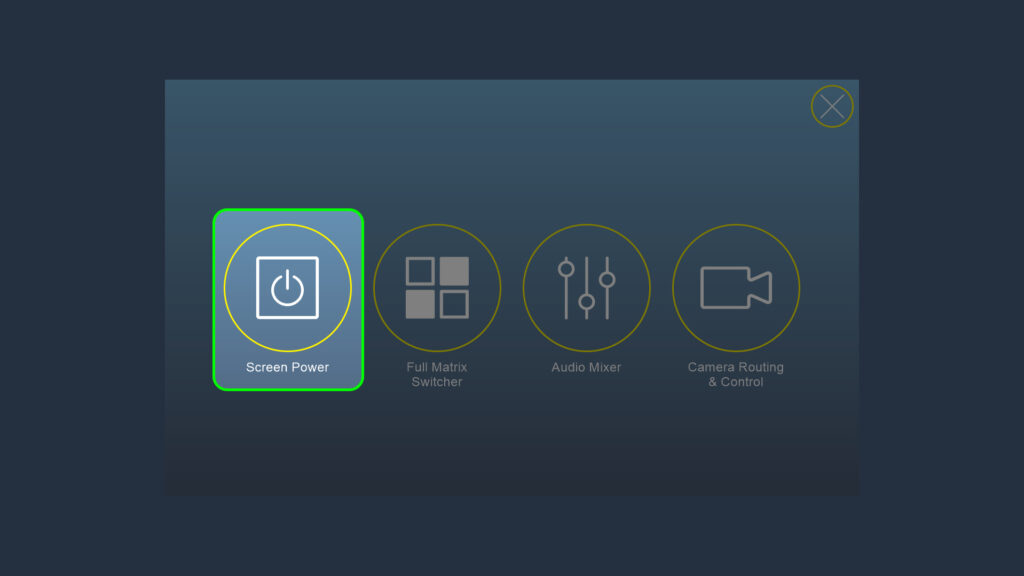
Advanced Controls
This section covers the menus that can be accessed from the “Advanced Controls” button in the common controls section at the bottom right of the screen. Note: The Camera Routing & Controls button is a secondary way to get to this functionality. For information about these controls, please see: Camera Control
Screen Power
Occasionally you may wish to turn some of the screens in the room on or off, and raise or lower the projection screens. This is done via the screen power controls.
Screen Power Controls
To access the screen power controls:
1. Push the “Advanced Controls” button in the common controls area:

2. Push the “Screen Power” button from the Advance Controls menu:
This will bring up the Screen Power menu:
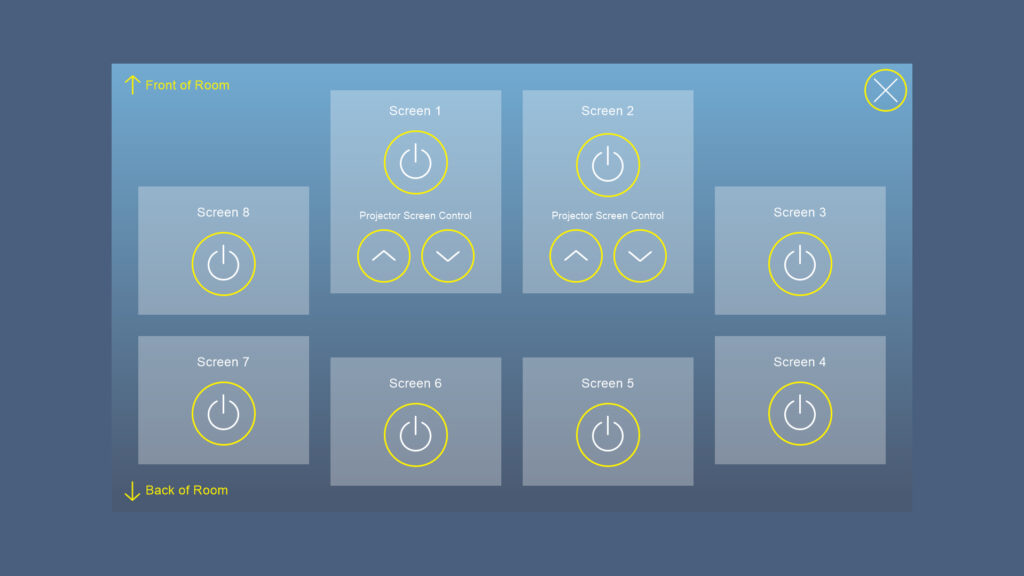
This menu can be viewed as a map of the room, with the front of the room at the top and the back at the bottom. Each screen within the room will also have a sign indicating what screen number it is.
- Power Button: Turns the individual screen on/of.
- Projector Screen Controls: Raises/lowers the projection screen for applicable screens.
Matrix Switcher
It is possible to show any input on any screen at any time. The room modes try to steer you to the most applicable options, but full control is possible via the matrix switcher.
Accessing the Matrix Switcher
1. Push the “Advanced Controls” button in the common controls area:
2. Push the “Full Matrix Switcher” button from the Advance Controls menu:
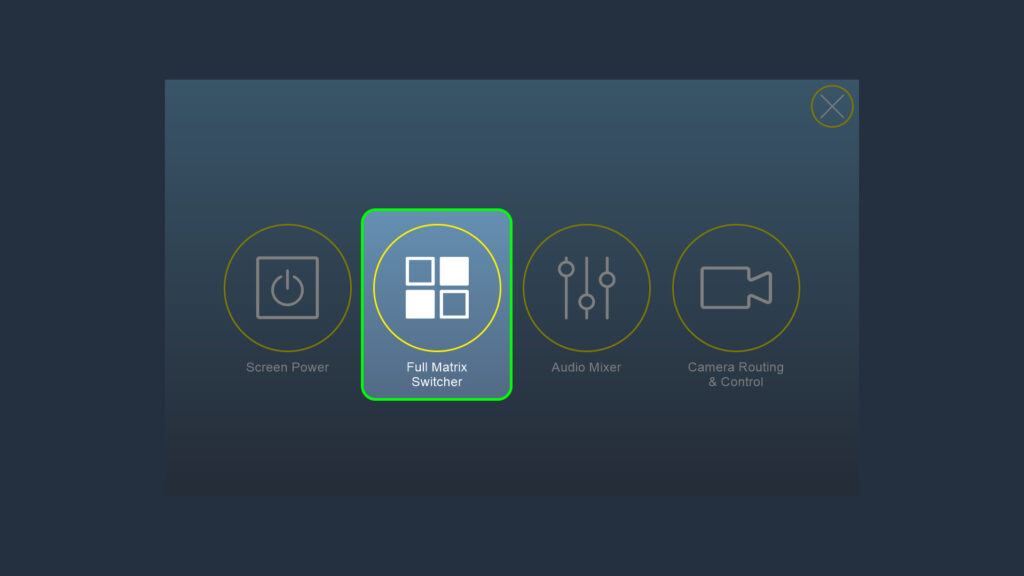
This will bring up the Matrix Switcher:
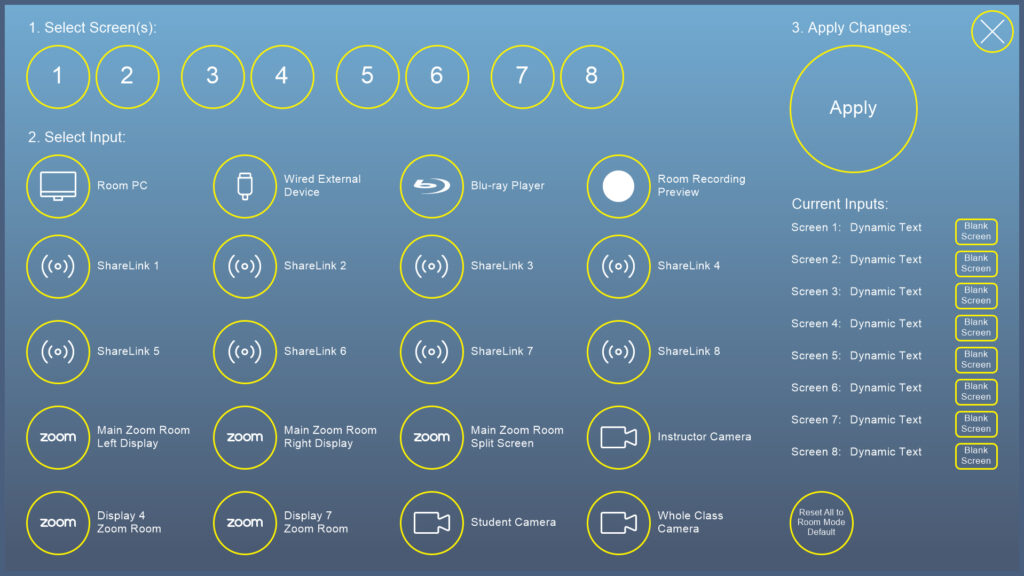
Changing Inputs with the Matrix Switcher
To use the Matrix Switcher to change the input on any screen:
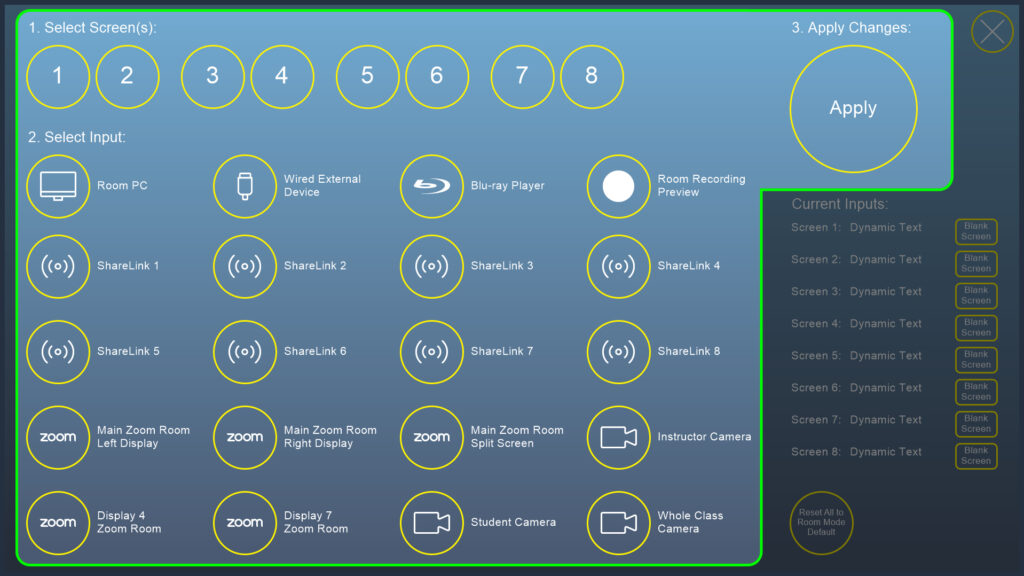
- Select Screen(s): First, select the screen(s) you would like to change the input for.
- Select Input: Second, select the input you would like to show on the selected screen(s).
- Apply Changes: Last, push “Apply” to make the changes.
Additional Matrix Switcher Functionality
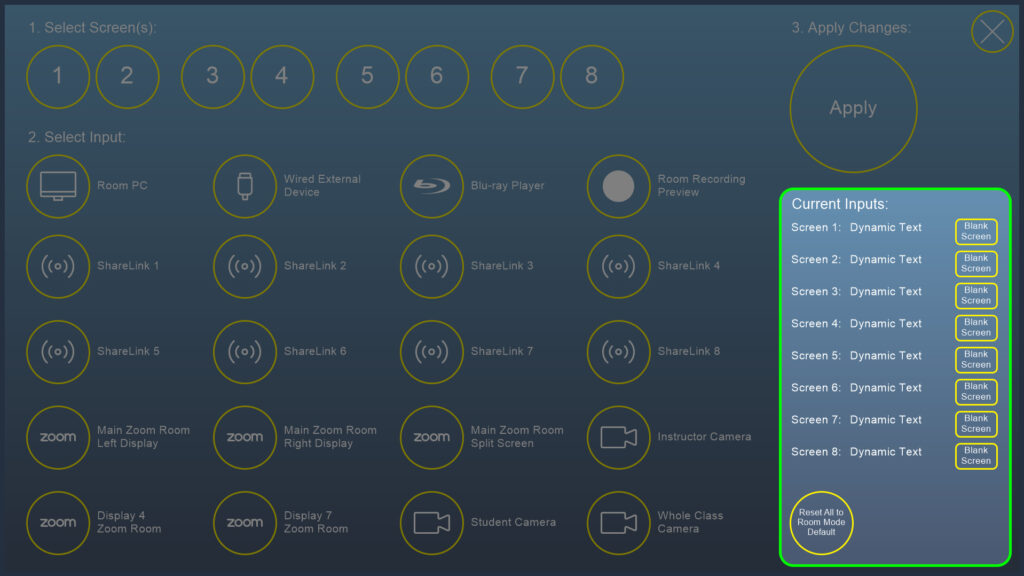
- Current Inputs: This section displays what the current input is for each screen.
- Blank Screen Buttons: Provides the ability to temporarily blank the associated screens.
- Reset All to Room Mode Default: This button resets all screens to their initial input, based on the current room mode.
Audio Mixer
The audio mixer provides additional volume adjustments for all speakers and microphones within the room, above and beyond what is available in the baseline control for each room mode.
Accessing the Audio Mixer
1. Push the “Advanced Controls” button in the common controls area:
2. Push the “Audio Mixer” button from the Advance Controls menu:
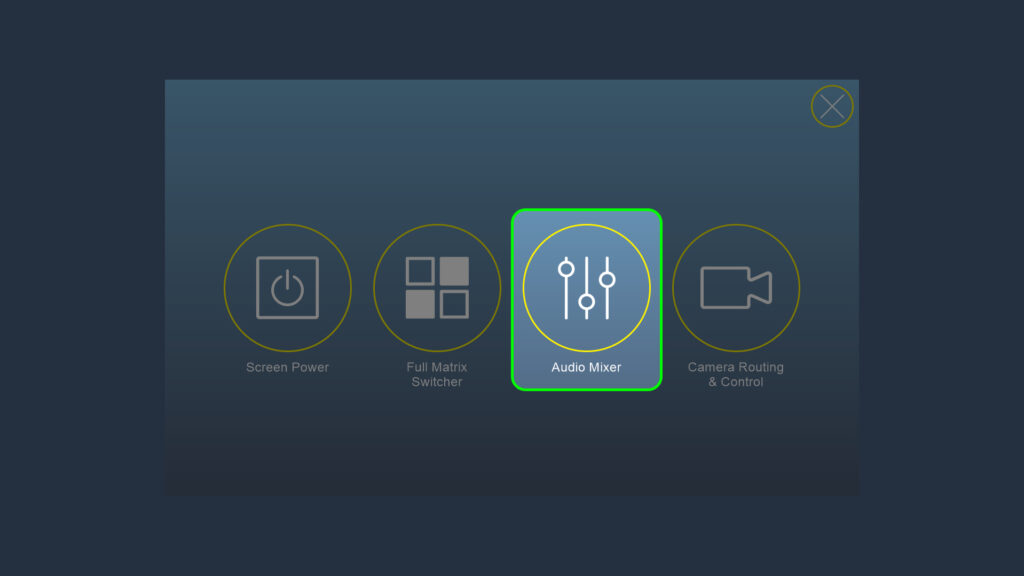
This will bring up the Audio Mixer:
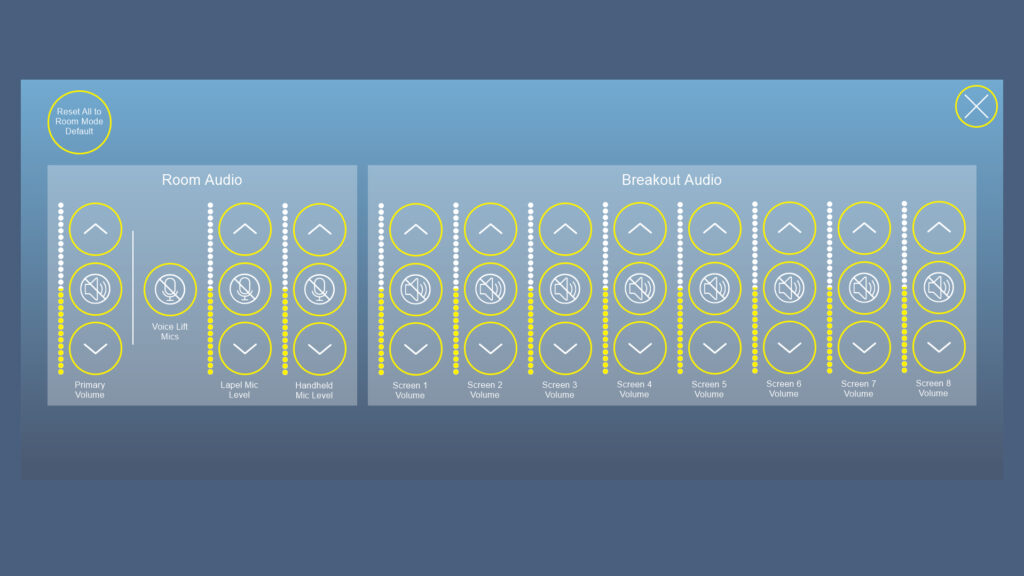
Audio Mixer: Basic & Dual Content Modes
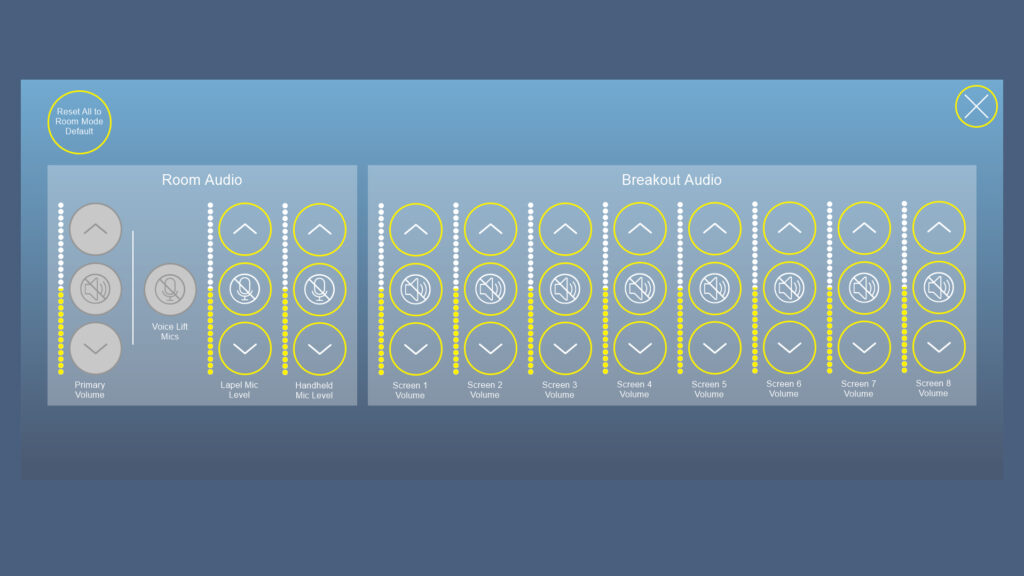
Room Audio (audio for the entire room)
- Primary Volume: Controls the volume and mute for all room audio.
- Voice Lift Mics: Mutes/unmutes the voice lift function.
- Lapel Mic Level: Controls the in-room volume and mute for the wireless lapel microphone.
- Handheld Mic Level: Controls the in-room volume and mute for the wireless handheld microphone.
For more information on the microphones listed above, please see: In-Room Microphones
Breakout Audio (audio for individual screens)
No breakout audio controls are available in Basic or Dual Content Modes.
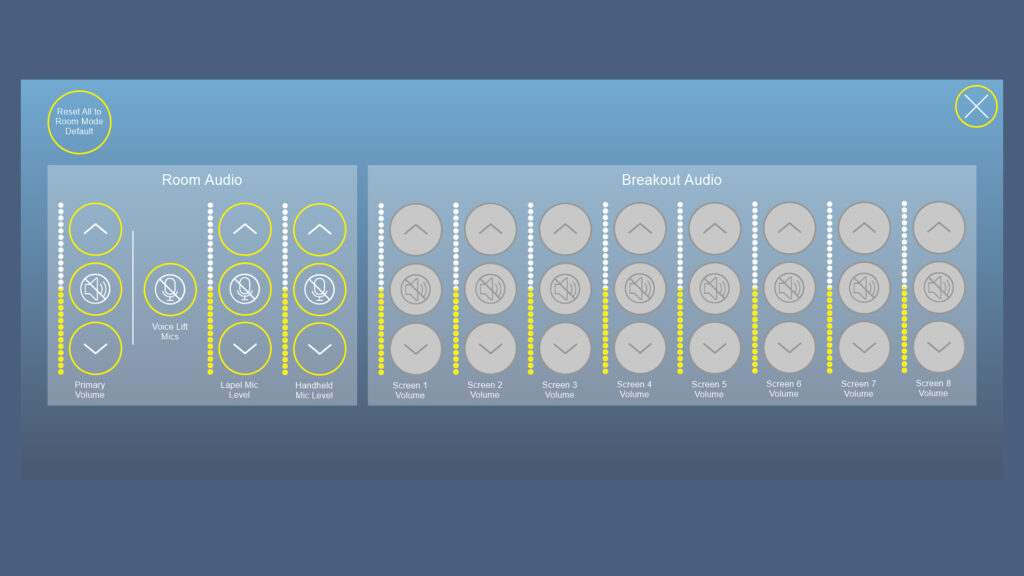
Audio Mixer: Breakout Mode
Room Audio (audio for the entire room)
In Breakout Mode, the primary volume and voice lift functions are disabled. Most audio is associated with individual screens, but lapel and handheld microphones will still project to the full room if used.
- Lapel Mic Level: Controls the in-room volume and mute for the wireless lapel microphone.
- Handheld Mic Level: Controls the in-room volume and mute for the wireless handheld microphone.
For more information on the microphones listed above, please see: In-Room Microphones
Breakout Audio (audio for individual screens)
- Screen Volume: Each individual screen is represented here, with controls for the volume and mute for audio associated with the applicable screen.
Need Help?
Need Help? If you need immediate assistance, please submit a help request via help.unc.edu and search for EdIT or Teams message EdIT team member(s). This allows requests for assistance to get to EdIT staff members regardless of their current location.
EdIT does have a support line 919-966-6220 that rings all EdIT members’ office phones. Corresponding tickets are expected within 24 hours for all requests if direct communication is used.