Print/Scan/Copy: Overview
Introduction
SOE offers two different models of Xerox multi-function devices (MFD) to serve the school’s printing, copying, and scanning needs. These devices are integrated with our PaperCut MF print management system, which provides a flexible and intuitive experience.
SOE employees (including student employees) have access to all MFDs in Peabody Hall.
Feature Overview
This section provides a brief summary of each function. See the PaperCut MF Interface section for more information
Printing
There are three modes of printing.
Direct Printing
This is the traditional way of printing. You add an individual device, then send print jobs directly to it, where it prints immediately.
Follow-Me Printing
In Follow-Me Printing, you add a special printer with pre-defined options, send jobs to it, then release the jobs at any MFD in the building via the Print Release option in the PaperCut MF interface. This creates a flexible and simple printing experience.
See the article Print/Scan/Copy: Follow-Me Printing for a detailed explanation.
Web Printing
Web Print allows you to print to selected printers by uploading a document to a web site. The documents are then printed at the selected printer automatically. This is helpful for printing from personal devices.
See the article Print/Scan/Copy: Using Web Print for more information.
Copying
All Xerox MFDs support copying and feature both a traditional flatbed for scanning and an auto-document feeder. Advanced copying features include resizing, 1- to 2-sided and vice versa, and color to black and white.
Copying is available through the Access Device option after logging in.
Scanning
All Xerox MFDs support scan to email, and include options for scan quality, multi-page documents, and color choice.
The PaperCut MF interface features simplified Scan option. Alternatively, you can select Access Device and then select Email to use the native Xerox scanning workflow, which is more complex but offers greater flexibility.
List of Devices
The last portion of each device name indicates its location in Peabody Hall unless otherwise noted
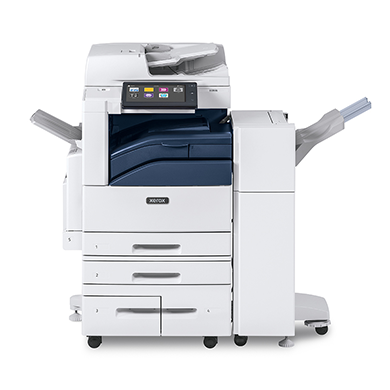
Large MFDs (Xerox AltaLink EC8056)
- SOE-PE-G070 (in the hallway)
- SOE-PE-1028
- SOE-PE-1050
- SOE-PE-1070J
- SOE-PE-2010L
- SOE-PE-3028
- SOE-CCEE (at Smith Middle School)
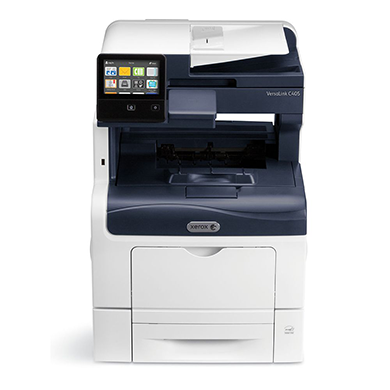
Small MFDs (Xerox VersaLink C405)
- SOE-PE-G012
- SOE-PE-G040
- SOE-PE-1010
- SOE-PE-1065
- SOE-PE-1096
- SOE-PE-2050
- SOE-PE-2092
- SOE-PE-3010
- SOE-PE-3040
Device Model Comparison
| Feature | Large MFDs (Xerox Altalink EC8056) | Small MFDs (Xerox VersaLink C405) |
|---|---|---|
| Print/Copy/Scan to email | Yes | Yes |
| Color print/copy | Yes | Yes |
| 2-sided print/copy | Yes | Yes |
| Auto Document Feeder | Yes | Yes |
| Paper Sizes (trays) | 8.5×11, 8.5×14, 11×14 | 8.5×11 |
| Paper sizes (bypass) | Envelope to 11×14 | Envelope to 8.5×14 |
| Finishing Options | Staple | None |
PaperCut MF Interface
PaperCut MF provides a simplified interface so that you can quickly and easily release print jobs, scan to email, or access the native Xerox device functions. Below is an overview of the interface.
Logging In
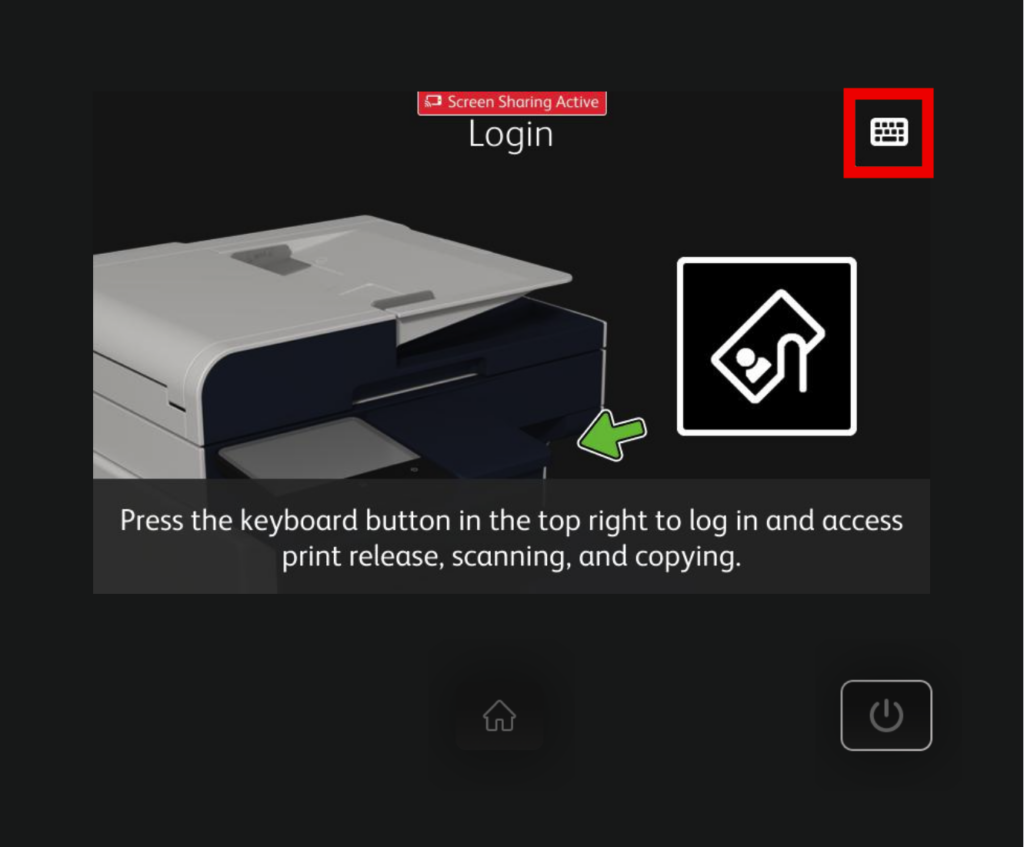
When you approach the copier, you’ll see one of the following screens, depending on whether you are using a Large MFD (AltaLink EC8056) or Small MFD (VersaLink C405). Touch the keyboard button at the top right of the screen (highlighted in red below) to log in.
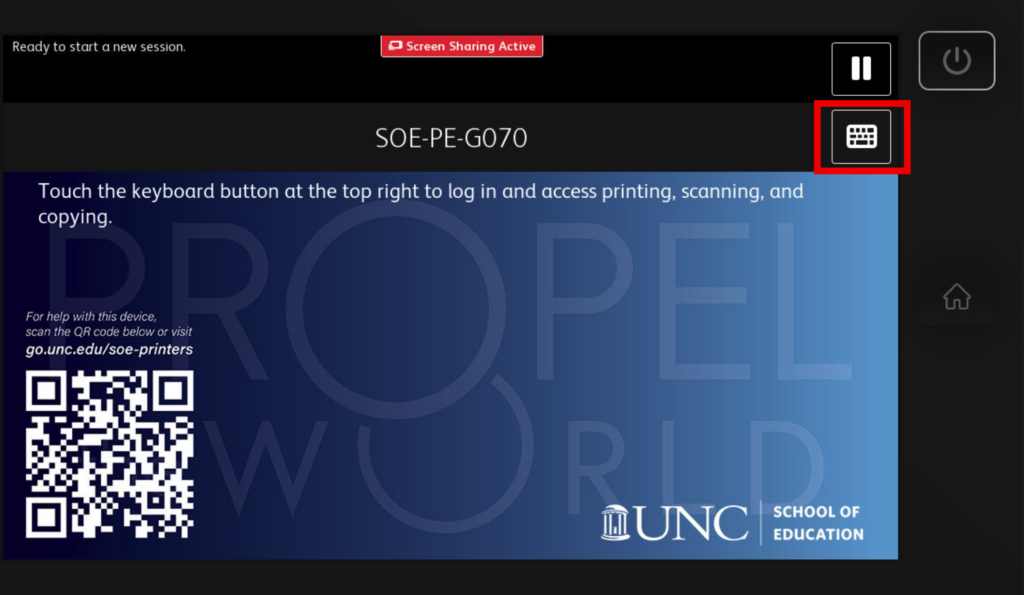
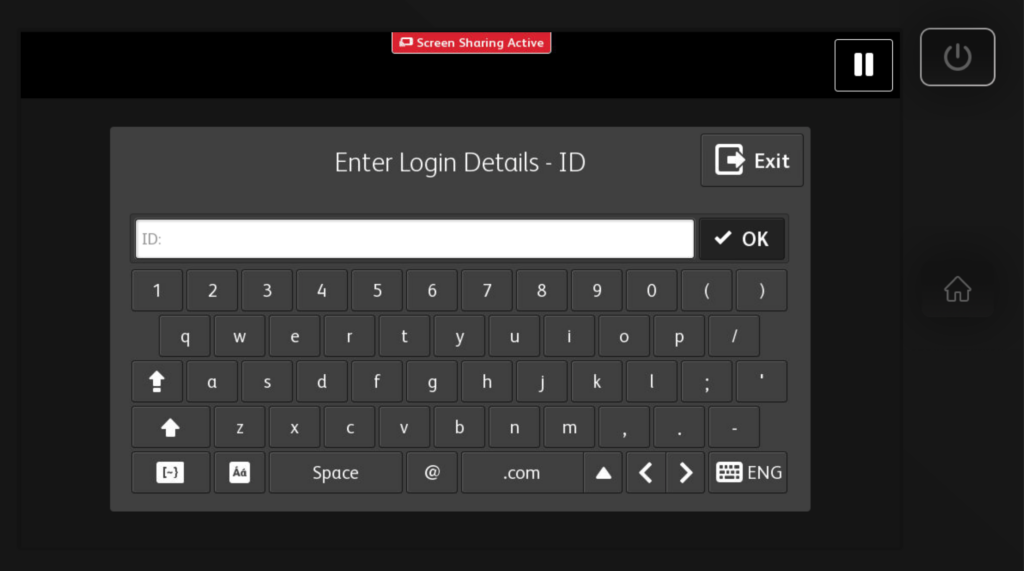
When prompted for your ID, enter your Onyen, then press OK.
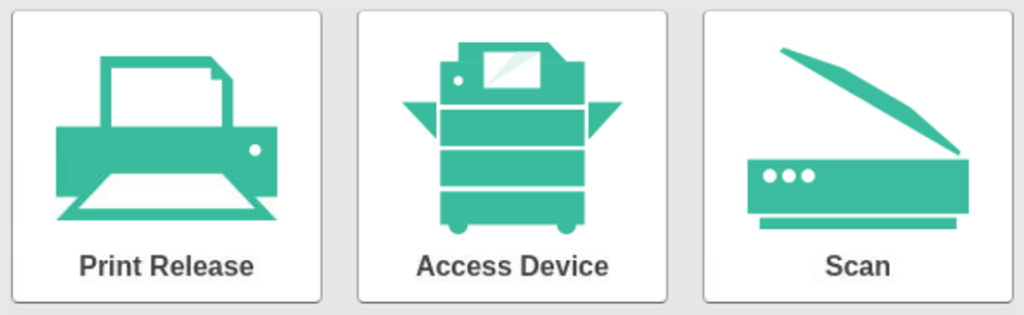
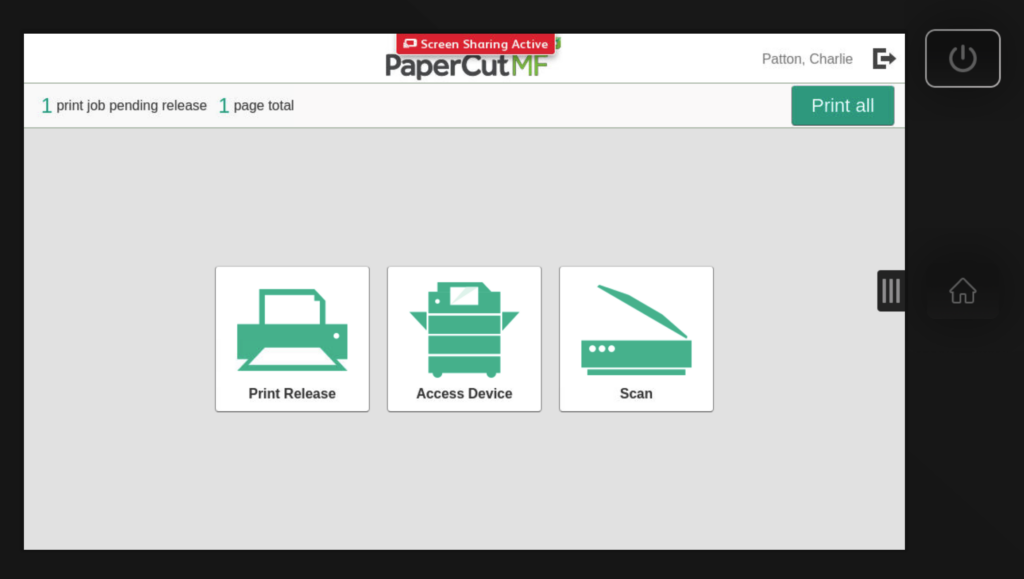
After logging in, you can choose from the Print Release, Access Device, or Scan functions. You can also quickly release all your print jobs with the Print All shortcut at the top of the screen.
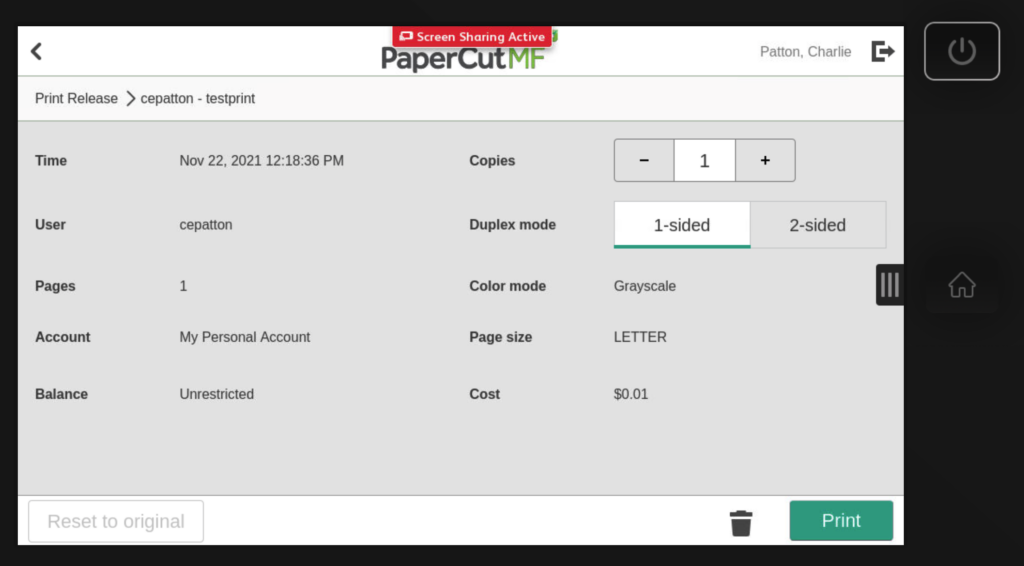
Print Release
Use the Print Release function to release any jobs sent to the SOE Follow-Me Printers. You can also change some options for the job, such as converting 1-sided to 2-sided, and changing color to black and white.
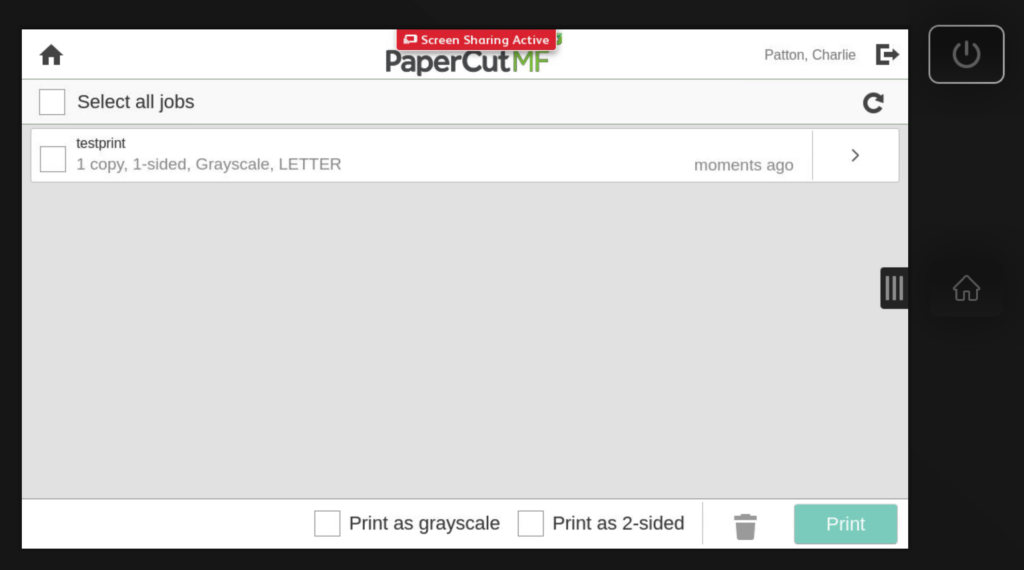
After tapping the Print Release button, you’ll see the following screen. You can Select All Jobs to quickly apply settings changes, release, or delete jobs. You can also tap the arrow to the right of each job to enter the Job Info screen, where you set the same options as the previous screen, but also set number of copies and see information about the job.
If a job you’ve sent hasn’t appeared yet, you can tap the refresh button to reload the list of jobs.
If you send a job as black and white, you cannot convert it to color at the time of release.
If you send a job as 2-sided, you cannot change it to 1-sided at the time of release.
There is a shortcut to release all jobs which is visible near the top of the screen after logging in. Using this shortcut will release all your jobs without changing any options.
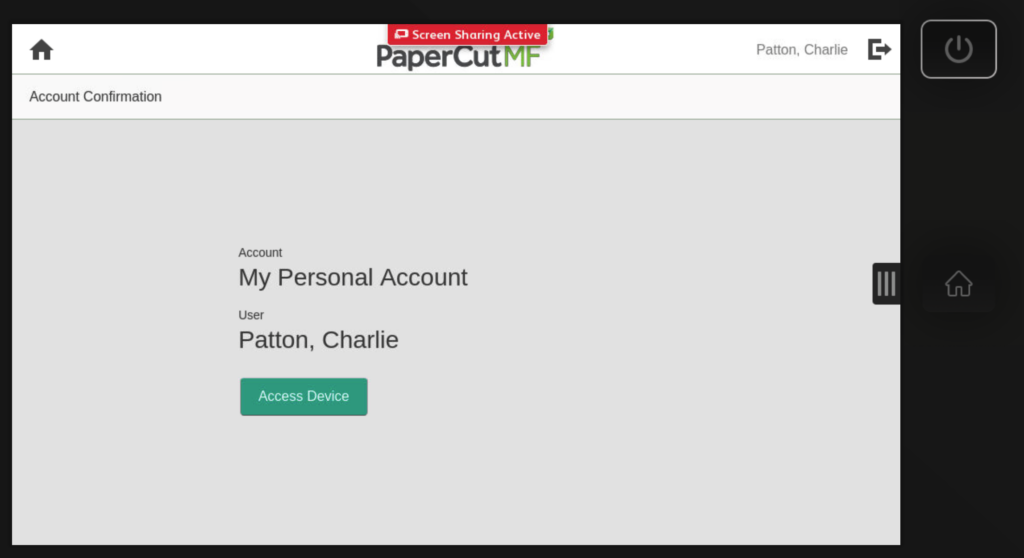
Access Device (Copy, Jobs, etc.)
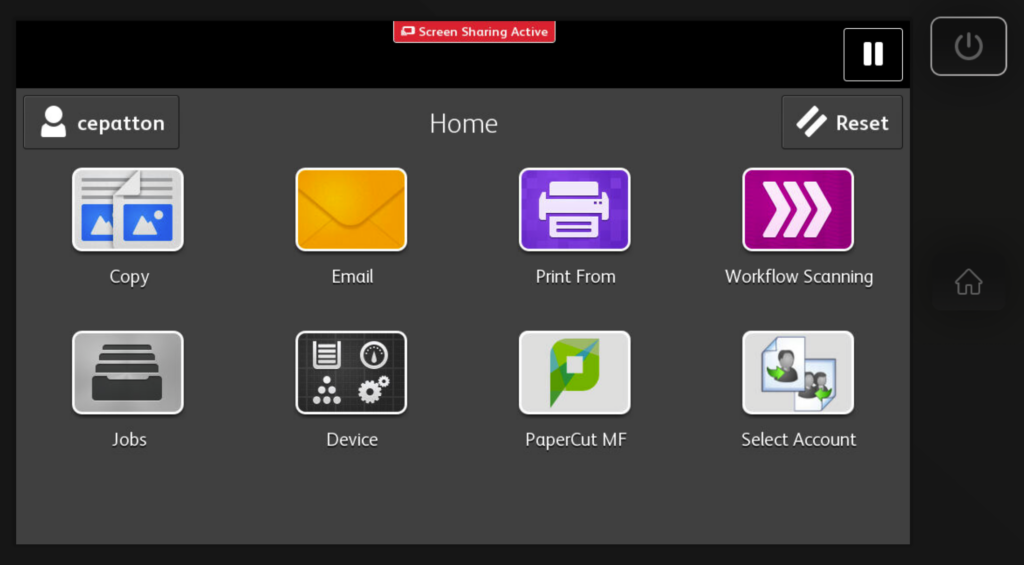
This button will bring you to the Xerox Home Screen, where you can access copying and other native functions of the device. Copying is the most commonly-used function found on this screen.
After selecting Access Device, you’ll be prompted to confirm your account. Simply press Access Device again at this screen.
After this, you’ll be at the Xerox Home Screen, where you can select the main device functions. Notable functions include Copy and Jobs. You can also tap PaperCut MF to return to the PaperCut Home Screen
If you have released a job but it hasn’t come out of the printer, the Jobs function can be helpful in determining why. The most common cause is that the printer is out of the required paper size. See the Print/Scan/Copy FAQ for more information.
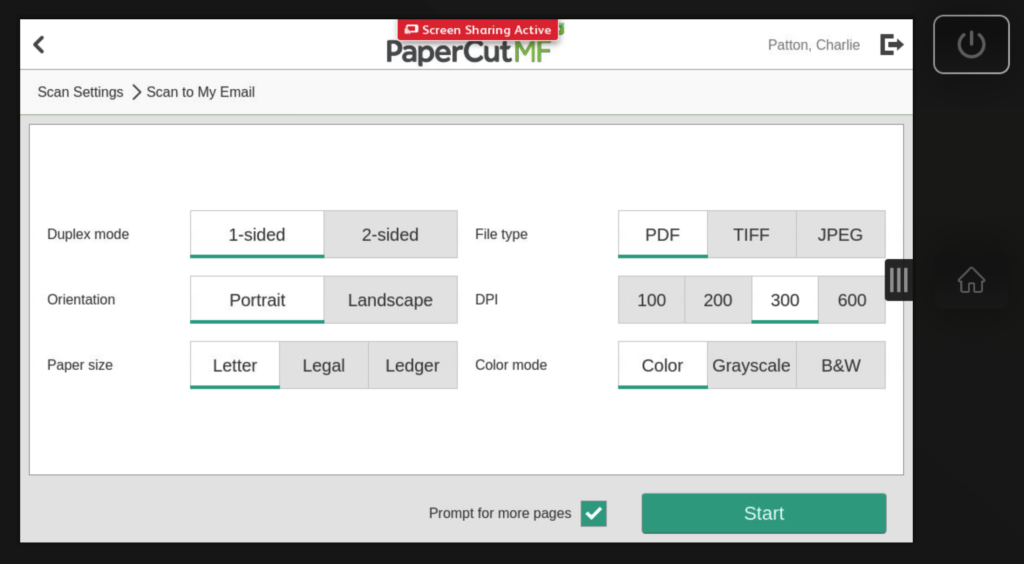
Scan
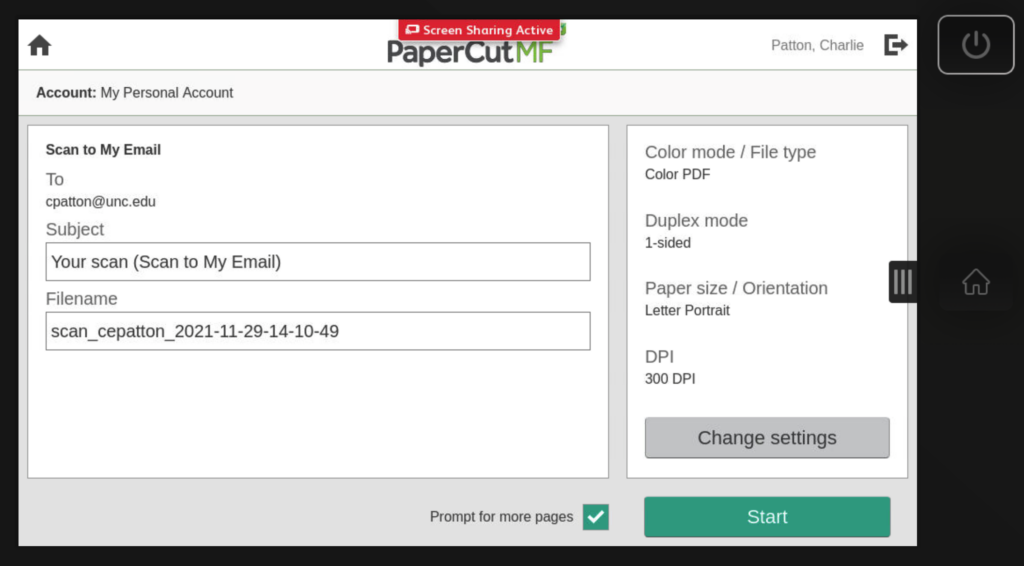
This function allows you to scan a document and send it directly to your email address.
After tapping the Scan function, you’ll see the following screen. Your email address will automatically be added as a recipient. You can choose to set options for the scan, but the defaults (color, PDF, high quality) should be sufficient for most purposes.
You can also set subject and filename from this screen. If you check the Prompt for more pages box, you’ll have the opportunity to add additional pages. This is helpful when scanning multiple pages on the flatbed.
If you need to change more advanced options, you can click Change Settings.
If you place items in the automatic document feeder, those documents will be used as the source for the scan. Otherwise, the flatbed scanner is used.
If you need to set custom paper sizes or other options not available in this function, you can use the device’s native Email function by clicking the back button and selecting Access Device. See the article on Xerox Email function for more information.
Logging Out

You can log out by selecting the Logout icon at the top right of the PaperCut screens. If you’re at the Device Home Screen, you can tap your username, then select Log Out.
If you do not log out manually, you will be automatically logged out after 30 seconds.
Getting Help with Printing/Scanning/Copying
Please check the Print/Scan/Copy: FAQ and Troubleshooting page for common questions, problems, and solutions.
If you need further assistance, contact EdIT.